It’s been over a year since we first painted our pop up camper cabinets, and I still get so many questions on how we did it and how well it’s holding up. Painting the cabinets in your camper is a perfect way to give your PUP a whole new look and feel, so naturally, there will be a lot of questions. I thought now would be a perfect time to give you a little more detail on how we painted the cabinets and also give you an update on what we wish we’d done differently a year later. So here ya go!
When we bought our Santa Fe, the very first thing I thought was, “I can’t wait to paint these cabinets!” 😀 Just because my camper was made in the 90’s didn’t mean it had to look like it. There was some serious ugliness going on here.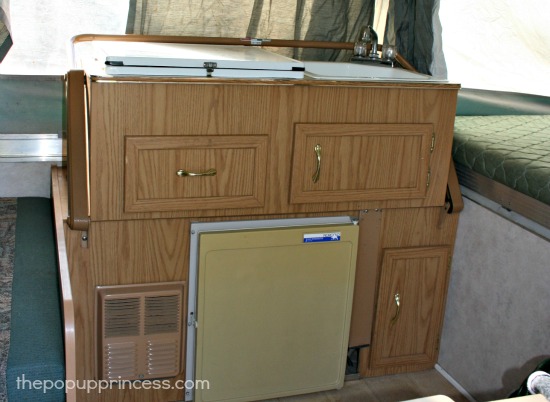 We had some structural issues with the cabinets to begin with, too. Mr. TypeTwoFun and I completely removed all the cabinets to lay the new flooring in the camper, so while we had them out, we figured it would be a great time to reinforce the old cabinets and paint them. For most of the cabinets, we added 1×2 pine boards for support. The long cabinet on the side of the camper was completely falling apart, however, so we had to rebuild that one from scratch. We used the old cabinet as a pattern and cut a new one out of 5/8″ MDF. As a side note, if you are using MDF, make sure to use a clear coat to completely seal all the surfaces once they are painted. MDF will swell if it gets wet.
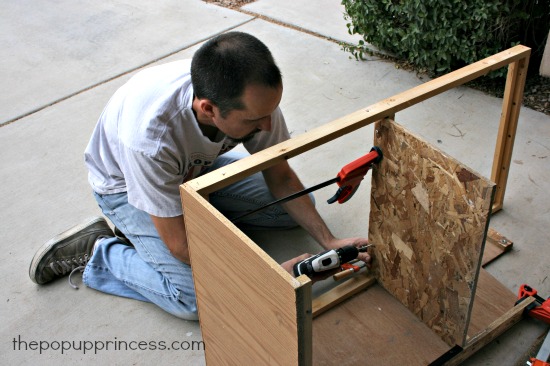 With all of the cabinets out of the camper, it was the perfect time for us to paint them. You don’t have to remove your cabinets to give them a new coat of paint, but it does make things a little easier. The problem with painting camper cabinets, though, is that they aren’t exactly what you’d call “wood.” They are a fiberboard with a paper coating in some spots and laminated fiberboard in others. That’s great if you are looking for cheap and lightweight, but not so great if you want to paint the ugly suckers. Luckily, I have painted a lot of laminate in my days, and I knew just what to do.
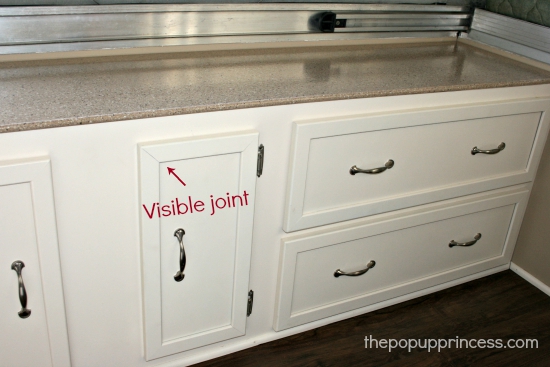
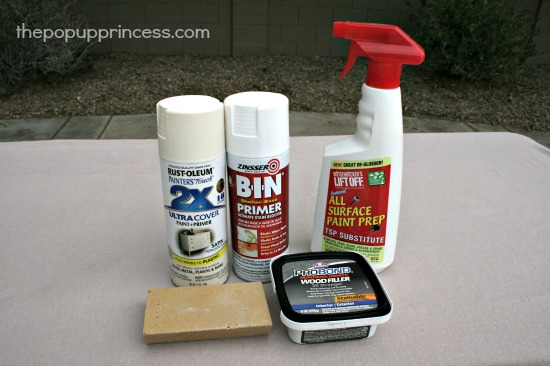 Meet my best friends when it comes to painting laminate. I absolutely love Zinsser primer. It is easy to use, dries quickly, and has excellent coverage. I always use it on all my projects. I started by cleaning all the cabinets really well with a TSP type cleaner. Make sure that you don’t have any exposed wood or MDF or the TSP will make it swell. Like I mentioned before, the wood manufacturers use to make camper cabinets is not high quality. They use the cheapest MDF possible and coat it with a paper-like wood print covering. I left that laminate covering on my cabinets and painted over it. I just gave it a light sanding with a sanding sponge and filled in any gaps, gouges, or holes with wood filler. I forgot to use wood filler on a couple of joints, and they were very visible once they were painted. If that bothers you, make sure you go over your cabinets very carefully and fill any imperfections.
 If I had spots where the laminate coating was peeling off, I used a little bit of wood glue to re-adhere it. If the laminate coating was torn or missing, I used wood filler to cover the exposed MDF and then sanded the wood filler down until it was smooth. Remember, imperfections will be magnified once you paint, so make sure you don’t have any lumps or lines where your wood filler is. When I was satisfied with my sanding job, I gave the cabinets a coat of Zinsser primer. Once the primer was dry, I gave everything two coats of Rustoleum spray paint. I really don’t like brush strokes, and since I was pulling everything out of the camper, I used spray paint. Would I do it again? I’m not sure. I am pretty happy with the results, and as Mr. TypeTwoFun says, “It is a camper,” but there are places where the spray paint left some streaks. Spray painting is a little tricky to master. It also took a lot of spray paint to paint all those cabinets. If you are unsure of your painting abilities, brushing or rolling on a good oil-based paint is a safer bet… and much easier to touch up when necessary. 😉
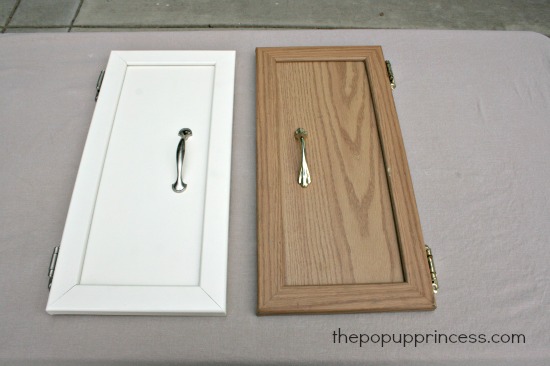 Yes, we chose an off-white color. I often get asked if it shows dirt or looks dingy. It does require the occasional swipe with a Magic Eraser, but overall, it stays pretty clean. I give my cabinets a good cleaning in Spring and do any touch up painting necessary. Overall, though, I’m very happy with the color. I removed all the ugly brass hardware and replaced it with pretty brushed nickel pulls and hinges. It really makes everything look sleek and updated. Bye bye, 90’s!
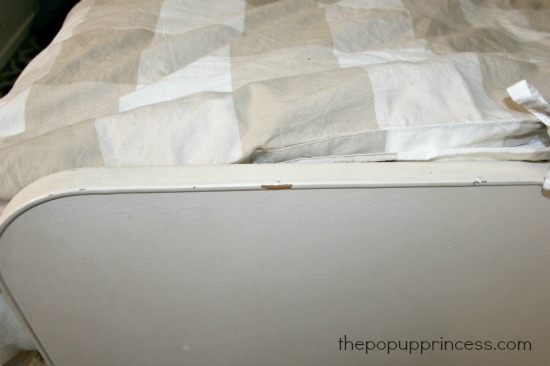
We used our Rustoleum spray paint to paint the plastic t-trim on the cabinets, too. The Rustoleum paint was recommended for use on plastics, so we thought it would work just fine. After a few months, though, we started noticing chips in the paint. I touched them up for a few months, but when I just couldn’t stand it anymore, I decided it was time to replace the trim.
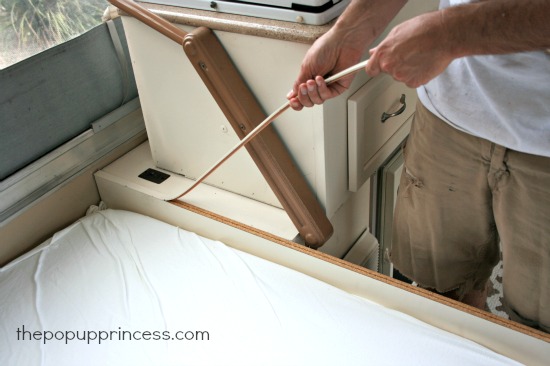 We started by removing all the t-trim on the cabinets. If you are planning on replacing your t-trim to begin with, I would remove it before you start painting. It will eliminate the need for touch-ups. We pulled all the t-trim off, and by the time we were finished, there were paint chips everywhere. The paint definitely does not adhere well to plastic.
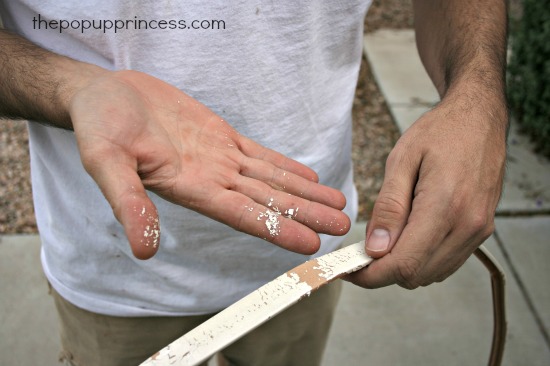 After we had the t-trim removed, we used a flat-head screwdriver (or a toothpick works, too) to gently clear out the channel in the wood. I can’t stress enough that you need to be really gentle with this step. You don’t want to gouge anything–just clear away and debris.
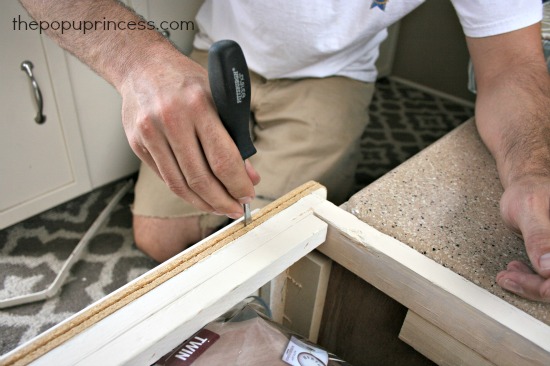 Once the channel is clear, you can install your new t-trim. I ordered our 3/4″ t-trim molding off of Amazon here. Even though they had a good selection of colors, they didn’t have off-white, so we settled for white. It’s not a perfect match, but it looks much better than the chipping, painted trim. We cut the trim to size, and inserted the barb into the channel in the wood.
Mr. TypeTwoFun used a rubber mallet to gently tap the trim into place. We didn’t need glue or epoxy to hold it into place. The plastic barbs do a good job keeping the t-trim where it needs to be.
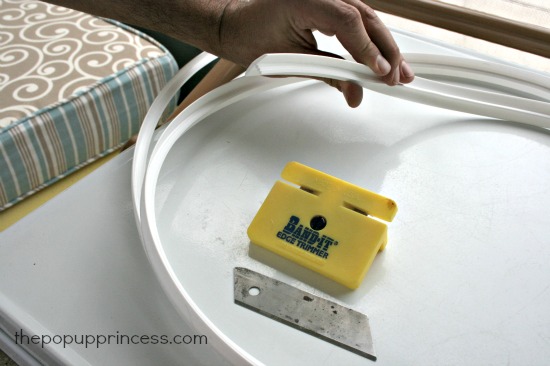
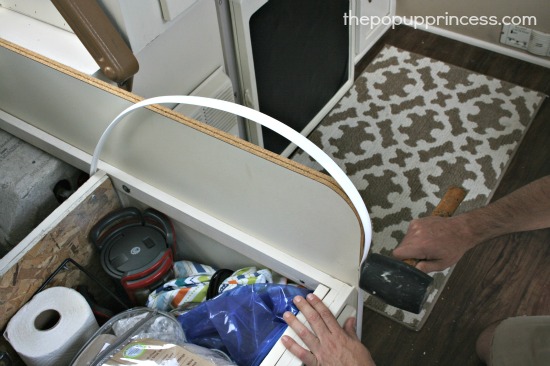 Since we opted to purchase 3/4″ t-trim, there was a bit of an overlap along the edges of the trim. Mr. TypeTwoFun used a Band-It Edge Trimmer to trim down the extra plastic overlap. It worked beautifully. He used a simple razor blade held flush against the cabinets to trim the areas where the Band-It wouldn’t reach.
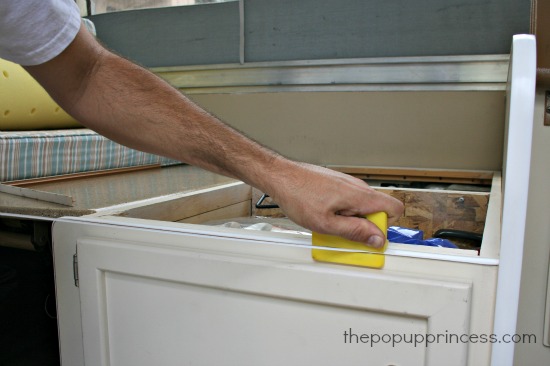 Because we painted the cabinets when the original t-trim was installed, we did have a bit of touch up painting to do. It wasn’t all that bad, but again, if you know in advance that you will be replacing the t-trim, I advise painting the cabinets after the trim has been removed. That way, when you install the new trim, you won’t need to touch up anything.
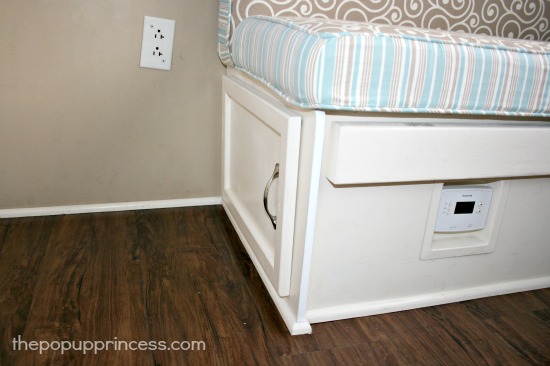 And there’s the new trim all installed. Pretty, right? I wish we would have done this in the beginning. It looks a million times better than the painted trim did. 🙂
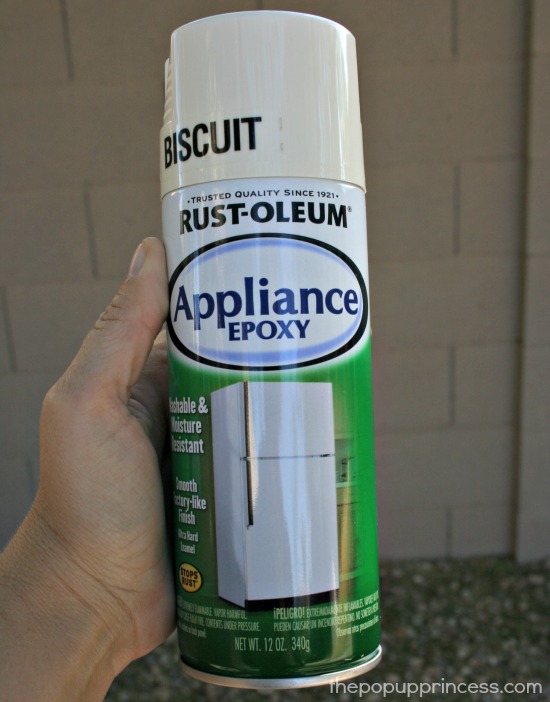
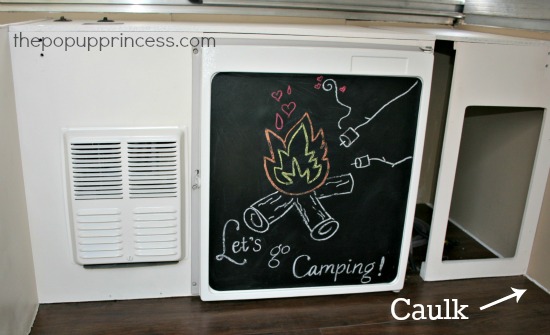
The fridge and heater grate got a coat of appliance epoxy paint. We chose biscuit, but they have so many other fun colors. It instantly updated the look of the kitchen. I also opted to add chalkboard vinyl to the front of the fridge to give it a cutesy feel. I can use the chalkboard vinyl to keep track of food items or menu choices. I love it! 😀 It’s amazing what a little {or a lot} of spray paint can do.
I thought I’d also point out that we ran a bead of caulk along the perimeter of the camper (before we laid the flooring) to seal everything up. Then we reinstalled the cabinets.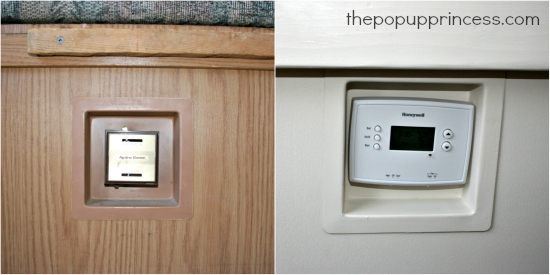 One last update that made a huge impact was changing out the old thermostat. Let’s face it, we live in the digital age. I hate reading those old thermostats, and its location under the dinette bench made it doubly hard to read. Mr. TypeTwoFun and his dad used their amazing electrical skills to change out the old one for a brand new digital one. It works like a charm, and it makes all the difference in the trailer. There is a lot of information on the Internet about just how to do this. We relied heavily on the expertise of the people at The Pop Up Portal. If you haven’t checked it out, head there NOW! But be warned, you may just spend all day there. 🙂
Disclaimer: This post contains Amazon affiliate links. The Pop Up Princess is a participant in the Amazon Services LLC Associates Program, an affiliate advertising program designed to provide a means for sites to earn advertising fees by advertising and linking to Amazon.com. This means that if you choose to purchase an item from a link in this post, The Pop Up Princess earns a small advertising fee to help pay for future projects and posts… so thank you! 🙂
Happy Camping!


Hi Larissa, my wife and our three little boys have also bought a similar camper (Coleman Westlake) Its in need of a major overhaul and your site has just been just the ticket with ideas and ways to approach things. Thanks a bundle. Any tips on Storage for food and clothes? Thx Again the
Thanks, Ryder. We almost bought a Westlake ourselves. We loved the floorplan, but couldn’t find one in decent condition. We are still struggling with food storage, as we prefer to keep it out of the camper, but we are finding we really like our method of storage for clothes and toiletries. We built a wire shelving unit, which you can see here, and it holds quite a bit of our toiletries, paper supplies, etc.
We use plastic drawer units for all of our clothing. Each family member has a set of drawers, and it has worked out very well. We store them on top of our long counter space. You can see them in this picture. They are about counter height, so we can put them on the floor between the dinette and long counter during travel.
This method has worked out pretty well for us. I use this pop up hamper to corral dirty clothes, and try to do laundry every couple of days if we are on the road for more than a week.
Hope that helps! Good luck on the remodel! I’d love to see pictures of your progress. 😀
Hi…. I don’t know if you’ll see this since the posts I am seeing are several years old. The link to The PopUp Portal doesn’t work. Is. It under another name perhaps?
Brad George
Piedmont, Oklahoma
Hmmm… not sure why that link didn’t work for you, Brad. Try this one… POPUPPORTAL.COM
I LOVE the things you do with your POPUP..
I am so ready for a remodel..
What really concerns me is i live, in SC and the heat and humidity is terrible. Some times it can get to 111 degrees.
Which means it can get to 120 degrees or so in the popup while it is closed.
I am concerned with the Paint Peeling or cracking?
I am not sure WHICH type of paint I should use for this?
Thank you so much for sharing all your great ideas…: )
I’ve got one more cabinet to remove and paint. It’s the one with the furnace and the fridge. How did you get yours out? I removed all the screws on the front of the fridge but it won’t budge. There has to be more screws I can’t see but where are they?
Any ideas?
There should be two screws on the back (access them through the panel on the outside of the camper) and a propane connection that you need to unhook before the fridge will slide out. Here’s a picture of ours for reference…
FOUND THEM!!!
I looked in the back yesterday but I looked up and down the sides… Not in the middle… duh.
Anyway, I took the two screws out and it just slid out! Whew…
http://www.toddstowe.com/Other/Camper/n-66bnTb/i-FxMVjMB
Just stumbled across your site, picking up our camper next week. 93 Coleman!
I have been collecting things to do a remod for last month or so. We will have the same colors.
I would love to share my photos with you once done.
And I would love to see them, Angie! Best of luck with your remodel. They are so much fun. 😀
Hi Larissa,
Love what you’ve done and it’s given me many ideas. I was wondering how many cans of both the primer and the paint to complete all the cabinets.
Thank you,
Thanks, Isabelle. Honestly, I lost track, but I know it was at least 5 of each. It got a little pricey. If you are on a budget, you might want to look at rolling (or brushing) on an oil based paint and primer. Hope that helps.
Hi Larissa, just wondering why you should use an oil based paint?
Oil based paint is more durable, Holly. Here’s a little article from DIY Network that explains it, but basically you’ll get a tougher finish with an oil-based paint.
You just got me excited over summer fishing season all over again!! I love it! Guess who is headed to Lowes now! Alaskan Summers are magical rain or shine! Thanks!!
Hi! We just got our 90’s pop up and i have been thinking of painting the cabinets, but we have 2 young children and I wonder how the paint will hold up to some bumps and scrapes…hoe long have you had the paint and how is it looking after use?
We painted our cabinets just over a year ago, Vicky. They’ve held up very well. I would recommend using a good primer and an oil based paint. If you prep your surfaces well, they should hold up just fine.
Hey again! Are you sick of me commenting on your blog yet? lol
You said in this post you dont know if you would do this again – what would you do, then? Would you have used paint and a roller instead? We are doing our tomorrow, so I am trying to make a final decision!
Also how much is the spray primer? I am trying to keep it on a budget but I just noticed you said to another commenter that it took 5 cans each of primer and spray paint. Ouch. Like really ouch lol.
Last question lol, which zinsser primer did you use? I looked online at my local walmart and there are several by zinsser. Should I use oil based or water based?
We like Zinsser Cover Stain, Kaela, but we also used the Zinsser BIN primer. If you are using an oil based paint, you want an oil based primer. Technically, if you are using a water based paint (like latex), you want a water based primer. Oil based paints and primers will be more durable, but the clean up is not as easy. You’ll need to use paint thinner or mineral spirits to clean brushes and rollers… and hands. LOL! 😛
Yeah, it took at least that much, Kaela. If you are on a budget, you might want to consider rolling or brushing on the primer and paint.
If I had it to do over again, I’d use Mr. TypeTwoFun’s paint gun and spray the cabinets. Not everyone has a paint gun, though. Using a foam roller and brushes is also a good option. There is nothing wrong with using spray paint, it just got a little expensive. If you’re on a budget, I wouldn’t recommend it.
You got me motivated! How many cans of spray paint did you need to do your cabinets. I have to order online as we live far from any box stores and I want to make sure I order enough. Our campers look like roughly the same layout.
Thanks in advance!
Love this blog!!
Oh, I just scrolled up and saw your previous comments. Please disregard post. Thanks!
Thanks for the kind words, Jennifer! It’s been super fun to share our makeover with other pop up owners. PUP people are the best! 🙂
On the spray paint… You mileage will vary, depending on how many coats you need and how heavy you apply it. I know I used at least 5 cans of spray paint. If you’re on a budget, you might consider rolling on an oil-based paint. Can’t wait to see what you do with your camper! Make sure to send pictures!
Thanks Larissa! Also for the link to the fabric. It is discontinued so I will be forced to use my own imagination. Will send pics when done. Off to Lowes.
Bummer, Jennifer! I think it is still available at Fabric.com–and some JoAnn stores may still carry it. Mine does. You could always order it on Amazon here, if you really wanted it.
Was considering repainting cabinets but discovered the drawers are a sticker type vinyl that covers them. Did you run into this. I would need to remove before painting and don’t know if I should. They are in excellent condition, but I really just wanted a new look…..I am stuck here. New flooring is ordered and curtains are cutting being hemmed as we speak. All cushions are getting recovered as well. None of this was “needed” but I want to enjoy my space 😉 thanks for the info!!!
You do NOT need to remove the paper coating that is on your drawers and cabinet doors, Jessica. You can paint it. Most PUP cabinets have that same finish–including ours. I painted right over it with zero issues. 🙂
Can’t wait to see your makeover. Be sure to send pictures!
You’ve done a beautiful job, and thank you for all of the tips! We’re hoping to paint the cabinets of our 2001 Coleman Niagara, but I’m nervous about that paper-covered fiberboard. You put primer right over the paper? Did you have any spots where the paper had pealed away, and did you have to cover the fiberboard with something before you primed it or did it go right on top? Thank you!
We primed right over the paper coating, David. We had no problems whatsoever. We did have a couple spots where the paper peeled away. If the coating was in good condition, I used a little wood glue or spray adhesive to glue it back in place. In the places where the coating had ripped off, I used a small amount of wood filler over the fiberboard to seal it and prevent the fibers from swelling. Then I sanded it smooth so you couldn’t see where the wood filler met the paper coating. Here’s a good tutorial from Sawdust Girl on how to paint exposed MDF edges. If you have exposed MDF or fiberboard, it’s a little more work, but you can still get a nice finish. Hope that helps! 🙂
Hi Larissa, thank you so much for sharing all of your tutorials and helpful tips on this site! My husband and I just purchased our first tent trailer and I can’t wait to start fixing it up! I was trying to find information on how you painted the “walls” in the camper and what color you used? Also, have you thought about doing a post on meals? I’m a first timer and would love any ideas on great meals, snacks, what cookware I need or don’t need, what food to pack or just buy at the destination. I have also seen some campers use a crockpot, which I love the idea of, just not sure if it’s logical. I appreciate any help, thank you for your time!
Thanks, Nicole. Actually, we used a custom color on our walls. We had leftover color-matched paint from a painting project inside our house, so we just used it on the walls of the camper. We did use Glidden Gripper primer on the walls first, though, and that stuff rocks. I really, really like the way it turned out and would totally recommend the Glidden Gripper.
We are prepping for our big summer trip right now. Last year was Yellowstone, this year is the Pacific Northwest. I’m realizing how much work meal planning and prep can be, so I’ve thought about sharing our tips and tricks here. I’ve been doing a lot of research and planning, and have even put together our packing list, so maybe I’ll share it! 🙂
We haven’t ever done a crockpot cooking while camping, and here’s why… We almost always camp in bear country. For us anyway, most of the places worth seeing aren’t in RV resorts or big urban campgrounds. We like to explore off the beaten path most of the time, and that means that 90% of the time our food has to be stored in bear boxes while we are away. A crockpot would be a huge no-no. Even when we camped in Zion, when we didn’t have to worry about bears, it was pesky squirrels. I don’t want them to have a reason to try to get into our camper, so all food is stored in a bear box or our tow vehicle. We also very rarely camp with hookups, and we can’t use the crockpot unless we are plugged in. We enjoy cooking over an open fire, too–it doesn’t happen every day. I use the crockpot a lot at home, so camping food is always a special treat for my kids. We try to make things we don’t normally make at home. That’s just my two cents, though. If you don’t have critter problems and are staying at a place with hookups, go for it! I know lots of campers love the convenience of a crockpot. 🙂
That is a great point about the bears and other critters that will be attracted to our food, I hadn’t thought about it! Your summer trip sounds like a great destination, hope you and your family have a wonderful time! I would love to read about your meal and packing tips if you do decide to share 🙂
Did you use any kind of a sealer over the painted cabinets…like a polycrylic sealer. Just worried that the paint will get scrathced off by the kids…don’t know if a sealer would help in that case anyway though. May just have to touch up every Fall…lol
We did not apply a sealer to our cabinets and have had no problems. We’ve never had to touch up anything except the plastic t-molding around the back of the dinette bench. I’m going to try to find another solution for that, as I don’t really like the way the t-molding ended up. The cabinets, however, have held up wonderfully. You can apply a sealer, but I’m not sure it is really necessary. It’s up to you. I can’t wait to see your results! 🙂
Hi Larissa: HELP! I tested Zinsser 123 plus on our camper bathroom cabinets and it’s scratching off before getting the finishing paint on. Any suggestions???
I’ve never used the Zinsser 123 primer before, Kaelyn, so I’m not really sure. From what I understand, it is a water-based primer. I prefer to use oil-based, so I’m a big fan of the Cover Stain or BIN primer (which is shellac-based). Did you sand your cabinets first and clean them with TSP? How long have you let the primer dry?
Love your blog!
great info!
I might have missed this somewhere, but did you peel off that tacky paper before you painted or did you paint over it? Mine is starting to come off and I don’t know if I should glue it on or perl it off.
Thanks!
We left ours on, Deborah. If you peel it off, you will have to deal with the funky texture underneath the paper, as it is a fiberboard type material. I had places that were peeling up, and I used a small amount of wood glue to re-adhere the paper coating. If I had places where the paper was missing, I used a little bit of wood filler to cover the fiberboard and sanded it even with the rest of the cabinet door. Once I had a nice even surface, I primed and painted. Worked like a charm. 🙂
I love your blog!! I cannot wait to start working on my 1999 camper!! I noticed in your photos that the “walls” are painted a beige color. How did you do that? And what color did you use? Your ideas are inspiring!! Thank you for creating this site!! The only things I am worried about in making over my camper are new curtains and covering those awful seat cushions! I have zero sewing skills. Any advise on how to accomplish those things?
Thanks for your time and consideration!!
Thanks for stopping by, Deidra! We painted the walls with a standard Behr paint. We had some left over paint from a home project. We simply used Glidden Gripper to prime the walls; waited for it to dry; then we rolled the latex paint over the primer. Super easy!
If you’ve never sewed before, the curtains might be your easiest project. You only need to sew a straight line. What a perfect first project! But… if you’d rather avoid sewing, you can do that too. I know of many readers that have used iron on hemming tape to make curtains without sewing. You can also use the wrap and staple method to cover your cushions. No sewing required. 😉
Best of luck on the remodel… and make sure to send me pictures! I love seeing makeovers.
We are working on an RV reno right now and your Pop-up renos are so inspiring. I also have those ugly edges surrounding the fridge which I would really like to paint but our trim is plastic. Were your edges metal or plastic. How has the paint been holding up since you sprayed it
The epoxy paint we used on the fridge has held up fabulously, Helen. It was all plastic, and it hasn’t chipped at all. We used regular spray paint on the plastic t-trim, and it chips occasionally. We’ve had to touch it up here and there.
WOW! You did such an awesome job on your camper. We bought a 92 Coleman for dirt cheap a few years ago and have treated it like a cheap camper for the last few years. What started as a simple search on replacing the lock handle has now turned into a full rehab after looking at what was done. Not sure if I should thank you or curse your name yet. Time will tell!
LOL! 😀 I think my husband feels the same way, Justin!
I want to put new curtains in our 1994 pop up. Can you tell me how I should do this and how to hang them? Thanks
I forgot to tell you our pop up is a 1994 Coleman Destiny
Here’s how we did ours, Patti. Every manufacturer used a slightly different system to hang curtains, and Coleman systems vary depending on year. I’m not exactly sure what system they used on the 94’s, but there is some great info in that post to get you started.
So excited about your blog!! I just bought all the supplies I need to paint the inside of our 2005 Fleetwood Sea Pine. I have been wanting to do it for awhile, I just didnt know how to get started till I found your blog. Thank you for all the helpful information!!! 🙂
Awesome, Shauna! I can’t wait to see it! 😉
I am gearing up to paint my cabinets and have read this post several times! I plan to use foam rollers because I’m just not a spray painter, plus I don’t want to remove cabinets (I will just removed doors). I know to use OIL based Zinsser primer. My question is…
Would you recommend using Oil or Latex paint? Any particular brand you would suggest?
Thanks! Your blog is such an inspiration.
Oh, one other question – where did you get your chalkboard vinyl?
🙂 Toni
We like Rustoleum oil based paint. It is durable, and it has never let us down. I know a lot of people use latex, but we couldn’t be happier with the finish on our cabinets.
Can’t wait to see your camper all finished, Toni! 🙂
Thank you!
I hope you could answer another question for me! 😁 I just want to clarify I have the steps in the proper order:
Glue laminate that is coming up. Use wood filler to cover any exposed mdf where laminate is missing. Sand filler.
Then clean with TSP.
Lightly sand with sponge.
Prime.
Paint.
Is that correct?
Thx again!!
Sounds good. Make sure you don’t get any TSP in the wood filler, though. Wood filler is porous and will soak that stuff right up. You might want to clean with TSP before you make any repairs. The TSP just gets rid of grime and oils on the surface. 🙂
Hi there. Thank you for providing so much great info. Did you use satin or semi -gloss spray paint? I cannot find the Rustoleum 2X one you used so I am thinking of using the Valspar or just regular Rustoleum. Do you think that will be fine? I am not painting any plastic, just pretend wood! Thanks
Satin sheen, Julie. I’d be careful with Valspar. We haven’t had good results painting laminate with it. You can try regular Rustoleum, but perhaps there is a similar color in the 2X you’d like? Or have you considered brushing or rolling an oil-based paint on?
Hi there. I have done quite a lot of both rolling and spraying and I have always gotten better results with spraying. Did you get the 2X spray at Home Depot? My Lowes didn’t have it. I bought the Zinsser primer spray today (5 cans). Did you paint the interior of your cabinets? We plan to. Also, did you have plastic seams on the corners of the cabinets? We are replacing those with wood seams and hoping that will work. Right now the camper is gutted. We are excited! 😊
Found some on Amazon so I have bought the last seven cans of semi-gloss and then seven more cans of flat for the inside of the cabinets.
You did a lot of work in your camper. Wouldn’t it have been cheaper & easier to buy one in better condition than to put in all the money and time to fix and update? Time is money.
Nope! We got our camper for an amazing price, Leigh. We did most of the remodel very inexpensively, too. There was no way could have purchased one like this for what we paid, and we have everything just the way we want it now. We really enjoy a good project, and this one was a lot of fun. We’d do it again in a heartbeat! 😊
Hi. Did you use oil based spray paint? I was sure I purchaed the ones in the picture you posted and I believe they are all water based. I have almost sprayed all our cabinets, inside and out, and they look as good as I expected them to. I am hoping they will hold up in the camper when we reinstall them 🙂 Thanks
I just bought a 1997 Starcraft pop-up trailer. I thought I got it for a real cheap price but found out the trailer floor had a soft spot inside a cabinet in the corner of the trailer. I was kind of upset about it but I saw your posting and felt that I could fix that and change the inside with some paint to give the trailer an updated look. My question is about the counter-tops. What did you use?
There are lots of different ways to finish your countertops, John, but we used the Rustoleum Countertop Transformations kit. You can read all about that here. 🙂
Hello,
You are a lifesaver! Thanks for all your great ideas. My dilemma is the ceiling. We have a 1981 StarCraft. The ceiling is currently cardboard. Im wondering if I should paint, tile with tin tiles, use contact paper or…..? Any ideas would be appreciated.
Mary
Hi from ‘Down Under’ (Australia) 🙂 Thanks so much for this great post. My boyfriend and I have recently been working on a very old Toyota HiAce campervan (we have a blog here: http://ringocamper.com/) and we have been referring to your blog a lot.
We followed this blog to paint the interior cupboards of ‘Ringo’ (our camper has a name). It worked really well! We are on a tight budget so we used tubs of paint and primer rather than spray on, but we’re very happy with the result. We only wish we had used rollers not brushes as the finish was not quite as lovely as yours! Nonetheless it has been a fun project and we wouldn’t have even known where to start if not for this post, so thanks!
How fun, Georgie! I look forward to seeing what you do with Ringo! 🙂
We are about to begin our remodel and I was wondering if you thought the chalk paints that are so popular would work on the cabinets. I spoke to the sales person and she thought it would work really well since it will work on laminate and varnished wood? What do you think??
You can use chalk paint, Laura, but you will likely have to seal it with some sort of poly or wax. I’ve used chalk paint many times on projects in my home, and it never dries to the hard, durable finish you get with oil-based paints. I’ve always had to seal it with wax. They have some great chalk paint brands, though, and it comes in all kinds of colors. Check out Felicia’s makeover here. She used chalk paint. Oh! And take lots of pictures! 😀
Larissa. I love your blog and all the great redos. We have pulled out the pop up and getting ready to start working on updating it. The plastic corners on the laminate cabinets. Did you just prep and paint along with the cabinets? Not the t strip but the corner edges of all the cabinets.?? I only want to do this once!!!
We primed and painted those, and they held up just fine. They aren’t as pliable as the t-molding, so they don’t flex. They still look great nearly two years later. 🙂
How did you get the old thermostat out? I can’t figure that out-it is installed with rivets or something.
Oh, gosh, Carolyn! It’s been forever since we replaced ours… I can’t seem to recall. I don’t think it was riveted on, though. Sorry, I’m not much help. 🙁
Hi there! I’ve just started painting the cabinets on our 99 Starcraft. We’ve decided not to remove them. I’ve got a few places where, much like behind the toilet in a bathroom, I just can’t reach. As much it’s it’s driving me nuts to not be able to paint the entire cabinet, do most people just paint as far in between/ behind as possible? I’m worried it may be visible. Any tips for that?
Also – what about painting metal walls that have a bit of rust starting? I am using gripper primer as recommended for my cabinets, would that, and the same paint also work for the walls/ceiling?
Thanks in advance!
Hello, first of all tgank you for all your great advice on remodeling. I love your blog 🙂 🙂 We just purchase a 1997 Coleman Santa Fe, but my husband wants to paint ceiling, what kind of paint you think we should use? Thank you!
Is your roof ABS plastic? You’d need to find a paint that will bond to plastic. I don’t really have a recommendation there for you. Have you tried cleaning it yet? I heard good things about Magic Erasers and a little diluted Awesome cleaner from the Dollar Tree. 🙂
Yes it is, I’ll try cleaning it first if not I’ll look for some spray paint and hopefully it works…lol!! We are actually starting our remodel project tomorrow. We got everything we need, except for the curtain fabric, I hope to find a good deal on fabric. Thank you so much for your fast response.
I bought some semi gloss spray paint and I just realized yours is satin finish. I’m not familiar with paint finishes. Is there a specific reason you chose satin?
I don’t like the super shiny look, Ana. That’s really the only difference. Semi-gloss will actually probably wipe down more easily, but I just wanted a more muted look. It’s all a matter of preference. 🙂
Hi Larissa- I am wanting to paint my cabinets but one of them is completely missing the paper wood grain finish. Do you have any suggestions for sealing it? Thanks so much 🙂
Is your cabinet door MDF under that paper coating? When I am painting exposed MDF, April, I usually give it a coat of primer, sand it well, and then give it another coat of primer and paint. Here’s a helpful tutorial on painting MDF. 🙂
Very helpful website!
Did you paint the handle used to lower the upper cabinet when folding up the trailer? (Not sure if this handle has an official name..) Maybe the same paint that was used on the fridge?
Thanks!
We did not paint the swing galley handle, Sherry. I know others have, but I was fine with the brown color. 🙂 You can see our complete makeover here.
Hi! So glad I found your site! We are re-doing our Prowler and I wanted to ask if you used the epoxy paint for the exterior as well as the inside of the fridge? We’re updateing all the “almond”in the camper but I wasn’t sure if it was okay to use the epoxy paint if it holds up in a cold fridge? Thanks! And your camper looks amazing!
We did not paint the interior of our fridge, Emily. I’m not quite sure how that would hold up. You might email Rustoleum to ask about the safety issue of it, though. 🙂
Thank you so much for sharing such great information! My husband and I just bought our ’02 Coleman and are excited about changing it up! I’m really wanting to paint the cabinets, so all this info has been great! One question though, did you have any trouble re-attaching the handles to the doors and the doors to the cabinets? My husband is concerned that the screws will strip the MDF and we won’t be able to get everything put back together correctly.
We had no problems at all. We took everything apart, primed and spray painted it, and put it all back together again. Two and a half years later, it is still holding strong. 🙂
when you painted your cabinets, did you have the plastic edging on the corners? if so, how did you handle it? did you paint it with the rustoleum too? remove it? thanks!!
Hi Larissa
I am new to your blog and a proud owner of a 2007 Fleetwood Bayside. It is in really good condition,but I feel like I have to make it mine. I have just finished re-upholstering all of the cushions and put in new curtains. I’m looking forward to starting to paint the cabinets next. It is very helpful to know what you used. It will certainly take the guesswork out of my trip to the store. Thank you for all of the great suggestions!
We just got a 1975 Apache eagle pop up and the cabinets in it are part metal and part wood. Would you paint the metal the same way as you do the wood? Or prep them differently?
I would definitely use a primer and paint that is made for metal, Haley. You won’t be able to paint latex paint on metal with any success. 🙂
Hello- have you ever heard of anyone staining the camper cabinets? Do you think it would work? Great blog!! So inspiring!!
OK, A few little questions. Why do you suggest foam brushes for painting the cabinets? Is it just for ease of clean up?
My doors have that ugly gold trim on them. I assume if I prime well I can get it to cover?
DO people pain the inside of their cabinets?
Thanks!
I recently painted and primed the interior of my tent trailer. When I moved one of the bars I noticed that it scratched the paint. Could that have been prevented by using an oil based paint? I missed the oil based piece in your tutorial. Since I’ve already painted with the water based paint would it be better to cover with a polyurethane, wax or the oil based paint?
You might want to call the paint manufacturer and ask them that question, Joanna. I can tell you that our paint job has held up fabulously, which is why I only recommend using an oil-based paint on camper cabinets. If you have already used a latex paint, I’m not sure what the best option would be. 😉
Cabinet Reno begins! we are considering pulling them out entirely then putting back in to make flooring easier and painting too. how did yours come out? Im afraid to damage things with removal they seem pretty okay structure wise
Ours came out pretty easily, Melissa. Just make sure you remove all the screws holding them in place, and be very careful when moving them out. They aren’t backed with anything, so they are a little flimsy when removed from the camper back wall. You may want to reinforce them a bit if you are concerned.
I love your blog–it’s been a great guide for remodeling our first pop up! We have everything painted (FINALLY! What a relief it has been to be finished with painting) but our t-trim isn’t sticking with the mallet. It seems that our channels are a little wider than the t-trim barbs. Since the trim seems to be pretty standard, I think our next step is using glue. Do you think wood glue would be sufficient or is there something better out there?
Thanks!
You could try wood glue, Christina. The countertops are MDF, so it should adhere to that. Not sure how it will work with the plastic trim, though. If you think you won’t be changing it anytime soon, you could go for something stronger… like Gorilla Glue.
Hi. I have a Sea Pine which is very similar to yours. It appears that you also put an additional molding along the bottom of some of the cabinets that wasn’t originally there as well as along the exposed floor/wall junctions. Is that the case, and if so, what did you use for this molding?
thanks,
Glenn
We used pine quarter round that we primed and painted the same color as the cabinets, Glenn.
Hey Christina,
Can you let me know how your t trim turned out? I’ve already ordered all of mine and have now come to realize that the channels are also bigger than the standards barbs on the trim. I was thinking glue would be of help. Any advice or suggestions would be great! We leave on a big trip in just over a week and I feel like I’m scrambling to finish everything. Yikes!
Can a person change the color of the canvas? Mine is that brown color and it has orange as an accent color I would like to change the inside to a beige or even white. I am redoing my old camper and the orange and brown that is 40 years old just has to go. Thank you so much.
You could try some sort of interior covering, but I’ve never seen it done successfully. Is a new canvas in your budget, Darlene?
Larissa, great site. I never imagined remodeling my old popup until I found your site! I pulled my cabinets out today for painting. You mentioned using a clear coat on MDF to seal them. Does this include MDF covered with paper? I couldn’t find in your paint steps that you used a clear coat. If yes, can you recommend a product? My ’87 Coleman has MDF cabinets covered in paper, but today I learned the interior wall panels, that look identical to the cabinets, are made of lightweight aluminum. Would I use Glidden Gripper to prime followed by Latex paint on my walls? Or is the oil based primer and paint okay on aluminum?
I would double check with a paint expert on the aluminum question, Claudia. An oil-based paint and primer should work, but you might want to double check. I didn’t use a clear coat on my cabinets, just on the exposed MDF underneath the new countertops. 🙂
Hi Larissa,
We are newly owners of a Flagstaff 227 2002, great condition and Lay-Out, we named it Flipper. We are going to slowly remodel giving it a very cozy cottage feel. Your website is simply inspirational, hope to be able to share our pics with you 😊✌🏻
Hello I read your blog about pop up cabinet makeover! We got a really cheap deal and the contact paper per say was coming off all over. I removed it all! A lot of scraping! I’m going to spray with zissner and rustoleum as you did! I’m out of ideas to try to sakavage the doors! Any help would be appreciated!
Julie, check out our post here on how the cabinets have held up after a few years. There are some tips about gluing the veneer back down. 🙂
Hi Larissa,
I must say that you did an AMAZING job of explaining the whole process of painting cabinets in detail. This is truly a talent and a skill. It’s hard to find manuals for products that are written this well. I am a freelance writer and am in awe of your writing talent and creative abilities. I will definitely be subscribing.
Thanks!
Rose
I have a Jayco pop up camper and I’m in the process of painting my cabinets the problem I’ve run into is that some of the edges or corners of the cabinets seem to have something along the lines of the plastic t trim but it’s not exactly t trim but probably made of the same thing. Should I just paint these pieces or find some kind of replacement for them? Not sure where to find the replacement or what they’re called.
We painted that trim, Cazzie. It was harder plastic and didn’t flex at all. It has held paint really well over the past four years.
I just bought a 1992 Jayco Eagle series 8 pop up last week (everything is brown!🤢) I can’t wait to get going on the makeover! I have my vinyl plank wood floors coming soon and gonna make new curtains in a yellow colored simple pattern, cushions in a funky turquoise/yellow/orange/brown/ red pattern and paint my cabinets bright orange! My question is, did you sand that hard plastic L trim on the fake wood a bit before priming and painting? I can’t seem to find a place that sells new ones. Thanks in advance! Can’t wait to post pictures!!
I did sand it a bit with very fine sandpaper. I couldn’t find new L-trim either. Make sure the primer and paint you end up using works for plastics. We painted ours over four years ago, and it is still looking great. 😀
Hi Larissa! Me and my boyfriend purchased our first pop up camper a month ago (Viking Epic). We are planning to paint the cabinets this weekend and maybe change the flooring if we have time. I had a couple questions for you:
– We are planning to use oil based paint. Can we use the same primer you did? Will we be able to paint the plastic L trims or do we need a special paint for them? Does oil paint require a finishing coat?
– Do we need to take off the countertops before painting?
– Did you also paint the interior of the cabinets?
Thank you, love your blog!
Congrats on the new camper, Lea. We used spray paint, which is oil-based, so you should be able to use the same primer. Zinsser works great, and we highly recommend it. We even used it on the plastic L-trim–but it doesn’t work well on the t-trim. The t-trim is more flexible, so the paint cracks and peels easily. As long as you tape the countertops off well and paint carefully, you don’t need to remove them. You can, but it isn’t necessary. And, no, we did not paint the interior of the cabinets. We hardly ever see them anyway. 🙂
Thank you for the answer! It actually turned out great! Can I send you pictures when all is done?
Yes! I’d love to see pictures! 🙂
Hi we have the same camper. There is a on/off switch on the left when you walk in. We have no clue what it’s for. We thought it might be for the porch light but it wasn’t.
On the cabinet? Hmmm… we don’t have a switch there. What year is your camper?
After reading tons of camper remodeling posts I’ve begun working on our pop up. The cabinets are done and turn out great thanks to all your advice. Thank you so much! Now I’m trying to figure out how to tackle the mini fridge. I know it’s been forever but I’m hoping you remember fridge details. Ours looks just like yours did with the exception of the trim on the cabinets (it’s that putty color just like the fridge). Did you take the whole fridge out to spray it or just take the door off? How did you protect or avoid the rubber seal for the door?
We took the whole fridge out, Stephanie. Once the fridge was out, we removed the door and sprayed it separately. It was actually pretty easy.
HI, I am so in love love love with your blog.. : ) THANK YOU so much for sharing.
I did write yesterday but I can’t find the message. ?? duh me, surely I did something wrong.
Soooo ready to remodel my PUP. But I do have a question that MAYBE you can help me with.
I live in South Carolina and it can get very HOT and HUMID here. As high as 120 in the Pop up in the summer.
MY concern is. THE PAINT PEELING or CRACKING.
I have painted my deck before with OIL BASE paint and had it PEEL and Crack in the heat.
I was thinking I might be better off with the “chalk paint”? I know I would have to use a sealer, but I have never known it to peel or crack..??
DO you have any thoughts on this?
THANK YOU again for sharing your experience and tips with all of us.
donna
Your blog is my go to for my new PUP redo!
I just had ones question…you guys didnt paint the lever that brings down the sink/stovetop cabinet.
If you were to paint it (because brown is not in my planned black/grey/navy color scheme), what steps would you use to paint it to be sure its doesnt chip?
We didn’t paint it precisely because I wasn’t sure I could keep it chip-free. You should definitely give it a bit of a scrub with steel wool or fine sandpaper. Wipe it down with alcohol or mineral spirits and then use primer and paint meant for metal. Ours gets a lot of use, and when we are packed up, it gets dinged a lot. I’m sure if we had painted it, it would be pretty beat up by now. Haha. Let me know how yours turns out! 🙂
We just purchased a 2008 Flagstaff popup camper. I’m so excited! I found your Pinterest postings and cant wait to get started on the inside remodel. There is one spot on the cabinet where the stove is on it lower left corner that looks like it might have gotten wet at one time. How can I fix that to make it look smooth enough to paint.woud I have to replace the entire front the cabinet?
Well… if it is MDF, it has likely swelled from water exposure. The only way to make it look perfect again is to replace it. We are currently rebuilding all the cabinetry in our Rockwood camper for that very reason. There really isn’t any way to “undo” water damage to MDF. If you aren’t a perfectionist, you can give it a light sanding, a coat of primer, sand again, and paint. It won’t be perfect, and you’ll still be able to see the water damage, but it will probably look a bit better than it does now. 😉
We just painted our cabinets and over the trim, realized that was not going to cut it so I’m going to order the vinyl trim off Amazon. Do you think you needed the 20 feet? There is one for 12 feet that is cheaper and I’m thinking that’s all we need. Thank you for your wealth of knowledge! As my husband and I are renovating I’m always saying “well the pop up princess says” 🙂
I’m so happy the blog has been helpful with your remodel. It’s been so much fun. Every camper is different, so your best bet is to measure it out. I can’t remember exactly how much we used. It’s been too long, and I’m getting old and forgetful. 😉
How did you paint the metal trim piece to the right of the fridge? And did you paint both the inside and outside of the doors?
We used a primer that was meant for metal, then we just sprayed it with the same spray paint we used on the cabinets. It has held up perfectly. We painted both the inside and outside of the cabinet doors, but we did not paint the insides of the cabinets. 🙂
Hi! I have been addicted to your blog for the past 2 days looking at all the remodels. We just bought a 2000 Coleman Santa Fe(From the pics I, I think that is the same as in this post). Anyway, I never thought we would buy a used pop up, I’ve always been a new full size camper kind of girl…but at this moment in time, this was what we needed. The couple we bought it from already painted the cabinets white and put new wood vinyl flooring in and redid the cushions. The only thing left is new curtains and mattresses. The outside is kind of showing it’s age and I thought since it’s sold old and we didn’t spend a lot, that why not try to paint it to match our SUV(a crimson colored Yukon). Do you know of anyone who had attempted this? Am I crazy for the thought?
We are currently painting the exterior of our Rockwood, and we painted the exterior of our Coleman, too. It can totally be done. Just make sure you prep the surface well and use a good oil-based or hybrid paint. We used single stage automotive paint for the Coleman and an alkyd paint for the Rockwood. 😀
Thanks very insightful. Wondering if anyone has renovated plastic rimmed doors. Worried.
Thanks for the great info. My 1992 Valor camper doesn’t have t moulding on the cabinets. They have 1/4″ corner molding and I’m having trouble finding some to match. Do you have any resources other than Amazon that might carry it?
Yeah, that presented a problem for us, too. We ended up using some wooden corner molding in our Rockwood camper. You can see it here.
Hello, Can you please share what sanding sponge grit (or grade) you used? Thank you!
I usually start with somewhere around 150 grit and move to 220 grit to finish it up. You don’t want to put gouges in the surface, you just want to knock the sheen off. The surface should look dull when you are finished. 🙂
I love your blog and your project posts. I would love to paint the cabinets in our 1989 Chesapeake, but they are metal, not the fake wood. Do you know if the metal cabinets would be more forgiving or less? The cabinet doors are the MDF and the edges are chipping, so I need to do something to seal them and protect them. Thanks for all of the useful information!
Just bought a camper and after days of reading your blog, I think I might be brave enough to paint the cabinets. Do you have any tips for painting them without removing them from the camper? What kind of paint/primer would be best, if painting the cabinets while still in the camper? Also what is a TSP cleaner? One more question, did you prime the walls before painting?
Thanks!
We always recommend Zinsser primer and oil-based paint, Candee. You can buy oil-based paint in a can and use a dense foam roller or good quality brush to apply it. Many people use latex, but we really feel that you can’t beat the durability of oil based paint. You are painting laminate and paper, and latex just won’t adhere as well as oil-based paint in that situation. We used latex on our walls, though, and to prime those, we used Glidden Gripper. I love that stuff! They turned out beautifully. Best of luck with the remodel! 🙂
Hi Larissa! The kids and I started in this weekend and removed all the cabinet doors and hardware. I used the tsp substitute that Amazon recommended as the one you used is no longer available (California?). Needless to say, it was a disaster. I have to find another one. Can you recommend something as good as the Motsenbocker’s Lift Off Paint Stripper? I am wondering if it is now banned in CA.
Do you think you could use a spray gun with the cabinets still in the trailer? As long as you cover and tape everything off?
Hmmm… Why was it a disaster? Do you need to repaint the cabinets? You don’t want to be using a paint stripper on your pop up camper cabinets. They aren’t real wood, and you could do some serious damage to the MDF underneath the laminate coating.
I didn’t mean stripper, sorry :(. I meant the All Surface Paint Prep. I cleaned them with the replacement spray and then applied Zisser 123 Primier (spray can). The primer “fish eyed” is what my friend called it; it made these little bubbles as it dried, like fish eyes. I just did the inside of the cabinet doors to test so thankfully, I only have those to try and remove the primer from. Would straight TSP to paint prep the rest of the cabinets damage the MDF? I don’t have any exposed MDF except where the hardware screw holes are.
Thanks!
I just found the Motsenbocker Lift Off Paint Prep at a site called Eagle Maintenance Supply. If anyone is looking for it, this is the only place that still has it in stock, after 2 days of internet searching!
You would really need to tape everything off, and you’d likely need a respirator. I wouldn’t recommend it, but it could probably be done.