Now that the cabinets were looking so pretty, they highlighted just how ugly the countertops were. They were stained, the plastic t-trim was chipped and peeling off in places, and they were just plain ugly. We really contemplated how to fix these for a few weeks. We thought about replacing the Formica. It seemed simple enough, but then what about the t-trim? We’d have to replace that, too. It wasn’t something we really wanted to do. We scoured the Internet for ideas, but nothing really seemed like the right way to go. We were stumped for a while.
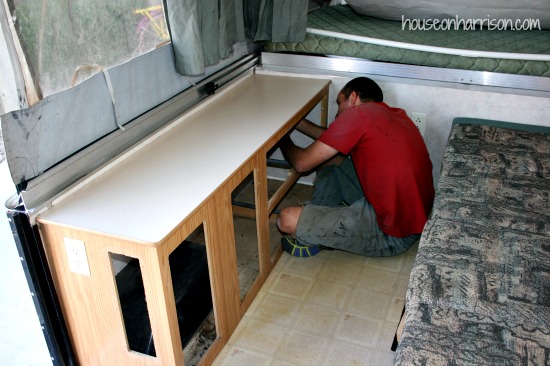
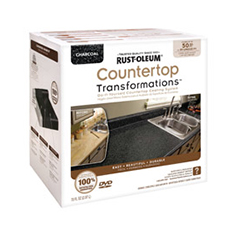
When Mr. TypeTwoFun had removed the cabinets, we discovered just how easy it was to remove the countertops themselves. They were only held on with a few screws. I thought about painting them, but that presented a set of problems in itself. While I was in Home Depot one day, I came across a sad, lonely looking box of Rustoleum Countertop Transformations. Apparently, Home Depot is no longer carrying this product, and there was one box left on clearance. You can still get it online at Amazon and in store at Lowes, if you aren’t lucky enough to pick up a clearance box at HD. 😉
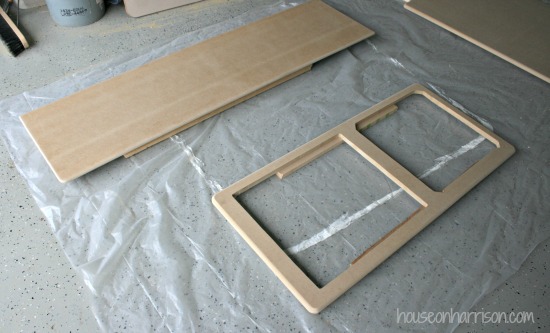
I knew that we would not be able to use our existing countertops with this product. The plastic t-trim wouldn’t take the paint well, and if I removed it, there would be a channel left in the edge of the counters. It is a good thing Mr. TypeTwoFun is so handy! We removed the countertops and used them as a template to cut new countertops out of MDF.
We used 3/4″ MDF for the galley kitchen and table top. For the long counter and cassette toilet cabinet, we used 1/2″ MDF. Mr. TypeTwoFun took a router to the edges to give it a custom rounded look. Then we gave everything a good sanding.
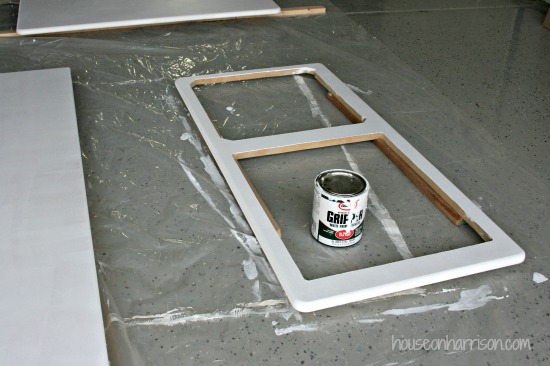
I was a little concerned that the MDF would soak up too much paint, so we decided to give the new countertops a good coat of primer. We used the same Glidden Gripper that we used inside on the wall board. I really like this stuff. I may like it more than my go-to Zinsser — and the clean up is so much easier.
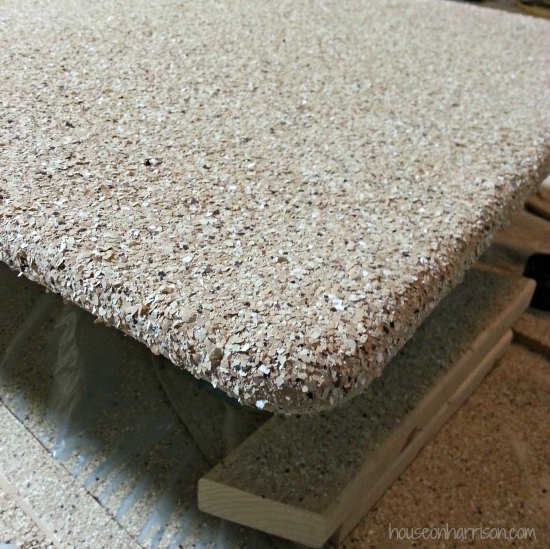
By the time we got around to applying everything, it was dark. We didn’t get many pictures of the process, but we did snap this one of the chip application. Basically, you paint your base coat on really heavily, then you apply a wetting agent, which comes in a spray bottle. At this point, your countertops are ready for the chips. You use a spreader to apply these plastic chips on top of the wet paint. Apply a thick coat, because once you sand them off, if there are places that you missed, you’ll see it. You can touch up your application before applying the top coat if you need to, but we found that you could see a difference in our touch up spots. It’s always better to do it right the first time. Now you have to wait at least 12 hours, but no more than 24 before you sand and apply the top coat.
Once you’ve waited for the paint to dry, you use a plastic scraper to get off all the excess chips. Then you use a diamond embedded sanding pad to sand the countertops until your arms feel like they might fall off… and then you sand some more. When you’ve got the right texture (there is a sample provided for comparison), you mix the topcoat and apply it with a foam roller. Rustoleum has a really good video tutorial on their website, and we referred to that quite a bit throughout the process. We used a small kit, which covered all of our counters well. We had a little basecoat paint left over and just enough topcoat for the job. There were tons of plastic chips left over.
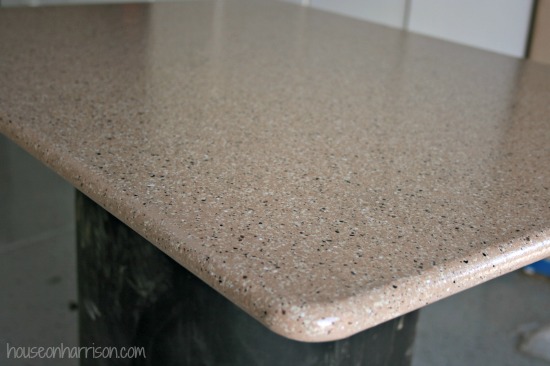
Here is a shot of the finished product. This is the 3/4″ MDF table top we cut. It looks like a real countertop. We are pretty pleased with it. All that sanding really made a difference.
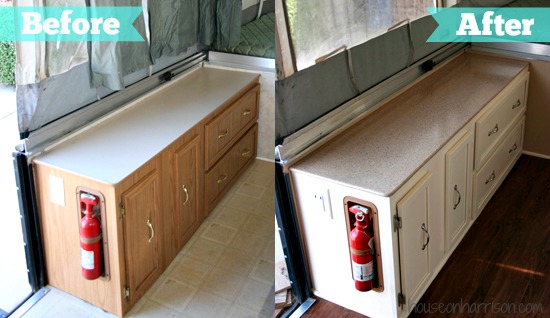
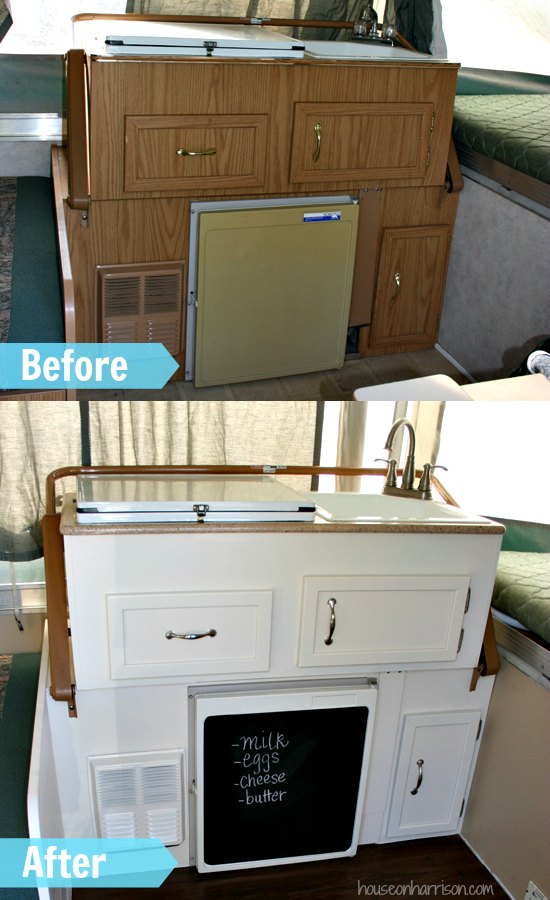
And here is the long counter installed! We built a new cabinet out of MDF, because the original one had been damaged by water and dirt from a torn rubber wheel covering. Mr. TypeTwoFun fixed the wheel well and installed this new cabinet with the beautiful new countertops. It is starting to look like a brand new trailer. Since we built our own cabinet out of MDF, we had the chance to make a few changes that would bring our little pop up into the modern age. We changed out the outlet for a USB outlet. Of course, we can only use the outlets when we camp places with electrical hookups, but I knew that the main things that would be plugged in to those outlets would be chargers for phones, mp3 players, and tablets. Now I only have to pack a few USB cords, and we’re set. We also changed out all of the brass hardware for pretty brushed nickel, which complimented the new cabinet color nicely.
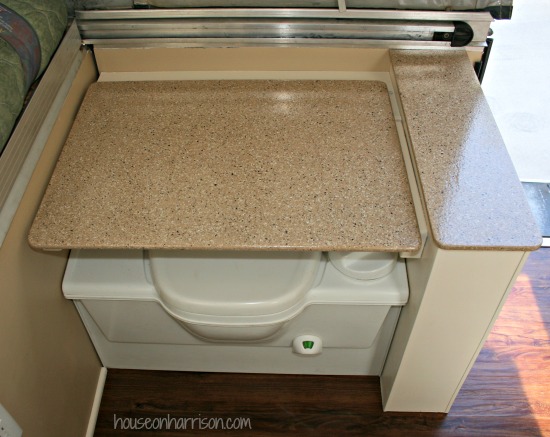
Here are the countertops that we installed on the cassette toilet cabinet. The lid was a little tricky, because when flipped up, you see the underside of the counter. To make sure the lid looked nice on the bottom as well as the top, we gave it a coat of semigloss paint, and then we sealed it with Parks Super Glaze. This stuff is awesome, and gave the bottom of the lid a nice durable finish. We plan on doing this to the bottom of the table top as well.
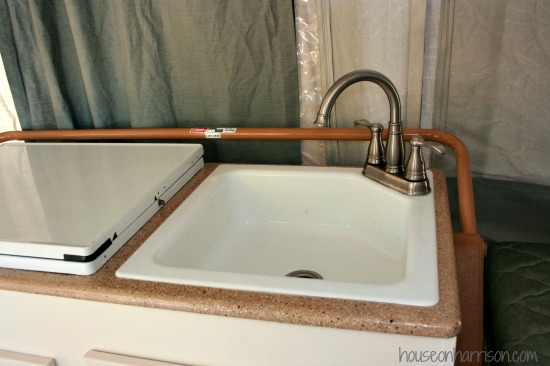
This is how lovely my kitchen looks now. We replaced the old, ugly faucet with a gorgeous brushed nickel one. The neck of the faucet gets in the way of the galley handle when we tear down camp, but we just unscrew the neck and place it in the sink. It is a quick simple step, and I wouldn’t go back to that ugly, old faucet to save time. This one is so much easier to wash dishes with, too.
You can really see what a huge impact those few things have made on the camper. The beautiful, freshly painted cabinets and fridge make such a difference. I’m so excited to add curtains and cushion covers to complete the look. It is really coming together!
Happy Camping!



Ahhhh!! Girlfriend! You speak to my heart. We have two little boys (3 and 9 months) and recently bought a pop up camper that looks like yours. Immediately I was envisioning these DIY updates and just stumbled across your blog. I. Am. Thrilled!!!! Yay! So glad you exist and are documenting all of this 🙂
LOL! Thanks, Mandy! I think a good portion of my tutorials speak more to us glamping women than die-hard camping men. My husband is sometimes thoroughly perplexed as to why we need throw pillows and cute curtains. 😉
Glad you found me, and I hope you’ll send me pictures of your camper makeover! I’ll love what others have done with their PUPs.
My parents gave me their pop up years ago, I used it every weekend that is until my husband decided to take it to the races, one time and well I don’t know what he did but it came home fallen apart. He broke the cable and it wouldn’t close and a rain storm got it and now I am making him totally strip it and redo it and replace the canvas. Love the look of yous thanks for the ideas.
Hi Stella. Just wondering if your hubby has gotten around to do the canvas? Was it hard to do? I had an ex boyfriend store it at a property for me while I’ve been dealing with a spinal injury and when I finally got it back all the canvas is full of mildew and is torn n ripped. He left the kitchen up and didn’t close it properly and it’s so terrible inside it needs a complete revamp. Men! Lol
Hi Kelly,
I just found this site so forgive the late reply. Replacing a pop up canvas is actually an easy job. Having bought a used pop up (2003 StarCraft 2110L) that had been damaged by mice made a new canvas mandatory. The new canvas was ordered through Bear Creek Canvas, http://www.bearcreekcanvas.com. The good news is that it was done perfectly and was better than the original. The bad news is they do such good work they tend to have long lead times for new orders. Installation took about two hours with one person. The only thing needed was a Philips screw driver to remove the trim pieces holding the canvas in place. Once the old canvas is out its a simple matter to re-install the new.
Love your site! We bought a used Santa Fe last month and have been working on it little by little. Installed LED lights and replaced/moved the thermostat last weekend. I’m looking at re-doing the counter tops since the t-trim is peeling off behind the sink and it’s dinged along with the table.
How hard was it to remove the stove and sink? So little space to see in there.
Thanks!
Liz, we removed all of the plumbing lines to the sink first, then we removed the whole swing galley. Once we got the galley out of the camper, it was much easier to remove the sink and stove. It’s just a matter of making sure you remove all the screws. I won’t say it was simple, but it wasn’t as bad as we were expecting. 🙂
We’ve had our pop up for 4 years now, and we are just now finding time to update it. I’ve been out there all day scrubbing, sanding, painting, etc. All while trying to avoid those ugly countertops with even nastier trim.
Cool, Lauri! I can’t wait to see pictures! 🙂
Larissa I was wondering if 1 box did all of your countertops?
One of the small boxes was enough to cover all of our countertops and our table, Gina. We had TONS of plastic chips and a bit of the base paint left over. We used every bit of the epoxy top coat, though.
I am currently rebuilding a ’82 Starcraft pop-up, I found a box (50 sqr. ft.) of the Rustoleum counter-top stuff at an Ollie’s. It is still available through The Home Depot, but you have to order it on the website…
Thanks! It’s available on Amazon, too. It’s just a little pricier than it was when I bought it. 😀
The cabinet with the sink, did you rebuild that one too or is it original?
If original, what paint did you use? Did it chip?
I have been wanting to paint the cabinets in our pop up but was told by a few people not to because it would chip off.
What would you recommend?
We have to replace a few our the counter tops anyway so our friend is going to make them out of MDF.
The cabinet with the sink is original. We have had no problems with paint chipping off the cabinets, but we do have a couple little chips in the plastic t-molding around the dinette. Use a good primer and an oil-based paint, and you should be fine.
If you are making the countertops out of MDF, make sure you seal all the surfaces. MDF swells when wet, so you want to make sure you seal out any water. As long as you do that, you should be fine. We love ours! 😀
We just got our pop-up a little over a month ago. We have taken it camping a few times and all I have been thinking about it how to update the darn thing! I am SO glad I stumbled upon your site! What do you recommend as the first step in the process? Also, did you get a different sink? Ours is that ugly steel. Your white one looks so fancy!
That sink came standard in our model, Stefanie. You could always make a cute cutting board or cover for it for when it isn’t in use. 🙂
Do you plan on taking out your cabinets to paint? If so, I’d recommend that you remove the cabinets and lay flooring for your first project. If you are painting the cabinets while they are in the camper, then I would paint them first and lay flooring second. Good luck! I can’t wait to see it all finished.
What is MDF? I’ve got plans for my parents’ PUP (1999 Coleman Sun Valley), and everything needs replaced. Possibly even the dinette table. It’s a disaster.
MDF is Medium Density Fiberboard, Beks. It’s a little heavy, and it will swell when it comes in contact with water. If you use MDF, make sure to seal all surfaces. It’s much cheaper (and straighter) than plywood.
Good luck with the remodel. Can’t wait to see it! 😀
Has anyone ever had to rebuild their cabinets completely from scratch? Our cabinets were water damaged and warped so we had to get rid of them; they couldn’t be salvaged. I am looking for ideas to rebuild them and the best method. If you have any suggestions, please give me some pointers.
We rebuilt the long cabinet in our camper, Ashleigh. Our cabinet was water damaged and warped as well, but we were able to use it as a template to cut out replacement pieces. We just built the cabinet from 5/8″ MDF and sealed all the surfaces. We used 1×1″ pine to brace the cabinet. It is rock solid now. Did you happen to keep the old cabinets to use as templates?
No, we didn’t. My husband is a good carpenter so he wrote up drawings with the dimensions and layouts so we could replace it as it was. He and I were debating on what type of material to make the new cabinets out of. I want something that will last but at the same time be sturdy.
We went with MDF because it was cheaper, straighter, and less likely to warp (unless it gets wet) over time. I also like that I don’t have to use edge banding on the edges to hide plywood layers. 🙂
Good luck with the rebuild. I’d love to see pictures!
I am trying to take some as we go along. This weekend, I finally got all the old linoleum floor up so now I get to clean it and prep the floor and walls for paint. I’ve got a canvas and awning ordered. I’m looking forward to camping again next year in my “new” camper.
I have read some comments in other places that suggested the resurfaced countertops chipped, scratched, and wore down easily. We are just on the verge of taking the plunge with Countertop Transformations and wondered if you have any regrets after-the-fact. The color we like only comes in the bigger kit, which of course means it’s more expensive.
Thanks for such great how-to information!
We have had zero problems with the countertops, Dave. I LOVE them and would do them again in an instant. It’s worth noting, though, that we did not paint the Transformations over our existing countertops. We cut new ones from MDF and primed them well. I’m not sure how they hold up if you are using the kit over the existing Formica.
I was wondering if you have some idea on what I could use to get the plastics paper off my cabinet. I have a 1997 Starcraft and low funds with my first trip planned in April. So I was wanting to paint my cabinets but I was told it wouldn’t stay since its have the plastics wood look looking paper on it.
You don’t have to remove the paper coating on your cabinets to paint them, Heather. If you use a good primer, you shouldn’t have any problem with the paint adhering. Here’s our post on painting your pop up camper cabinets. There’s lots of good info in there. Good luck! 😉
Great thank you.
Hi this is awesome! Was there much trouble with replacing the faucet? I love this idea for my own remod!
The faucet was super easy to replace. It just unscrews from the bottom like a regular bathroom faucet would. It’s a super simple modification. 😉
I am picking up our very first pop up trailer on Sunday and I have been searching the web for ideas and DIY how -to’s! I think Ive pinned all of yours!
My man is pretty handy (he’s a carpenter) so Im in good hands there. I love the counter tops, the trailer is coming from my sister and it was my parents before then so I know its been well taken care of. Although its been some years since its been used, its been sitting in my sisters garage for awhile.
I really cant wait to get started.
Can you tell us the exact faucet you got? I’m having trouble finding a faucet with the gooseneck that unscrews, as well as anything under $100
I want to know too. I can’t seem to find anything that will even fit!
This is the faucet we used, Valerie and Tasmin. We just picked up at Home Depot. Unless they have changed it in the last couple of years, that collar twists off and the neck of the faucet pops right off.
Love your website!! We are in the middle of our project. What did you use between the cabinets/countertops and walls to replace the rubber piece. The piece that is stapled to cabinets. Right now its ugly brown and doesn’t look good. I can’t tell by your pictures what you used. Thank you!!!
Did you have to remove the furnace and the fridge? If so did you have any problem getting them out?
We did, Shawn. They were both a little difficult to remove, and definitely a two-person-job, but as long you get all the screws out, they shouldn’t be a problem.
I love your makeovers. My husband and I just bought an older popup that’s in amazing shape but the previous owners didn’t stabilize the sink top before they closed it up. It is hinged on one side so while stowed, the sink is upside down. Well now the counter to has pulled away from the sides of the counter. I would love to replace it with the kind shown in this makeover but have no idea where to find the parts. Any suggestions?
We bought the MDF at Home Depot, Sunnie. The countertop treatment kit can be found on Amazon. They are a little pricier now than they were when we bought ours, though. 🙂
How did you get the rounded edges on your MDF countertops?
Love your site, thanks!
We used a router to round the edges. 🙂
Where can I find the hardware for raising the sink cabinet as I’m rebuilding my jayco pop up? Thank you
The only place I have seen this hardware is on the Liftco website here, Jeff. I’m not sure if it available from any retailers, though. You might try contacting Liftco directly.
Nice work! I am thinking of redoing my countertops with 3cm solid surface corian knock-off material. Do you have the dimensions of the countertops? I’m going to see if a friend who is a distributor has any scrap pieces lying around that are the same size. My sink/cooktop in my 2002 santa fe is in rough shape and the faucet and ripped loose from the counter. I’d have to use glue and silicone instead of screws on the 3cm material but it should hold up forever to moisture.
What is the weight like on the solid surface material, Ryan? You want to make sure you are keeping on eye on that.
Hi. New to the site and loving it. Just bought a 1996 Viking and looking forward to making it our own. I’m curious where you bought your faucet? We dont have a hot water heater, so will a 2 handle one work for us? Thanks for all the great tips. Doing exterior cleaning this weekend.
We just bought a bathroom faucet at Home Depot. 🙂
I love that you were able to replace the sink faucet! My remodel project has a horrid squatty one that looks impossible to wash dishes with. I’m glad you found a faucet that you could break down, I’ll be on the lookout for mine! I’m so happy I’ve found your site, it gives me so many ideas!
I love our new faucet, Ellie. I don’t even notice the extra few minutes it takes to break it down anymore. Totally worth it! 🙂
How are the counter tops holding up? I found a box of this for $75 and wondering if it’s worth it. Thanks!
Hey Larissa! I just bought a 2003 Coleman Yuma so my wife will actually go camping with me lol. I plan on restoring it, but with a more masculine, cabin type look. I love all your ideas! Especially these counter tops! I know you’re probably tired of answering this question, but how have they held up since it has been several years? $155 is a lot for the kit, but if it’s worth it, I’ll make the investment. Thank you so much for all your hard work and inspiration!
They have held up perfectly. They still look just as great as they did on day one. 🙂
I am also wondering about the faucet. The one in the Coleman Laramie we just bought looks to be a little hand pump one. It’s broken, so it needs to get replaced regardless but would it even be possible to hook up a regular bathroom faucet? We are totally new to this and I’m not sure how the plumbing works!
My other challenge is that the “kitchen” cabinets are entirely made of metal. Looks like it would be really hard to change out the hardware, and there is a section on the back that has some damage. Anyone else have metal cabinets? The doors are the paper coated wood.
If you are sure that you are only using city water hookups, you could replace the faucet with a single temperature or reverse osmosis type of faucet. Check out how Campfire Traveler’s did theirs here. We are hoping to replace the pump faucet in our new Rockwood project with a bathroom faucet, but we are going to have to add a water pump for the tank, since we know we will be using the tank water when we dry camp. I hope to have a tutorial on that soon. 😉
I haven’t ever seen metal cabinets in a pop up camper. That is interesting. What make/year is your PUP?
Thanks for the link to that other faucet! That looks perfect. I can’t really picture us using the pump either. We are hoping to replace the counters with a piece of Corian I found online for $75. Looks like it would only be 7lbs heavier than MDF, which I think is doable.
The camper is a 1987 Coleman Laramie.
I am wondering if there is any way you can let us know how you rebuilt your cabinets? Any advice and tips on that?
We only rebuilt on of the cabinets in our Coleman, Kimberly. Even then, we mostly just replaced the facing on that one. We used the original drawers. Most of the work we did was reinforcing the originals.
Now, on our newest project, we are rebuilding ALL of the cabinets. We’ll be sure and post more information on that one as soon as we are finished. 😉
How did you remove the wood and gold trim off the counter tops and sink area? T molding was easy to remove in other places of camper but on our camper it has the same countertop trim and I can figure out how to remove it.
We did not use the original countertops, Jennifer. In both of our remodels, we cut new countertops from 3/4″ MDF. I’ve never had to remove the gold trimmed t-molding before, but it is possible that it is glued in place. If that is the case, there is a possibility that your countertops could be damaged when you are removing it, so use caution. 🙂