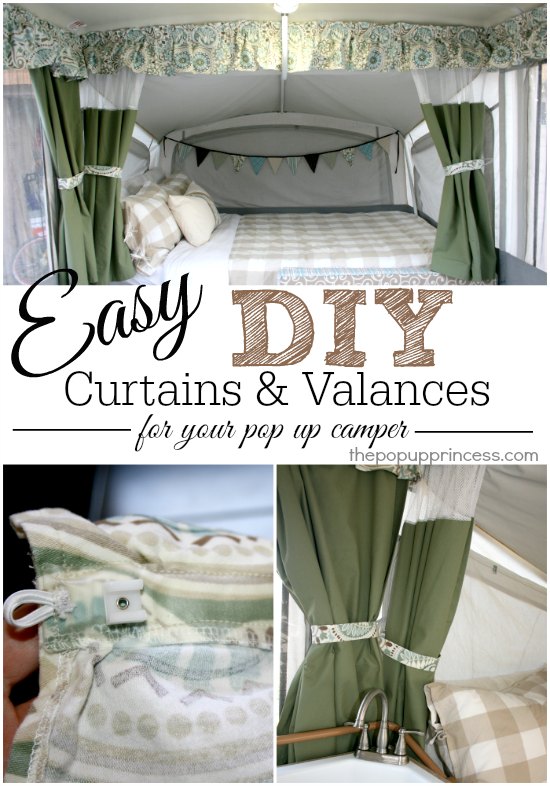
 I know what you’re thinking, “Another post about pop up camper curtains???” 😉 Well, here’s the thing… when I started blogging last year, I had no idea that my curtain tutorial would be my most popular post. I honestly get so many comments and e-mail questions about my curtains, and it occurred to me that maybe I didn’t do a very good job explaining the project the first time around. If you missed that post, you can find it here. If you’re already familiar with that post, I hope this one will clear up any questions you might have about just how we made (and hung) the curtains and valances in our pop up camper.
The Curtain Panels
Let’s talk about the curtains first. Curtain fabric can get pretty expensive. I ended up purchasing 15 yards of cotton duck cloth fabric to make my panels. It’s pretty heavy stuff and it does a great job insulating the camper. I was lucky enough to happen across a local home fabric store when they were going out of business, so I only paid $2.50 for my first 7 yards. When I went back to purchase additional material, my fabric was clearanced even more, so I got my last 8 yards for $1.50 each. The cost of the curtain fabric was under $30! If you aren’t lucky enough to come across a deal like that, check closeout stores for curtain (or shower curtain) panels. They can often be a cost effective way to get fantastic looking pop up camper curtains. 
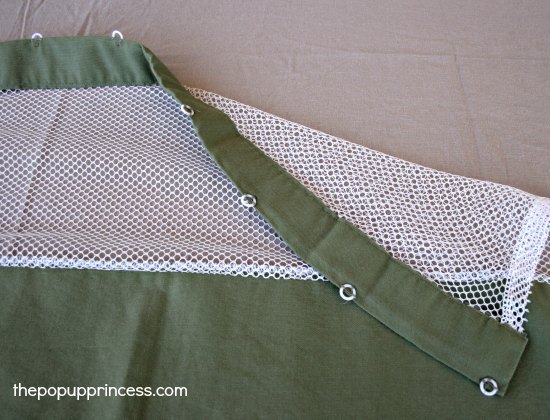
When it came to making the actual curtains, I didn’t use the original panels as a pattern because I wanted mine to be longer and wider than the old ones. I added several inches of length and width to my new panels, and the new ones are fuller and longer. I’d highly recommend doing that if you can, as it gives your drapes a custom look, but it also means they’ll close easily in the middle without any gaps. You’ll need to make sure you have enough room in your camper to add that length and width, though. Additional fabric means additional bulk, so you will have to be more cautious about items like bedding and mattress toppers, or you may have issues closing the camper. You can check Part One for more details on how I made our panels.
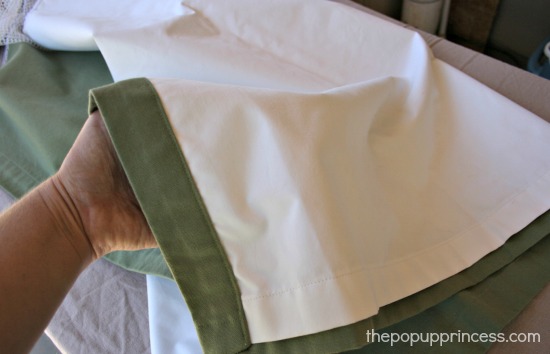
The new curtains are fully lined with blackout material. I love how this keeps the camper darker in the mornings, helps keep the heat at bay, and gives us a little more privacy at night than thinner curtains do. It is an added cost, though. I purchased my blackout liner at Hobby Lobby with a 40% off coupon. It was originally $4.99/yard, but I got it for $2.99/yard. I did have to purchase 15 yards of this as well, but I think it was money well spent. If your budget doesn’t allow you to purchase blackout liner, look for a heavier curtain fabric. You’ll thank me later!
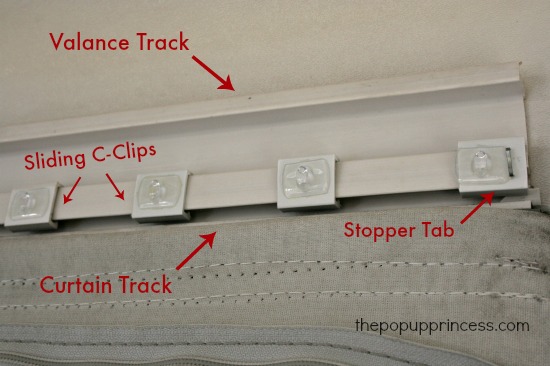
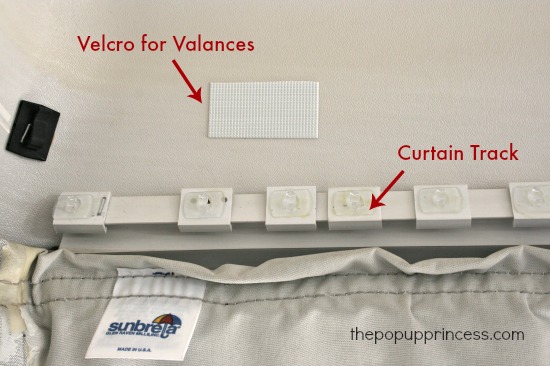
Here’s a closeup shot of the curtain track piece in our Santa Fe. You can see the piece has an upper track for the valances and a lower track for the curtains. For the lower track, we use a hook and ring method, which I detailed in Part One. There were c-clips attached to the original curtain panels, and they slid along the curtain track. We reused the c-clips from our original curtains, but I purchased a few more to fill in the gaps from missing clips. These c-clips are super hard to find now, but I’ve found that these carrier clips match the original Coleman track pretty well. You can also snap them into RV curtain glide tape, which you can sew on the back of your curtains if you prefer that method. If you’ve been looking for those pricey and hard-to-find Coleman c-clips, the carrier clips may be your answer. They are available on Amazon here.
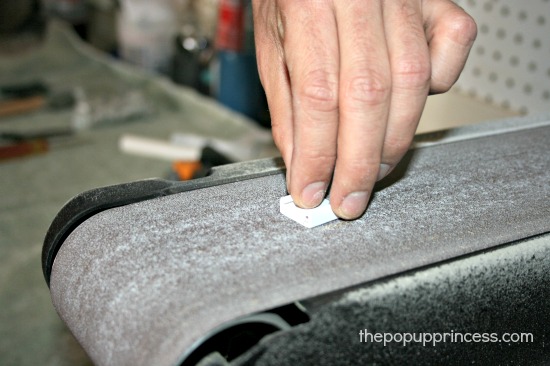
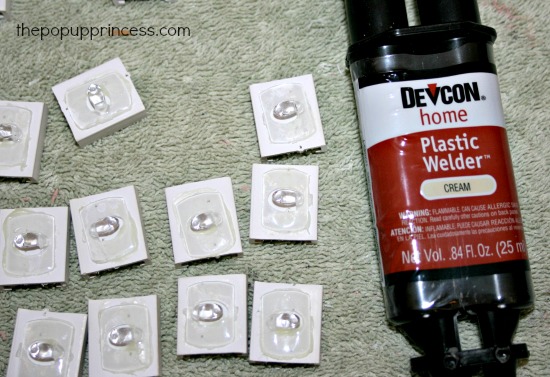
I removed the original c-clips from our old curtain panels and attached a small clear Command Hook to each one with plastic epoxy. To do that, we first sanded each c-clip on our belt sander to rough it up a bit.
If you don’t have a belt sander, regular old sandpaper works just fine. You basically want a rough surface so your plastic epoxy will adhere well.
Then we took some plastic epoxy–we like this Devcon Plastic Welder–and attached the Command hooks. We used one c-clip at each end of the track to serve as a stopper. On those clips, we offset the hook a bit so that we could staple the c-clip to the curtain track. Once your epoxy is set, you can thread all your clips onto the curtain track and staple a stopper at each end. All but the stopper clips should slide freely on the track. As a side note, we originally used the adhesive tabs that came with the Command hooks. Sadly, they were an epic fail. The adhesive didn’t hold up well, and I would find little plastic hooks all over the camper. The epoxy does a much better job! 🙂
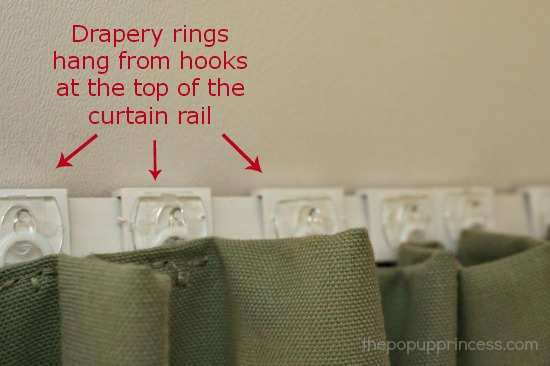
To hang the curtains, I sewed small drapery rings across the tops of the panels. You can find these little drapery rings at any fabric store in the drapery department. They were fairly cheap, and they fit the Command hooks perfectly.
Now all you have to do is loop a drapery ring over each hook, and you’re set! You can remove your curtains for cleaning, and they will still slide open and closed easily. They stay in place perfectly while we are camping, too. I love this system!
I have heard from a few readers that they were having trouble keeping their drapery rings on the Command hooks. If you are having this problem, try looping a small clear hair elastic (like these) around the Command hook and drapery ring to hold them in place. 🙂
The Valances
I chose to go with a solid color on my curtain panels, but I really wanted to incorporate some color and pattern into curtains as a whole. To accomplish this, I purchased Waverly Paisley Prism Twill in Latte from my local JoAnn Fabrics. It is tricky find it on JoAnn online anymore, but some local stores still carry it. I’ve also seen it on Amazon and Fabric.com, so if you are looking for the same fabric–check there!
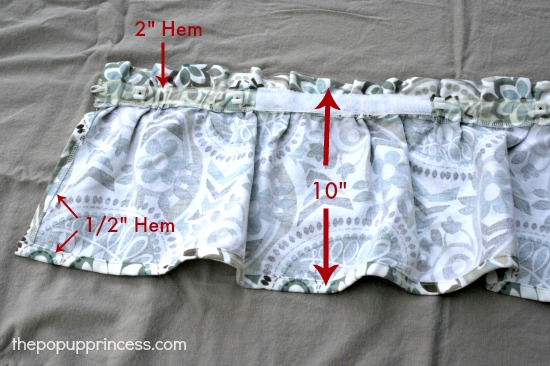
I honestly cannot remember how much fabric I purchased for the valances, but I can give you the measurements and a rough outline of how I made them. First, I cut strips of fabric 13 inches high. To determine the length of each panel, I took the measurement of the sections of my valance track and multiplied it by 1.5. For example, for my 10 foot sections, I cut a 15 foot long by 13 inch high panel. Then I added a 1/2″ double fold hem to the bottom and sides and a 2 inch hem to the top.
To gather the valance panels, I made a 1″ casing about an inch from the top of the panel. Then I took 3/4″ elastic and cut it to the desired length–for this panel, it was 10 feet, the same as the length of the track. I threaded the elastic through the casing and secured it at both ends. Then I had a finished valance panel that was 10 inches high by 10 feet long.
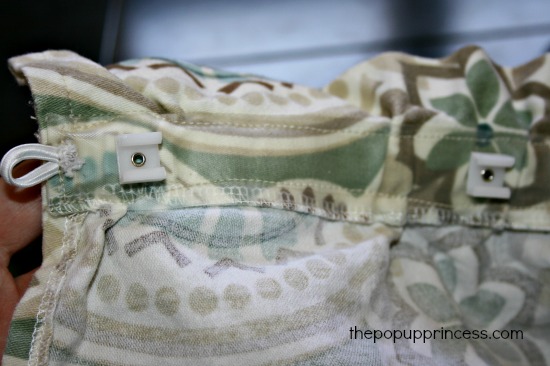
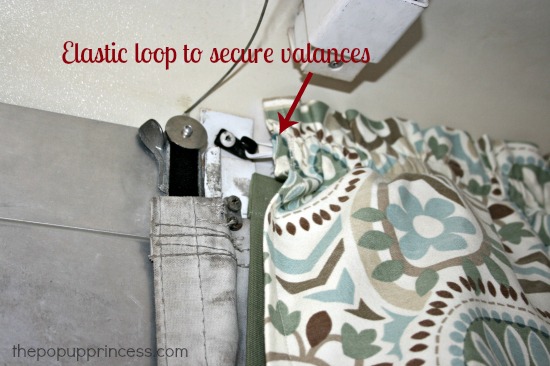
Our camper has a track for the curtains and a separate track for the valances. The valance track is smaller than the curtain track, and it requires smaller glide clips. We were not able to save the tabs from the old valances, but we did find this glide tape, which worked perfectly. I simply sewed the glide tape to the back of the panels, right over the casing. Although this flattens the gathers a bit, it helps the valance keep its shape. When the elastic starts to wear and stretch out after a few years, the valances won’t sag. The gathers are basically sewn into place and not dependent on the stretch of the elastic to hold their shape. To finish it off, I added a small elastic loop at each end of the valance. This helps secure the valance at the end when it is hung in the camper.
To hang the valance, just slide the glide tape clips along the valance track and secure the elastic loops on a hook at each end of the track. Over the bunkends, we don’t have a valance track. The original valances were attached to the ceiling with Velcro, so we stuck with that same system.
I attached hook Velcro to the camper, and I sewed loop Velcro on the valances. We just attach the valance to the ceiling with the Velcro and secure the elastic loops at each end. Easy-peasy! 🙂
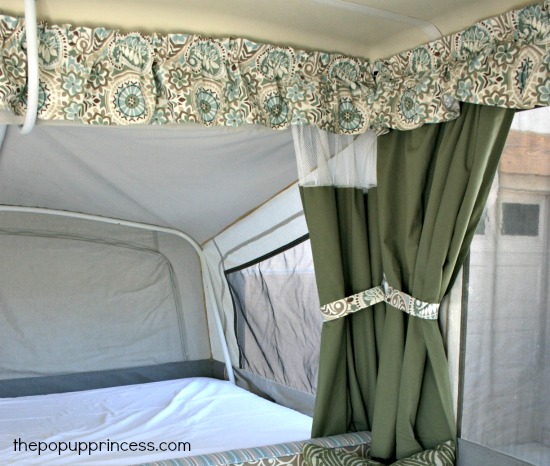
I made a few curtain tie-backs with my leftover valance fabric to “tie” it all together. Hahaha! 😛 Sorry, that was bad… but seriously, isn’t it amazing how much difference changing out the curtains makes? With just a few yards of fabric, we added some much needed color to our little pop up. It’s a pretty easy thing to do and really makes a big impact.
I hope that answers any lingering questions you might have had after my first post. Have you changed the curtains in your pop up camper? I’d love to see what you’ve done! You can e-mail me pictures or post them on our Facebook page.
Happy Camping!
Disclaimer: This post contains Amazon affiliate links. The Pop Up Princess is a participant in the Amazon Services LLC Associates Program, an affiliate advertising program designed to provide a means for sites to earn advertising fees by advertising and linking to Amazon.com. This means that if you choose to purchase an item from a link in this post, The Pop Up Princess earns a small advertising fee to help pay for future projects and posts… so thank you! 🙂
Happy Camping!



I am getting ready to redo our pup curtains. Mine are hung with different hardware so I will be cutting off the top of the old curtains and attaching the new ones to that section. I plan to buy room darkening curtains at Walmart and cut them down to fit. I figure 5 curtains will be enough with some left over to replace the flap of fabric that covers the edge of our bunk ends. Your blog is definitely my inspiration!
Thanks, Beth! Great idea! I think buying premade curtain panels is a great way to give your PUP a new look. Make sure to send me pictures! 😉
Hi, first of all your ideas are great and look fabulous! Unfortunately I’m no good at any of this. Do you know where I can buy the curtains/valance for a 2000 Coleman Santa Fe popup camper?
Try Coleman Pop Up Parts. They may have what you are looking for. 🙂
That’s what I was thing…
I bought the room darkening curtains from Walmart as well. Works perfectly. I did however hang them the same way as Larissa did hers.
Awesome! I wanna see! 😉
I found your blog a few weeks ago and you have inspired me to see past the nasty pop up trailer look and just go for it! We will be picking up our 2000 8′ pop up this week and then the fun will begin! Thanks for the inspiration!
Thanks, Michelle! Giving the PUP a makeover was so much fun. Buying used is the way to go. We have the trailer just the way we like it now–and it’s paid off! It’s awesome! Another added bonus to doing it yourself is that you really get into the “guts” of the camper. Now, when something goes wrong, we know where to look and how to fix it. 🙂
Good luck on your camper makeover. I can’t wait to see pictures!
This is definitely better explained than the original post about it which left me with a lot of questions. I see that your roof is higher than the curtains and valances. In our Jayco the curtains hang at the ceiling so it left no room for our valances which we had to figure out a creative way to hang them. We ended up going with a piece of wood that had a 90 degree angle and had to screw it into the roof. Not our first choice but we didn’t really have another way. It ended up working out well and we haven’t had any leaks from screwing into the roof, thankfully.
You didn’t have a track for your valances, Amy? I have heard some people say that their original valances were stapled to the ceiling, which amazes me. How were yours originally attached? I’d love to see pictures of what you. 🙂
They were stapled to the roof, which is why there was no room for one. I will get some pics in a bit and share.
My Jayco valances were also staples to the roof. One of my projects for this year is to replace them. Anyone else replaced valances in a Jayco using same method?
I am just looking at replacing jayco valence also stapled. How did yours turn.out?
We bought a Santa Fe last summer and I used some of the cotton canvas to make curtains. Now I’m going to take those and redo them for the Casa Grande we just purchased. In the Santa Fe, there is white residue on the vinyl from where the blackout on the original curtains melted. Have you had any issues with this since you did yours?
Also, do you use the track for the valances? Or do you just use the elastic/hook and velcro?
Thanks for your site! I refer to it all the time as I’m working on the campers.
Melissa, we have not had any issues with the blackout liner melting on the windows. It did melt when I washed the curtains, though. Have you seen our tutorial on cleaning your vinyl windows? You can find that here. The ProtectAll has worked wonders on our windows. You might try that to remove the residue on yours. 🙂
And, yes, we do use the valance track. The glide tape that we sewed to the back of the valances runs along the track. Above the bunkends there is Velcro, but the sides on the camper use the track.
Larissa, I believe you are in AZ as I am. I have found that the adhesive on Velcro ‘melts’ in the heat. Have you had that problem? What else can be used to attach it?
I am, Patt! Are you talking about the Velcro on the camper ceiling? We haven’t had any problems with that, but I used industrial Velcro from Home Depot. In fact, I accidentally put one on crooked last year, and when I went to fix it this year, I couldn’t get it off. But if you are having issues with the adhesive melting, you could try epoxy. We used that on our curtain clips and it holds really well. You probably won’t be able to remove it easily, though, so it’s a pretty permanent fix. The Velcro that was put on at the factory (or maybe the previous owner?) was attached with heavy duty staples, so that might be an option, too. Hope that helps! Maybe we’ll see you around out there! If you see us, come say hi! 🙂
Hi Patt,
I just found your site thanks to the story on Greg Gerber’s RV Lifestyle email. I have been trying to figure out the best way to replace the curtains in our Aliner (a hard sided pop up) which we’ve had for 11 years. Time for a makeover indeed!
What’s been holding me back is that I haven’t been able to find exact replacements for the system they used to ‘slide’ the curtains, as the one over the sink has a slide both top and bottom, and the corner curtains are an L shape that is held on at one corner. After seeing your hook method, NOW I can finally figure out how I can keep the same slide idea, but not have to find the exact matching slides to replace the old ones. I also plan to redo the cushions at the same time, as I would like to make sure it is all complimentary in color and pattern. It’s a big project for me, which is another reason I have been putting it off. Thanks again for the great explanations and especially the pictures. I have bookmarked your site to refer back to as I get this underway. Beth in Florida
Hey Larissa, also was thinking about using the room darkening curtains from Ollies here in Danville, VA bargain store. my thing is i don’t know how to sew. so this will be a treat to learn. lol The question i have, did you also recover your cushions also?
and on cleaning the outside of the canvas, can i use a pressure washer?
I would not use a pressure washer on your canvas. Our local awning repair place says that is the most common way to damage canvas awnings. I baby my canvas. That stuff is expensive! 😛
Thank you Larissa, It was my husbands idea. I normally do all the cleaning on the camper. so back to the scrub brush and the baby ALL! 🙂 Going to ask my daughter-in-law about sewing the curtains. Anxious about getting this camper remodeled before vacation. Use one more time before sale it.
Good luck, Angela. The decorating is the fun part! 😉
Larissa where did you find your material for your curtains and your cushions? I looked at Walmart tonight and couldn’t find anything.
This post is amazing and I can’t believe the price that you got for your fabric. I am planning on redoing our curtains and our cushions with cushion covers. Do you know the length for the curtains that go along the beds? The fabric that I see online that I like is only 44″ long. Wondering if that is enough. Also, do all coleman campers have a valence going around the entire inside? I just folded up my camper that I bought less than a week ago and I can’t remember. I am opening it back up this weekend to clean it out and prepare for my trip in 1.5 weeks. I do not think I will have any curtains or cushion covers done for that trip.
You can use 45″ wide fabric for your curtains, Lauren, but you’ll need a lot more of it. Home decorator fabrics come in wider widths. You’ll also need to be careful of the direction of your print. My panels were 48″ wide, so if I were using the 45″ fabric, I would have had to either piece together two cuts of fabric or cut the panel from the length of the fabric, not the width. That can be a problem if you have a pattern that is supposed to run a certain way.
I’m not sure if all Coleman campers have valances. The older campers might not. What year do you have?
Hi, we have a 1989 Coleman Larissa and it does not have a valance. My husband and I are remodeling the inside and I am going to put a valance on ours. I haven’t decided yet how but I have gotten some good ideas. Thank you for the information.
I remember seeing a photo of a notebook page with the measurements for your curtains, and since we also have a Santa Fe, I was planning to use that as a guide, but I can’t seem to find that anymore. Would you mind sending it my way?
Thanks!
Jennifer
I think this is the picture you are talking about, Jennifer. I’m not sure they were my final domens ions, though. I believe I added a few inches here and there. When we get back from our epic summer trip, I’ll see if I can hunt down my final measurements. 🙂
That is the picture I was looking for! Thank you! Any additional measurements you can send my way would be much appreciated.
Have a wonderful trip!
Jennifer
THANK YOU!!! This is just the ammo I need to get my husband on board with a pop up. Thank you for your awesome blog and all the tips and tricks. Anytime you want to tackle more organization tips, I am all ears!
We are in the middle of our big summer trip, and I have realized how important organization is. I’ll definitely have to share our tips soon! 😉
Hi, I have recently found this site. And want to say hi I have a skamper and my valances was stapled to the roof .. my wonderful daughter sewed everyghing for me and im in the middle of redecorating. Its a small pup but I think adorable as I get ready to go to Sturgis SD. Any tips for adding or changing thing around to have better working/storage.
Awesome! Ours is small, too, Debbie, but we love it! We built these shelves to help with storage, and now that we have them, I couldn’t imagine a trip without them. They hold so much stuff, and they are super easy to put up and take down. We also added doors to our dinette storage area. That was a huge help. You can find that tutorial here. Both those things have been huge space savers for us. 🙂
Our pop up is REALLY old (maybe mid 70s) and we have no info on exact year or brand… There is no curtain hardware anywhere in what I like to call the “living” area. There is a track for curtains to cover the sleeping areas but the sliders in the track are missing. I was planning to Velcro the valances up so I’m glad to see that it works 😉 Do you have any suggestions on how to install curtains though?
Jennifer, any chance you could send me pictures of your track above the bed and the track (or lack of) in the living area? I used Velcro on my valances, but not on my curtains. You might have better luck using another method on the bunkend curtains, since you’ll need to open and close them frequently. What type of camper do you have?
Thanks for all the tutorials. I’m working on cushion covers, and then the valances. My husband is wondering if you take the curtains off before popping down, or do you leave them in place? If you leave them up, do you have problems with them coming off?
Thanks!
If you are attaching the curtains using the drapery ring method I detailed here, you can take them off easily when closing up the camper. Of course, you can leave them on, too. When we are on a big trip, I leave them on when we pack up between stops. When I pop the camper back up, I may have to slip a few rings back over the hooks, but it’s usually not a big deal. I love this method, btw. I think it is really convenient for washing the curtains, but it keeps them in place, too. 🙂
I have been motivated by you to get my camper up to date. Ours looked like your did originally. I am in the process of redoing the curtains. I did the actual curtain parts exactly like you did. My question is about the valences. I don’t understand the last part about the Velcro. You put the glide tape on but still Velcro it to the side of the actual camper?
Hi, Luci! Thanks for stopping by. The bunkends do not have a curtain track like the rest of the camper. I used Velcro to attach the valances there because with no track, I couldn’t use glide tape. The sides of the camper have the double track, so I used glide tape there. Does that answer your question? 🙂 I can’t wait to see your curtains!
love the way it came out!! can you please send a picture of the valances on the door side? I am curious what you did above the door?
thank you!
We didn’t put a valance over the door, Christina. I didn’t want to deal with it getting caught in the door every time we went in and out of the camper. 😉 If you look here, you can see where the valance ends at the doorway.
ok perfect thank you!! love your blog btw!! keep ’em coming!
I finished putting our bunkend curtains in our camper yesterday. They look great! I don’t have a sewing machine so I purchased panels at Target and used the rings (had to hand sew) and command hooks. I am going to redo the window curtains that I put up when we got the camper with the same method. It will make it so much easier to wash them at the the end of the season! Next is the floor! I have some left over vinyl plank peel and stick flooring that looks like bamboo. I think it will look great in the camper! Keep the inspiration coming! I look forward to each new post!
Can’t wait to see your camper Mary! Make sure to send me pictures or post it on the Facebook page. 😉
Ok, so…we bought this used Fleetwood Destiny and I’m trying to make it really cute and you are a great help! Here’s the problem. The screens have some holes that are patched with screen patches. It really looks tacky! I don’t want to replace the entire canvas cover or even the sides or ends. I tried using screen saver magnets but the ones I really need are about $12-$15 each!! Does anyone have a creative idea to disguise these patches? Thanks!!
Have you tried calling your local tent/awning repair shop? We have a fabulous local one that has fixed a couple of spots on our canvas. For $30 they completely repaired a torn section, and all we had to do was remove that section and bring it down to them. It’s totally worth a shot to see if you’ve got a similar repair shop in your area! Call your local RV dealer and see who they use for repairs. 🙂
Hi , great suggestions, we have been stuck for ages trying to solve teh problem of re-attching the original c clips to the new fabric curtains we have made.. with no luck.. Now we see your ingenious idea.. we have gone ahead and attached the command hooks to the c- clips.. this weekend we went camping and sadly all the curtains will not stay on the hooks.. the fabric I used for the curtains seems too stiff, that’s why they won’t hang and stay put? so I need to find some way of keeping the circular hooks on the curtains attached to the command hooks on the c-clips without glueing them so I can remove them for cleaning easily.. Anyone else have this problem? Any suggestions would be so very welcome
Thanks again for the great ideas..and inspiring pictures.. hope to do the valance next..
Diane
Hmmm… are you using the tiny Command Clips, Diane? A few rings slip off the hooks when we pop the camper down, but that’s about it. We never have them come off the clips when we are set up. In fact, it’s a tight fit to get them on, and they fit really snugly. Do you have pictures of your system? 🙂
(If I missed this info somewhere, please pardon me!) Would you tell me the dimensions of the mesh fabric at the top of the bed curtains? We are in the process of replacing our curtains, which do not have this material. I definitely wan to add it to the curtains we put in. Thanks so much for the FABULOUS tutorials!!
From the top of the panel to the end of the mesh measures 10 inches, Autumn. The actual mesh part is about 8 inches tall, though. Don’t forget to add about an inch for seam allowances. 😉
Thank you so much! Hope your trip is epic!!
Hi Larissa,
I love your website it is extremely helpful in our new to us pop up camper, which is a 2001 Coleman Santa Fe. We are now in the process of doing a little remodeling and were wondering if you know the length of the big window that sits in front of the galley and dining area? We are making curtains and hoped you new the correct measurements for that window. Again thanks for putting together this website it is so helpful, especially because we are new to pop up camping.
Thanks,
Diane
Yay! Congrats on the new camper–and a Santa Fe, too. I love my Santa Fe! I don’t have the dimensions of the big window right now, as the camper is all folded up in the garage. I can tell you that I made three curtain panels to span the length of the window. Those panels measured 51″ wide by about 45″ long. Does that help? 🙂
Thank you so much for all of this helpful info and fabulous inspiration!!
In regard to the valance: Is the elastic necessary or could you gather the valance and then sew it to the glide tape? On your photo I can see the clips but not the glide tape, not sure I understand how you sewed it all together. Our original clips are on the old stretched out elastic. Any help is very appreciated.
Our clips were on the old elastic, too, Dawn. I didn’t gather my valance, because I did not want to try to pull the gathering threads on 15 feet of valance and risk one breaking. I made a casing and threaded elastic through it to gather my valances, but you can do it however is easiest for you. There is no one right way. The glide tape is a clear plastic “tape” that has the clips attached to it. If you look closely in the pictures above, you can see it on the valance. Hope that helps! 🙂
Great points. Wish me luck!
I have another question re valances, Larissa, that I’m hoping you can clarify. Correct me if I’m wrong, but it sounds like you threaded the elastic in the casing and THEN sewed the clear ‘tape’ on. My seamstress, aka my mom, and I are wondering if you stretched the material out when sewing the ‘tape’ on the casing?? Please advise. LOVE your ideas!
I did not stretch the material out. I wanted the material gathered but not the glide tape. Hope that helps. 🙂
let me say I am obsessed with your blog! my husband and I just bought our first camper it’s a 99 coleman utah. I have been inspired to redo the curtians now and in fact the whole camper. the bad part is I don’t own a sewing machine or have the experience to use one.I do fairly well sewing by hand though. but are there any no sew methods I could use? thank you so much for all your inspiration! !
Hi, Paige! Welcome to the addicting world of pop up campers! 😉 I featured a remodel by Kathleen at Life With 4 Boys awhile back. You can find her remodel here. She didn’t sew either, and used seam tape to finish her curtains. You might just want to check that out.
Larissa,
Thank you for the help on the curtains. I actually made a pair for our other camper and then when I had to make them for the second camper I forgot how I did it. One thing I can add on the valances. We are only borrowing our camper so I did not want to put alot of money into the valances. I found a print at Walmart of a single flat sheet and was able to cut 4 strips that are just a little short of the length I need and I added a small trim at the bottom. I used the glides from the old valances. So my valances actually on cost about $5.
My question. Our camper had been left out in a field for about 2 years. It is in amazingly good shape but the moths got to the curtains. I just added new black out over the old blackout to keep the light from showing through the moth holes. However, I found some small holes in the canvas as well. My thought was to put clear duct tape over them. (Here in NC we use duct tape for everything..Lol) But I haven’t done it yet so I wanted to check and see you you or anyone has a better idea.
Thanks
What about a patch kit, Donna? They sell them for canvas tenting and vinyl. 🙂
I seen this post and skimmed through it and when I went to do my curtains in my Santa Fe I remembered seeing the little command hooks in a post somewhere. So I came back to pintrest and searched and searched until I found your post and thanks to your brilliant idea I have done the same thing. Although I should have read it all so I would know how you attached the curtains. Drapery loops or whatever. Simply brilliant. Thanks
Has anyone tried the curtain clips? I am really struggling to sew the glide tape down. I have broken way to many needles and my stitching is all over the place trying to stitch around the clips. Should I buy clips? Cut off the tape and attach the clips, glue the tape down, or cry because I’ve spent so much time and money making curtains I love and can’t get them up. I have ten days left before my camping trip. May have bitten off more than I can chew buying this rockwood and trying to make it over in less than 4 weeks. 😬. Any advice would be fantastic. I am really hoping not to buy c clips. Thank you!!
We just purchased a 1967 Starcraft. Randomly saw it when I went a different way to work one day. It just so happens that it was purchased new by my grandfathers brother and his wife in 1967. I now also have the original bill of sale. I guess it was ment to be at our house. I have started to fix it up inside. I took store bought Thrift store curtains, cut them down to size and used the remainder fabric to make a wall of pockets for storage.It needs paint to lighten it up a bit. I do how ever need a new canvas and can not seem to find anyone who sells them. Any suggestions?
Have you tried Bear Creek Canvas or Canvas Replacements, Micky? They should have what you need.
Thank you. Love your site.
I am trying to decide what type of fabric to use for my new curtains. Are you happy with your curtain fabric? How wrinkly is you fabric when you pop up your camper? Thanks!!
Hi Larissa, I need an answer tona question and thought since so !many people see your site, I might find an answer here. My hubby and I are remodeling our 2000 Coleman. We are even rearranging the sitting area by taking out a cabinet and the table. However, there is a cord under one of the booths near a bunk and without tearing out the panek we have no idea what it goes too.
Can you or anyone help us out on this?
Ok so I followed your original post and made new curtains. But everytime I try to attach the command hooks to the plastic sliders they don’t stick because they are a little bit rounded. Any suggestions how else I can hang them? I have a 95 Coleman fleetwood.
Did you try using the plastic epoxy, Christine? The Command adhesive never worked very well for me, but the plastic epoxy hasn’t budged! 😀
Hi,
I have no experience making curtains and also have a Santa Fe. Would the “lining cut” dimensions be close to the final curtain size? I will purchase pre-made curtains cut down (hopefully only the vertical axis-length) and attach RVDESIGNER A114 Snap Tape to attach to PUP.
so if you have 3 equal panels on the starboard side (Kitchen) that are 49″ wide(lining width) that would indicate 147 inches of curtain panels,
I assume that curtains should be wider than the window for atheistics and to prevent gaps between panels. The Santa Fe’s window is 89 inches with 3 inches of canvas on each end before meeting the transverse netted bed panels. But, I don’t believe the tracks extend much past the vinyl window
Did you make yours wider than the original curtains?
I hope my questions are clear, I am in a brand new world for me….I have no idea how a 1 1/4″ “double fold hem” effects the final dimension. Double sounds like 2 1/2 on each side for 5 total…? making the fabric cut of 55 1/4 a final of 50 1/4——5/8 an inch wider (each side) than the lining…and that is where my head started to really hurt.
I have found 40×63 panels that Ms Connie(I am retired–she isn’t) has approved for color and texture, but I don’t think I can handle altering both length and width.. and putting 4 panels seams really wide—160 inches to cover a 89 inch window.
Any feed back would be a god send…thanks
LOL! It might be easier if I just posted a picture of the measurements we used for our curtains. Hope this helps! 😉
My husband and I just recently purchased a 1994 Palomino Colt. This is my first pop-up and we only paid $500. We are super excited, but there is a lot to learn!! There have been no leaks, according to the owner, but it did condensate some during the winter. Because of this, there are some mildew stains on the canvas.. I would love to add some cute curtains, but the current curtains are attached to the canvas. There are no “tracks” or clips to attach any curtains, just the attached canvas curtains (and they aren’t really curtains). Since I’m new, I don’t know if this is normal, or if I’m missing something.
That sounds odd, Tiffany. I’ve never heard of curtains being attached to the canvas, but I don’t have much experience with Palomino campers. Do you have a picture?
So we bought a 1987 Viking pop up. It does not have a curtain track. The curtains are attached and hang over the windows. To put them up, you roll and tie them. I am not sure how to get rid of them without just cutting them out and I don’t know how I can do that so it looks nice. Also, it is canvas all the way up. Nothing is hard until literally the roof so I am unsure where we would attach that. Any ideas or suggestions?
Congrats on the new camper, Abby! Now the fun begins!
Are the curtains attached to the canvas? I’ve never seen one like this before. Most of the curtains are attached to the ceiling of the camper. 🙂
Yes. They just literally hang at the top of the window and get rolled up and tied if you don’t want them down.
Can you cover them with a cute fabric? I’m guessing they aren’t removable, but you might be able to use a fabric glue of some sort to cover them with a panel of cute fabric. 😉
Hi Larissa, I have a question about the pieces that go on the track of the original curtains. Not sure what they are called. Maybe C clips. You replaced yours with command hooks. I read somewhere that they can be sewn in. I am wondering if you use a particular needle or what since the material is so hard. Any advice is appreciated. Thank you.
Originally, I attempted to sew the c-clips back on my new curtains by hand, but it was so difficult. I used a thick upholstery needle, but I found that I needed to drill the holes in the c-clips a little larger to accommodate that needle. After about two clips, I realized I couldn’t do this anymore, so that’s when I adopted the Command hook/drapery ring method. Best of luck if you decide to go for it. You’re a braver woman than I am, Donna! 😀
Thanks Larissa. Not brave here either. Years ago I had made some for another camper and for the life of me I do not remember how I attached the C Clips. And your site was not around so I never looked for an alternative. When I made them this time I used the idea that someone posted about the little clips from Ikea. They work perfect except that when I go to open or close the curtains it is not all that simple because the edge get caught in the tract. I am short so for me doing that stretch, is a stretch. lol So I am not brave or patient or tall.
So I thought I thought since I had so many I could see just how people were sewing them in as I didn’t see how it could be done. OH MY…. as I am writing this I just remembered how I did it!!!! I took them so a guy that sews upholstery/canvas/boat. Wow! so I guess that may help someone else if they ask. That was 10 years ago and it came to me as I was writing you. I guess journaling is a good thing. SOOO
Just another little tidbit. I saw someone asking about sewing in the glide tape on the valances. I made my double width as you and my machine broke so I saw someone else on your page suggested using a staple to attach them. Did it and it worked like a charm. Because of the pattern you can’t see them and I still get the bit of ruffle.
Hi Larissa, I am in process of sewing curtains for our Jayco pop-up. I am using decorator fabric (cotton duck) in 46 width with blackout liner. I am following the original curtain dimensions because of costs. My husband noted they are much heavier and sturdier than the original curtains and wonder if they will interfere with closing the pop up fully. And that got me to wondering, do your curtains wrinkle a great deal after being closed down in the camper? I will be using your hook and ring method to hang all but the bunk end curtains. Do they pop off the hooks in the closing and opening up of the camper? I am already committed since I have 5 of the 11 curtains already sewn (they are so cute!) But want to be forewarned if any of these issues come up. Thanks for all your information and help. Your pics are so inspirational!
We don’t keep the curtains up when the camper is being stored. I’m a little OCD like that, and I take them down, fold them up and store them. That’s just me. It’s not really necessary, as we keep them on while we are traveling between stops on our summer road trip. The camper closes just fine. They will be a bit wrinkled when we open up the camper, but the wrinkles fall out within a few hours. 🙂
We just brought home a Coleman 2001 Sedona tonight and I’m excited to get started. I have taken a ton of before pictures and it started to scrub down some of the inside vinyl. Getting ready to measure for curtains, and the duck cloth that I bought on sale at Joanns last week is in the dryer for new cushion covers. First though we need to scrub, scrub, scrub! Our first camping trip is in week!
Thanks so much for all the info you’ve posted on making new curtains. We too neede the 3/4″ C-clips that are impossible to find. Looking at many sites this seems to be a common problem. After much research we found the 3/4 clips with the hole in them that fit perfect on our 3/4″ Coleman curtain track. They are “JR Products Snap In Curtain Carriers” part #81455. There is a fabric tape with snaps (part #81005) that you easily sew onto the curtain and then snap it into the clips on the track. Makes it easy to remove for washing too. They are both on Amazon and our local Rv store could order them even cheaper. With all the people searching I thought this information might be helpful.
Thank you! Coincidentally, we just discovered these as well, Michelle! I’ve updated the post to reflect that, but they are available on Amazon here or through Canvas Replacements. They seem to be a great alternative to those expensive C-Clips. 🙂
Michelle, Did you try these with the snap strips? How did it work?
I originally made my curtains using a tension rod, but it’s not working. I was ready to go with Larissa’s method, but this might even be a bit easier
Hi Larissa,
I am new to the pop up camper world, but by no means less entusiastic about it. We just bought our “new” 1983 pop up camper and I was thrilled about it until I took a better look at it and found out the whole thing should be taken down and rebuild so to speak. Initially I thought it just need a few canvas, ours is in really bad shape, so I figured $900 for canvas plus $900 for the camper wasn’t so bad. Now we found more complicated issues like the whole top is rotten and some of the interior too due to water damage and that is a bit more challenge for a DIY. Do you have any suggestions and ideas for a DIY canvas replacement? I think the $900 I was willing to spend on it will have to go for all the other structural issues so I don’t have the budget for the new canvas…..
I appreciate any advice.
Thanks you!
Bummer! Sorry to hear about your camper. That stinks! 🙁 I haven’t heard of anyone that has successfully replaced their canvas on their own. It is a big project, Lais, and not many people are willing to undertake it. You could always clean and patch it up until you’ve got the budget for a new canvas.
Thank you for all of this great info! We have a 1998 Coleman Fleetwood that we bought in 2011. The valances have been long gone as they were all stretched out and I hated looking at them sagging. Unfortunately, this is the second time that MICE have gotten into our pop-up and made a mess. YUCK. I wanted to cry and spend $10,000 on a newer hybrid. But, that’s not happening. This time, the mice decided the curtains looked tasty. I didn’t love them anyway but I was not willing to tackle this project unless I had to…and now I do! I bought room-darkening curtains at Walmart that I need to hem. However, I cut the fabric strip with the C-clips off of the old curtains and was planning to sew it onto the new curtain. I’m not a seamstress or very crafty but that sounds like it should work, don’t you think?
Yup, Anna! You should be just fine. Several readers have done the same thing with great results! 😀
Larissa, I am so grateful for your website! I just bought a pup and am obsessed with your FB page and website.
I am indecisive about whether or not to keep the webbing at the top of the panels on the beds . I’ve seen the amazing remodels with just curtain panels which I love that look. Wondering if you have found the need for that extra ventilation
Thank you, Tammy! We don’t close our bunkend curtains that often, so we could probably do without the mesh. If you sleep with the curtains closed, though, you may want to keep that. 😀
Larissa, I love your blog! I have a 1991 Jayco. We had Bear Creek make a custom canvas for us and it was worth every penny! We had a local RV place replace it while doing maintenance. They even said it was the best fitting replacement they had ever seen.
I managed to salvage some of the curtain tabs (which looked more like a “T” clip. I used tiny buttons to replace the many damaged ones. I also refitted curtains that I purchased on sale that had the black-out lining. They were heavier duty and far less expensive than even sewing my own. Now I’m trying to come up with an idea to put at the end of the tracks to stop my curtains from sliding out. I also had a valance tacked to the roof and have some rust spots with obvious holes. Any suggestions on how to fill and paint these? Your remodel has inspired me to build onto my existing dinette seating to make a bit more sitting room and bigger step getting into the bunk! Thanks for such great info!
I have a 1996 Coleman Santa Fe that we bought new. It is time to refurbish it and I am gathering ideas. In looking at your curtain instructions, I was wondering how wide your duck cloth fabric was and how you figured your fabric needed. Just to clarify–did you put glide tape on the curtains AND the valances?
I’m pretty sure I bought about 15 yards of the green duck cloth. It has been so long, I don’t remember exactly. I did initial measurements and only bought about 6 yards, but ended up going back and buying the rest of the bolt because I didn’t have enough and didn’t want to run out again. I have a little bit left over, but not more than a yard or so. I didn’t put the glide tape on the curtains. If you look in the pictures above, you can see that I attached rings to the curtains. The rings hang on the c-clips that are attached to the track. They do sell glide tape that fits the curtain track, though, so if you’d rather go that route, you can use the link above to see what size glide tape to buy. Hope that helps. 🙂
Oh my goodness…I was looking at t-trim this morning and trying to decide on that. I’m looking at some photos on your site and at pop-up portal and all of a sudden it hit me. The fabric you picked for your valances is what I selected for our cushions and our valances. My husband laughed when I said I must have been more influenced by your remodel than I realized.
We picked up the fabric at loomcraft’s fabric outlet in Burlington, NC a couple of weeks ago.
Great minds think alike, Elizabeth! I can’t wait to see it. 😉
I love all your ideas!! We have a 1998 Coleman Santa Fe that we are starting to remodel this weekend. I can’t wait!!! Your site has inspired us so much!! Thank you for all the great detail on every aspect!! Happy Camping!!
This was very helpful, we just bought our first pop up and I am intimidated about the curtains but this is very helpful.
So glad you have so many details on your post i’m heading out tomorrow to buy fabric. I’m excited because to date we have been rebuilding the storage trunk and that hasn’t been too fun! Now for the cute fun stuff! Thanks so much!
Hi again Larissa,
I just recovered our seat cushions and bought the curtain fabric too. I was going to pull the old curtains off but noticed they have a stapled “stopper” at each end. Do you just take those off? I’m afraid to damage it.
I also purchased the valance glide tape you recommended (thank you!) but I’m not a huge fan of valances in general. Do you think I could use the valance track and glide tape for the curtains? The curtains will be just a bit higher to hide the ac wires etc. Do you think they will hold the weight? Will the glide tape allow the curtains to gather or should I cut it into pieces?
One last question, I’m adding two inches of width to each curtain and was going to six inches of length (enough to cover the aluminum tracks). Is this too ambitious? I’m afraid the curtains will get caught when closing the camper.
Thanks for everything, I’ve completed 5 of your recommended mods, and just getting started. I will send pics when she is done!
Fellow Santa Fe camper
We removed the stopper from each end, Carolina. You just have to be very careful when stapling it back on. The plastic track might be a little brittle. I considered leaving the valance off of our camper, but I realized that there was no valance track on the bunkends. The valance is attached with Velcro over the beds, so if you skip the valance and use the track for curtains, you’ll have no way to hang bunkend curtains. If you use the curtain track on the bunkend sides and the valance track on the sides of the camper, your curtains will be hung at different heights. If you use the curtain tracks all the way around and leave the valance off, you’ll have exposed valance tracks on the sides of the camper. 🙁 And that is the reason I went ahead and added valances.
If you are adding extra length and width to the curtains, just be mindful of how thick your fabric is. Extra bulk adds up, and if you plan to leave mattress toppers or bedding on the camper, you’ll want to make sure the curtains aren’t too bulky. I made our curtain panels a little bit longer and wider, and I like it, but we can’t close the camper with the bedding on the beds. We have to remove it.
Can’t wait to see your camper! Take lots of pictures! 😀
Hi Larissa,
I am anxious to get started on new curtains and cushion covers for our Coleman Utah camper. I have been sewing for decades but nothing as intimidating as cushion covers so this should be interesting. When looking at your curtains I see that you still have the mesh at the top but you also talked about making them longer and wider. Did you purchase new mesh and if so, where did you find it?
Thanks so much!
We reused the mesh from the original curtains, Lisa. It was still in great condition, so I just carefully cut it away from the old curtain and attached it to the new panels. 🙂
Hi Larissa,
For your curtain tie backs you made did they attach to the “wall”? I’m trying to think of a non-tacky way of making a tie-back for the bunk end curtains and either have them attach to the curtain themselves or the side of the camper when the curtains are being used.
Thank you so much!
There is a loop sewn into the canvas, Trish, and that is where the tie-backs attach. Do you have loops near your windows?
Hi, Larissa!
I just discovered your blog earlier this week, and love all the photos, tutorials, and informative tips! My hubby and I just bought a 2006 Santa Fe yesterday. It’s in excellent condition. So, we won’t be doing a complete reno right away. We want to become more familiar with it as well. However, we decided that the curtains, valance, and dinette cushions DO need a makeover, and I hope to be able to get it done before our camping trip next week. I enjoy sewing, but know that fabric can get pretty pricey, even with discounts, and this is A LOT of sewing to do right before our trip. So, I’m opting to replace some of the curtains with some black-out curtains we have on hand, to cut down on buying extra fabric. We’ve been storing them for years in our linen closet and they are still in immaculate condition. I’m still figuring out what to do with the privacy curtains and valances, as well as the cushions. I think I’ll be still making a trip to the fabric store in the next few days. One question I do have is: do the valances HAVE to be ruffled? Does the extra fabric serve a purpose? I was thinking of going with cleaner lines and not scrunching them up so much, which would also cut down on the need for extra fabric. We have the two-rail system like you do, so going without valances would show the valance rail; hence, not an option. Any thoughts?
Thanks in advance!
Anya
Anya, the valances don’t have to be ruffled. I just found that the gathering hides the bunched up curtains when they are open. It is totally a personal preference. Good luck with the remodel! 😀
I am updating the curtains in my pop up. I was able to detach the glide strips from the original fabric, but I don’t think they can endure being sewn onto my new curtains without ripping. Do you have any suggestions for how else I can attach it to my new curtains? Some of the curtains are cotton and the others are upholstery material.
I have heard of people just cutting a small square of fabric around each tab and sewing the individual tabs on that way, Kathy. If that seems too daunting, you could always purchase new glide tape.
This might seem like a silly question, but where did you find your clear Command Hooks that you used? And how small are they? I have looked around here, and did find clear command hooks, but they are rather large, and kind of pricey! The ones I have found are about $8 for 6 hooks, and at that rate, with all the hooks that it will take, I would be spending way too much for just the hooks! There must be a better place, lol! Thanks!
We bought ours on Amazon (here) and they were about $7 for 40. Much better price. 🙂
Hi there!
I love this website and the ideas and inspiration you share here!
I have made new curtains for my beloved popup out of pre-made blackout curtains purchased at Walmart. I thought it would be so much easier and in some ways has been…however, they are quite stiff and using the ring and hook system they tend to pop right off the little command hooks. I have used the tiny rubber bands as well and while some stay put, others still pop off. Does anyone have any genius ideas on how to ensure the rings can’t pop up and off of the hooks? I am at the end of my rope and out of ideas! Help please?
Hello PUP Community!
Does anyone have any advice on sewing the glide tape with clips onto a gathered valance? My wife is really nervous about this step and thinks that it can’t be done. She’s not a confident sewer so any advice that you have will be greatly appreciated. I really want to help her anyway that I can’t to get her success so if you could share your process, that would be wonderful.
Thanks and wish her luck!
Darren
You can always buy the glide tape with the removable tabs. Sew the tape in place, then reattach the tabs. If that isn’t an option, remember to use a thinner presser foot (like a zipper foot) and just go slowly. You can always use a basting stitch first so it is easier to remove mistakes. Good luck!
Hello Larissa, thanks so much for blogging about your pop up re-do. I am getting ready to re-do our valances and curtains and I was wondering how your curtains have held up since you did your re-do, and, if there are any changes you would make now after having used them since the re-do?
I love, love, love our curtains, Tina! They have held up beautifully. I know that some people don’t love how easily they can come off the glider tabs, but I like taking my down in between trips, so I don’t mind. I wrap little clear hair elastics around the hooks and rings to hold them in place when we are on a road trip. Works out wonderfully! 😀
Hi! I love your tutorial and am using it as a guideline to redo our curtains in our PUP (they were clearly from the 90’s) and I had a question about sewing the drapery rings on. I’m very familiar with machine sewing, but my abilities are pretty limited with hand sewing. Do you have any instructions or links on how to hand sew the drapery rings? I found a few youtube tutorials on roman curtain panels involving the drapery rings, but I don’t trust the technique to hold heavy canvas curtains. Any guidance would be amazing! Thank you so much!
I used the button setting on my machine to sew mine on, Jill. It worked great. 🙂
Hi, beautiful camper! I just icked up a 1995 Palamino Colt. It has no privacy curtains at bed ends. Just valences that seem to be streched on an elastic strip and hooked to each end. It apears someone used small u shaped staples and stapled the sagging areas up. I am assuming I need to put some kind of curtain tracking up. Any suggestions? Thanks so much for any help.
If you have a Coleman camper, you can often find replacement parts at Coleman Pop Up Parts. If you have any other manufacturer, try contacting them directly (or even an RV dealership) to see if you can order replacement parts.
I have an 8′ Jayco pop-up, which no longer has curtains, but all of the track and a few curtain tabs are still in place… I’m making curtains for it, but I’m unsure of how many tabs to use and what the spacing should be. I’m thinking I might need to buy more tabs. I can’t find any info on the spacing between tabs on any of the DIY sites. Any advice? Thanks! I love what you’ve done with your camper. It’s gorgeous!
That is kind of personal preference. My tabs are about 3″ apart, but I really don’t like a lot of gapping when the curtains are open. You could space them wider if you are short on tabs. 😉
My aunt just gifted me her old PUP from the early 90s, and a little Pinterest exploring brought me to your site! I have a curtain question- are the privacy curtains at the bunkends necessary? We have 4 kids and since they will all be sharing the beds when we sleep in the PUP (although I think we will be doing some tent sleeping as well) no one is going to need a privacy curtain. When I redo the curtains I don’t want to have to replace those if I’m not going to need them! Thank you!
Nope. They aren’t necessary. We sometimes use them when someone needs to change inside the camper, or if one of the kids wants to sleep longer. On our last trip we left them home and didn’t miss them.
Thank you so much for all your postings and tutorials! We had been looking for our pup for ages (at least 5 years) we were tent campers 1st. We happened upon a 1994 coleman pioneer for a great price 😉 & have had a really fun time with the improvements. Your posts have inspired me so much. I was terrified to sew new items for the pup, but since the fabric kind of disintegrated upon gentle washing. (The AZ sun is brutal!) It was needed. Now I have made my own cushions and curtains! Wow! Now on to the valances! Thanks for the support and encouragement!
Just bought a 1997 Santa Fe! Total PUP virgins! Experienced sewist however and excited to change the cushion covers and curtains. About the valence. Is it necessary? Does it serve some
Purpose other than cosmetic?!
I think it is just cosmetic… at least on an ABS roof like our Santa Fe. On our new Rockwood, it covers the seam between the ceiling and the sides of the roof. We decided to leave the valance off the Rockwood and just add a lightweight trim to cover the seam. 🙂
I’m not a big fan of our valence and just want some cleaner lines, but don’t want a big strip of staples Velcro showing or the camper seams. What light weight trim did you use to cover the seam? Did you just Velcro it?
We just used some cheap cove molding from Home Depot. We were rebuilding the roof anyway, so it made sense. You can see that post HERE.
https://www.amazon.com/gp/product/B004LF6VIA/ref=ppx_yo_dt_b_asin_title_o00_s00?ie=UTF8&psc=1
Do you think these would be a suitable replacement for the C Clip?
Those don’t work in the later Coleman tracks. I have tried. 🙁 In my experience, these clips are the only ones that fit, Bethany. You need to buy the snap tape (which attaches to the curtain) for them, though.
I adapted this idea to make curtains for my Jayco 1987 trailer. I use the Jayco sliding tabs which I got off eBay, then sanded them and used epoxy to attach command hooks. Now I’m sewing little rings to the curtains that will fit in the hooks. 20 down 40 more to go whew! I am normally not a do-it-yourself person but this is working out okay.
Instead of glueing the command hooks and using the curtain rings, could I put velcro on the existing c clips and on the back of the valances/curtains? Or do you not think it will hold?
You could certainly try it. I find that if the curtains get tugged on too hard, they will pop off the rings unless I secure them with a clear hair elastic. I would think the Velcro would present a similar dilemma, but you never know! 😉
If I buy curtains from Walmart. Will they work?
Lots of campers buy premade curtains and cut them to length. Shouldn’t be a problem, Andrea. 🙂