 We’ve updated this post! If you want to see more information about our camper curtains and valances, please see part two of our camper curtain post, which you can find HERE.
When we first got our pop up camper, it was definitely showing its age. Although everything was technically in fairly good condition, it was dated and tired looking. We wanted to give the whole thing a major facelift, but we were also on a budget. Early on, I decided that the curtains were in nice enough condition that we could reuse them once they had been given a good washing.
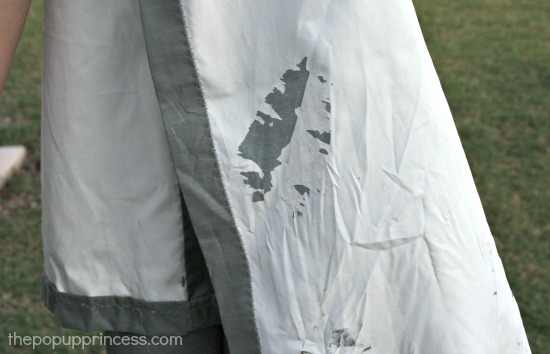
The curtains weren’t fabulous, but they weren’t awful. They had a plastic black out liner that would keep the heat and sunlight at bay, and the color would coordinate nicely with the scheme I had planned. I put the curtains in my washing machine and set the cycle to delicate with cold water. I even used Woolite, so as to be extra gentle. While I was setting them out to dry, I noticed that all the curtains that had faced a vinyl window were melted and had come apart in the wash.
The old curtains were obviously unusable now, so it looked like I was going to have to break out that sewing machine. Since I was having to make the curtains from scratch, I decided I was going to make a few changes. I didn’t like how difficult the curtains were to remove. I don’t think the old curtains had ever been removed, and hence never washed. I knew I would want to give the pop up camper a good cleaning a couple of times a year, and that would involve washing the curtains. The new curtains not only had to be durable, but they also had to be easy to remove. I had seen this post from Peg’s Gotta Do, and it was my inspiration. I knew I wanted to do something very similar to allow me to remove my curtains easily as well.
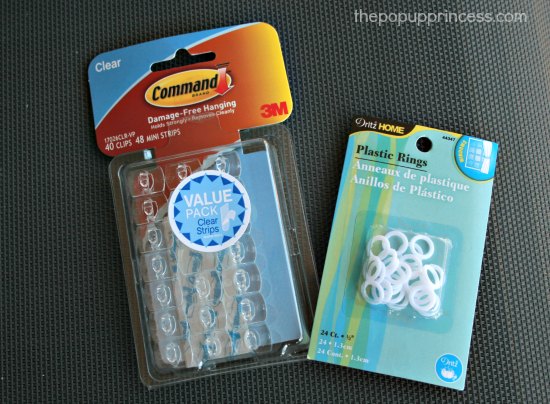
Unlike Peg, I didn’t want to put grommets in my curtains. I wanted the hooks to be hidden, so I decided to purchase drapery rings from my local JoAnn Fabrics. I sewed them to the backs of my curtain panels where Peg put her grommets. Then I clipped off the original curtain c-clip sliders from the old curtains and attached these mini Command Hooks to the sliders. I learned early on that the Command Hooks stuck better if I sanded the sliders with 400 grit sandpaper first and them wiped them down with alcohol. If you are short on sliders, Coleman Pop Up Parts has a great selection of curtain accessories, however, I have recently learned that their price on these c-clips has more than tripled since we bought ours. If anyone has a great idea on how to hang the curtains without the c-clip sliders, I’m all ears. 🙂
UPDATE: I’ve found that these carrier clips match the original Coleman track pretty well. You can snap them in to RV curtain glide tape, which you can sew on the back of your curtains. If you’ve been looking for those pricey and hard-to-find Coleman c-clips, this may be your answer. They are available on Amazon here or through Canvas Replacements.
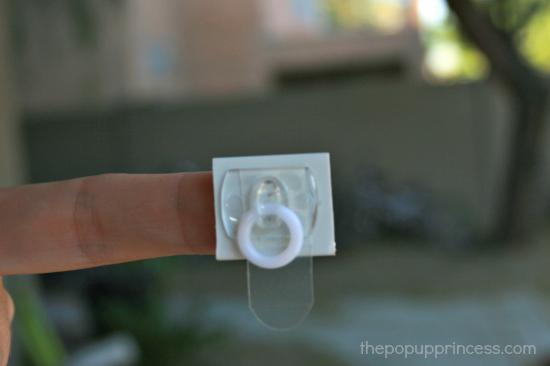
This is how the curtain rings fit on the Command Hooks. As a side note… after two weeks of camping and kids pulling curtains open and shut, the Command Hooks haven’t held up. I’m going to remove the adhesive and use Gorilla Glue or something similar to permanently attach the hooks. If your camper isn’t going to see a whole lot of abuse from kids, you may be fine using the Command adhesive. ***Update! I ended up having to use a new adhesive to attach the Command hooks. If you want to see how I did that, you can check part two of our curtain series HERE.***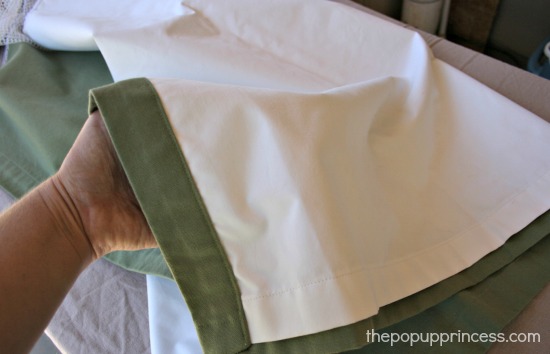
To make the actual curtain panels, I used this awesome tutorial from Craftsy. I pretty much followed it to the letter. It’s a fabulous tutorial, and I never once ran into a problem using it. For the fabric, I was lucky enough to find some heavy duty sage green drapery fabric at our local upholstery store for $2.50/yard. It was an absolute steal. I used a Hobby Lobby coupon to buy black out liner. I think I ended up purchasing about 15 yards of each and had some fabric left over.
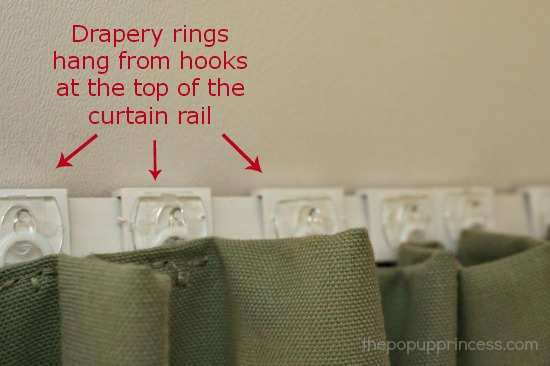
Once the curtain panels were finished, I sewed the plastic drapery rings to the back of each panel. Although the stitching is visible from the front, it blends in nicely when you aren’t up close. You can hardly tell it’s there, and the valance covers it as well. I love how easy it is to remove the curtains for washing.
I also reused the mesh panels at the tops of the privacy curtains for the bunk ends. I simply cut very close to the original stitching so that I could use as much of the panel as possible. Once all the mesh panels were removed, I squared them up and made sure they were all the same size. A word to the wise… the mesh material stretches, so make sure you pin everything before you sew. If you have a walking foot, that helps as well. 🙂
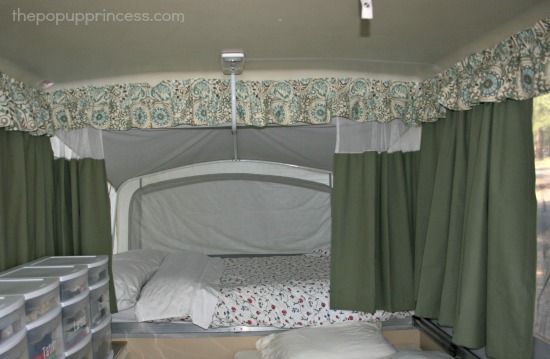
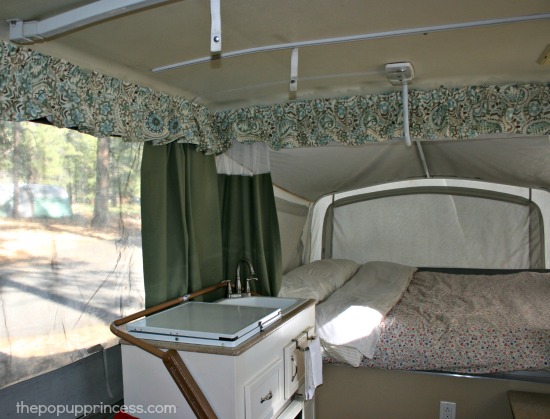
While the curtains were quick and easy, the valance took a little more work. I had, at first, decided on a flat panel, ungathered valance. I made one and decided I didn’t care for it. When the curtains were open, the bulk of the panels made the valance stick out funny. So I went back to work, making a slightly gathered valance for the top. I liked the look of this valance much better.
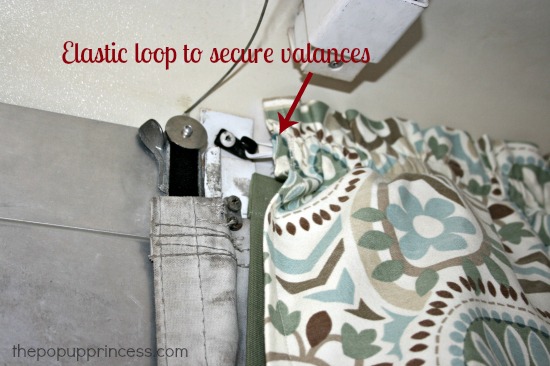
![]() To attach the valance to the plastic railing, I used this glide tape. It was pretty difficult to work with, and I highly recommend pinning it in place and using a zipper foot. This was by far the most difficult part of the entire project, but once the glide tape was sewn into place, it worked like a dream. To keep the old valance in place, there were button holes sewn into the ends which then attached to black hooks at the end of each curtain rail. I didn’t want to mess with button holes, so I used a very thin elastic to sew a loop on each end of the valance.
To attach the valance to the plastic railing, I used this glide tape. It was pretty difficult to work with, and I highly recommend pinning it in place and using a zipper foot. This was by far the most difficult part of the entire project, but once the glide tape was sewn into place, it worked like a dream. To keep the old valance in place, there were button holes sewn into the ends which then attached to black hooks at the end of each curtain rail. I didn’t want to mess with button holes, so I used a very thin elastic to sew a loop on each end of the valance.
It actually works much better than the original method with the button holes. The elastic stretches a bit and allows me to pull the valance as tight as I want it. I was very happy with the way it turned out.
That’s it! The curtains and valances were actually very easy to make, just a little time consuming. Like I said, the hardest part was that dang glide tape. I love the way the curtains make the camper feel like a little home away from home. I intended to make curtain tie-backs that matched the valance, but I ran out of time before we left on our trip. As it was, I was sewing at midnight the night before we left. And it turns out, we didn’t need them anyway. The camper curtains ended up being closed a good portion of the time to keep the heat out. That black out liner worked wonders.
So far, we’re pretty pleased with how things are turning out. Many of the projects we were unsure about have turned out wonderfully. If you’re dreading those dang curtains like I was, you may be pleasantly surprised at just how easy they can be! And if you’ve already tackled curtains for your pop up, I’d love to see them. I’m sure many of you have some great ideas to share.
Happy Camping!
Disclaimer: This post contains Amazon affiliate links. The Pop Up Princess is a participant in the Amazon Services LLC Associates Program, an affiliate advertising program designed to provide a means for sites to earn advertising fees by advertising and linking to Amazon.com. This means that if you choose to purchase an item from a link in this post, The Pop Up Princess earns a small advertising fee to help pay for future projects and posts… so thank you! ![]()
Happy Camping!





I just found your blog and really think it’s great!! We to have bought a Santa Fe and I love your ideas! Random question is there a fuse box on the Santa Fe?? We think one may be blown but even reading the Manual we can’t find it.
Amber, I had to consult Mr. TypeTwoFun on the fuse box. He says there is a breaker underneath the dinette where the converter is. You might check the Pop Up Portal forums for more information on your issue. I’ve found that forum to be a lifesaver in more than one situation. 🙂
we have a 92 starcraft pop up and would really like some help or ideas with the curtains and valances. the ones that came with it where dirty and in some bad shap. to replace them with the same are around $500. thats pricy as to i got the camper for $500. i would like to here some of your ideas to help me and my wife out with this. thank you. kenny
Wow, Kenny! That is pricey for curtains. Can you salvage the tabs from the existing curtains? I know lots of people have used premade curtain panels from Target or Wal-Mart, cut them to the right size, and hemmed the cut edges. Do you or your wife sew? If so, that might be the best option for you. If you don’t sew, you can always use hemming tape like Kathleen at Life With Four Boys did. I featured her camper makeover here. She has some great ideas. You can also use tablecloths or shower curtains. Sometimes premade panels and curtains are cheaper than buying fabric and doing it yourself, which is what I did. Best of luck on your makeover! I’d love to see what you do with it! 😀
HI, this website is great! Just got an 20year old pop-up handed down to us and looking for great ideas to modernize it. The curtains are my first thing and wanted to know if you have a preference to fabric type for curtains in a pop-up? I was thinking of buying store bought and cutting to my needs but not sure if I should look for a fabric with a plastic lining, or black-out so not see through, or does it even matter? Any advise on type of fabrics to use for curtains would be helpful. thx!
The fabric type doesn’t really matter. The camper will close a little easier if you go with a thinner fabric, but you’ll want to make sure you get something lined. Blackout lining not only helps keep the heat at bay, it also gives you a little more privacy at night. You don’t want to inadvertently give the other campers a show through your windows at night. 😉
Ikea also has great fun fabrics for curtains at a good price. I got my fabric at Fabric.com because they had a much larger selection.
Where did you get the fabric for your valances? It would go well in our camper too 🙂
We got the valance fabric at JoAnn Fabrics, Randi. We used a 50% off coupon (watch for them!) and the fabric wasn’t too bad. It was way too expensive to make curtains for the entire camper, so we just added that pop of color on the valance. The fabric is called Waverly Paisley Prism in Latte. You can find it here. Hope that helps!
You can also get the actual curtains @ Wayfair. I have them in my dining room & kitchen lol.
I love your blog…we have a Coleman Mesa pop-up…it is huge! It of course needs lots of TLC to make it more comfy, but I am not married to a “TypeTwoFun” guy, so we will probably not tackle as many projects as you have! It would be fun to see a “gallery” of pictures of your finished project…interiors from both ends, so to speak!!
Thanks, Penny. We are planning to do a gallery once we’ve got the camper finished. I’m trying to work up the courage to tackle the cushions on the dinette. They are so intimidating! 🙂
Larissa, Sailrite.com has some great tutorials for how to do box cushions and pillows. Check it out it’s worth watching. You can also catch them on YouTube.com. I have used their tutorials many, many times. Good Luck!
I have that same type of husband. We just bought a 99 Coleman Bayside camper and following this Blog has given mean great ideas that I was able to use myself. I painted all the cabinets myself I’m going to try and tackle the floor I’m not taking out the cabinets because I know I won’t be able to get them back in the right way. Even if it’s little make over it’s still an impovement
What kind of paint did you use on the cabinets?
Larissa, I am getting ready to tackle the curtain project. Thanks for the tip on the flat valance. I wanted to do that until I read your comments. How are the curtains holding up with the way you have them attached? I can easily reattach the clips to the valance but the curtains it might be a bit trickier. How did you sew the rings onto the curtains? Can you attach a picture of the backside of it? After the curtains I am going to attack the cushions. I found some great You Tube videos that show some simple techniques on making cushion covers. Once I watched those I felt more confident that I could make them too.
Christina,
The curtains themselves are holding up well. We have already washed them and they look great. The slider tabs on the curtain rail are a different story. The Command adhesive doesn’t hold well, and they are constantly popping off. I plan on attaching the hooks with epoxy when I pop the camper up next. I’m sure that’ll fix the problem. I love how easy the curtains are to remove and wash, and I don’t want to lose that flexibility. I just used a button stitch on my machine to sew the rings on.
I’d love to see pictures of your camper when it is all finished! I love to see pop up remodels. I’ll report back on how that epoxy holds up! 😀
Larissa, I loved this curtain project and am very happy with the way my curtains turned out. Thanks to your warning, I was able to secure the hooks to my curtain tabs and they are staying put. The problem that I am having is that the loops keep coming off the hooks whenever I need to open or close the curtains. This is a pain in the neck, since I have to keep putting them back on the hooks. I just ordered new tabs and plan to just sew them to the curtains like the original curtains were hung. I used a little heavier fabric, and lined them with black out lining so they were heavier than the originals, so I am thinking that is the problem. I am open to any other suggestions. DW
I’m also curious how the epoxy will hold up. I made new curtains for my pop-up as well and ended up hand stitching the tabs directly to the fabric, which was difficult and time consuming. They look ok…but I need to make more. I love the idea of the drapery tabs and the 3m hooks, i wonder if a super glue would work well.
i would like to be able to take my curtains out of the camper for the winter for when we store it so the mice don’t get them.
Stephanie, that project is still on my to-do list. It’s been so hot in AZ, I haven’t wanted to pop up the camper to fix the Command hooks. I took the curtains out to wash them, though, and found a handful of plastic hooks. I just don’t think the adhesive is strong enough for my curtains. I love the system, though, so I’m willing to try to make it work with epoxy. I will be sure to report back how that holds up.
We have Velcro on ours. Did you have Velcro on your originals. I think I may just leave mine up. Thoughts?
Mona, we have Velcro on the valances just above the bunkends, but nowhere else. Where is the Velcro on your curtains?
We purchased a used pop up in May. I have been working on new curtains for what feels like FOREVER (2 weeks). I have the curtains finished and up, now I’m working on the valance (at first I didn’t plan on replacing the valance, but it needs it). I had planned to use velcro (states “industrial strength” on the package) to hold them onto the metal strip the original ones were on. This morning I made a small panel to go right above the door. I put the velcro on the strip and the other on the material, attached together… 3 hours later I opened the door and there it was, on the floor. I’m thinking the small strip isn’t enough for the sticky to adhere to and stay. I saw you mentioned using velcro on some of your project. What kind did you use? Do you think the 1/2 or less strip is too small to maintain a good surface to hold?
I saw the Glide tape suggested, but if I purchase enough to go around the whole camper, it would be $60+ and I was hoping to not spend that much. I’m doing my valance straight instead of gathered. Do you think I could purchase 2 strips of glide tape and space them throughout and it would still work?
I appreciate your thoughts and any other suggestions as well.
I used industrial Velcro from Home Depot, Gina. We’ve found that the adhesive works much better. There are spots where the previous owner stapled the Velcro to the ceiling, though, and that has held pretty well. That might be an option for you as well.
I’m not sure about the glide tape. I find that it is already pretty well spaced, and unless you’ve got something to hold the valance tightly at the ends, you might have some sagging if you space the clips any further apart. Can you use the original valance glides?
We have a Santa Fe aa well. Love seeing your pics. Looks great.
Thanks, Sandy. I was initially thinking the Santa Fe would be too small, but I really love it. It’s just enough room.
Hi Larissa,
We bought a Rockwood a week ago and not stopped working on it. My hubby (love, love, love), daughter (princess) and myself..I can’t wait to the curtain and cushion part of the reno….I will be heading to Joann Fabrics, for curtain ideas..Our popup has a lip, that I believe requires special hooks. I have to try the Coleman site you gave earlier. I would love to show you our before and after, it’s only been a week but the changes are incredible…Hubby has been working on the electrical and water sealing it. Have you painted the outside of yours? Thanks for your input..
Alice, That’s awesome! I would LOVE to see your before and after pictures. Send me an e-mail! 🙂
You might also check eBay for the curtain tabs you need. I was unable to find a few things at Coleman Pop Up Parts. I have used eBay with good results. We have not painted the outside yet, but it is on our list. The front and back ABS panels are cracked, so we need to repair those first.
Can’t wait to see your pictures!
Hi Larrisa,
I made a trip to Joann Fabrics and I found the little plastic rings, but nothing that I can use…I don’t know if you and I have the same system, mine has a lip. My daughter wanted a Red, White and Blue theme. We found the fabric for the bench seat and back, so I’ll be covering the cushions soon. We are thinking of Mod Podge for the tabletop, what do you think? I’m getting quotes to replace the complete canvas, but it’s expensive and no one local. I would appreciate your ideas…
Alice, The best place for canvas is Bear Creek Canvas, although I hear they take their time. We didn’t have to replace our canvas, but several people I know have used Bear Creek. I hear the quality can’t be beat. Canvas is pricey anywhere you go, but I think their prices are pretty fair.
As far as Modge Podge for the table… What are you covering the table with? Maps? Stickers? Photos? I’d use something like Parks Super Glaze or an epoxy resin. It will be much more durable. Good luck! 🙂
Hi Larissa,
The table top is done, we covered it with craft wrapping paper and then added an anchor vinyl decal and added 3 coats of polyurethane. We haven’t used it yet, it should be fine..My daughter just painted the table legs, hopefully tomorrow they will be reattached…She also bought the wood vinyl floor planks, that I think will make the biggest change..We are in Florida so we still have a little time for the temperature to drop a bit.
Can’t wait to see it! Be sure to send pictures! 🙂 thepopupprincess@gmail.com
Alice, try Fabrics.com as their prices are so much better than JoAnn’s and their selection is HUGE! You can even purchase swatches to see what works better for you. I did that and then used the swatch in a quilt for the camper. Waste not, want not.
Hi again,
You said you bought 15 yards..How many panels did you make and how long were they? I think I don’t have enough fabric, I bought 10 yards…I may have to make the bunk ends a coordinating fabric..
Alice, all my panels were different widths because I made them from a pattern of the old curtains. They were all 46-inches long, though. I initially bought 6 yards, thinking it would be more than enough… I had to go back for more fabric. Luckily, it was still there when I went back. I bought extra just to be sure. I’ve seen several campers with coordinating bunk end curtains, though. I think it looks really nice.
Hi Larissa,
Your Santa Fe is really an inspiration! We just purchased a Sea Pine a couple weeks ago and so far I’ve yanked out the curtains and am going to spend the winter sewing new ones. I have a quick question about the black out liner. You said you purchased it at Hobby Lobby? Our HL does not carry fabric, so I am thinking about sourcing it online. This is the one I’m considering, but I’m unsure about the thickness/quality: https://www.fabric.com/buy/uj-160/roc-lon-blackout-drapery-lining-white Am hoping you or one of the readers of the blog has any experience with this particular product?? Thanks!
Thanks, Carina! And congrats to you on your new Sea Pine. I can’t wait to see what you do with it! They are so much fun.
I checked out the link you suggested, and that looks like exactly the blackout liner we used in our camper. I’m really happy with it. It blocks the light and heat well, but it isn’t too heavy. I’ve actually already washed the curtains, and it held up beautifully. I would definitely use it again. Keep me posted on your progress! I’d love to see pictures.
Hi Larissa,
Do you have a tutorial or post on how to make the gathered valance?
I love your blog.
Thanks!!
I don’t, April. I really just eye-balled it. I took the length of each side of the camper (i.e. one long end was 10 feet) and multiplied it by 1 1/2. So on that 10 foot section, the valance was 15 feet long. Then I sewed a casing in the back of the valance and ran elastic through it to gather it. I could have used a gathering stitch, but that was a LONG section, and if any of the threads broke, I’d have to start over. This seemed like the easiest way. It really depends on how full you want your valance. I didn’t want mine too full. Just enough to hide the bulk of the curtain panels, so I was conservative with my length. I think the height of the valances was 10 inches, and then I hemmed each side with a 3/4 inch hem. I’d have to pull out the camper to be positive, but again, it is a matter of preference here, too. Hope that helps a bit.
Hi, Larissa,
You commented that you used Roc-Lon Blackout Drapery Lining when making your curtains and you have successfully washed them. Fabric.com states that the lining material should be dry cleaned. How did you wash and dry your curtains? Thanks for the terrific site and tutorials! You give a wealth of information and great pictures! Peggy
Peggy, I wash mine on a gentle cycle in the washing machine. Then I hang them to dry. I’ve never had any issues with them at all. 🙂
Sailrite.com makes an excellent black out fabric and it’s where I’m purchasing mine. Others I have tried just don’t work as well.
HI
JUST FOUND THIS BLOG THROUGH PINTEREST – I LOVE IT! WE’VE JUST GOT RID OF OUR CAMPER AND BROUGHT A TRAILER TENT WHICH WE ARE PICKING UP IN A COUPLE OF DAYS. OUR FRIENDS WHO WE CAMP WITH HAVE GOT A MASSIVE ONE SO KNOW THE TASK AHEAD! I HOPE I CAN TRANSLATE SOME OF YOUR U.S PRODUCTS INTO U.K PRODUCTS AND TRY SOME OF THE MAKEOVERS.
WISH ME LUCK!
JO
How fun, Joanne! You’ll have to keep me posted on how it goes. I would love to see a pop up camper makeover from across the pond. 😉
Hi Larissa,
Have you popped your camper back up and re-done the command hooks yet on the curtains? My camper has the same tabs…we tried stick on Velcro tabs first, because I too, wanted to be able to remove the curtains…the adhesive wasn’t good enough for longer than a day, as soon as someone pulled the curtains one would fall. Now I had my husband drill small holes like a button on each one and I sewed my curtains to them for temporary purposes. I’m about to re-do the curtains and sew my own (we used cheap store bought sheers just for last summer) and I’m still looking for another way…but I may just stick to the method we are currently using, since I’ll be able to cover with the valences.
Thanks!
We haven’t, yet, Tara. I think that will be a project for this weekend. So far, many of the Command hooks are holding, so I’ve only had to put a new piece of adhesive on here and there. It hasn’t become too much of a bother yet, so I’ve put it off. 😉
After more thinking yesterday I think I’m actually going to attach snaps to the tabs. Our camper “canvas” is made of vinyl material that’s held together by Velcro, and its in excellent shape but the Velcro was worn toward the bottom of each attached section, letting out our cold air in the really hot part of the day, so I bought an industrial snap kit yesterday, and it turned out amazing without having to remove the entire canvas. Then I was in bed last night and it popped into my head, about how quick I can attached snaps to the curtains and the tabs, for a very secure hold!
We bought a Sante Fe last weekend and I am SO excited to get in there and freshen things up. Thank you for this tutorial. I am a lot let intimidated by the project now and I love the idea of snaps for curtains so please let me know how that works!
Abbey
Abbey, I’m so excited for you! You’ll have to send me pictures of your makeover. I can’t wait to see what you do! 😀
HI Larissa, I’m going through Pintrest as I take a road trip with the Hubby from TX to MD ☺. I miss working on Betsy, we have a trip planned for March 20th, so I’m sure we’ll work on a few finishes, like attach the 1/4 round moulding around the flooring, so I’m making lots of lists, lol..Looking forward to getting back…. Are you planning anything for spring break?
I have my valence cut out, just need to attach them, I wasn’t going to add a valence, that seems so 80’s, lol
But I want to cover up as much of my canvas as possible. I’m going add the elastic, like you did ☺. Talk to you soon.
Alice! Nice to hear from you again. We have a small trip planned for Spring Break, but nothing major. My kids actually have too many activities for us to take time out and camp. I can’t wait for summer… (sigh)
Glad everything is going well on Betsy. I can’t wait to see what she looks like with all her finishing touches. I still want those pictures! 😉
Great site, we just bought a 92 Coleman pop up that needs a few updates so I appreciate your site, especially the pictures for the curtains. Thank you.
Thanks, David. I’m glad you found it helpful! 🙂
We just got a 95 Coleman Pioneer and I am super excited to remodel my camper. Your site is so helpful! Considering there isn’t many sites like this one. Thanks!! I appreciate all that you do. 🙂
Thanks, April! It’s sure been fun, and you’re right! There aren’t many pop up camper related websites around. Be sure to send me pictures of your remodel! I’d love to see it! 🙂
Hi Larissa!
Thank you. Your site is amazing and I am inspired each time I read it and see what everyone is doing with their Pop-ups. The curtains are perplexing! I hope to see what epoxy you try and how well it works…. I spent almost two hours sewing the original clips on… One panel!
Thanks, Katie! I originally tried sewing a few of the tabs back on the panels. An hour in, I knew I had to find a different solution. 😉
Hi! We have a ’99 Bayside and unfortunately, our camper didn’t come with any curtains, so I am having trouble finding the clips for the curtains (the glider will work find for making new valances). Any suggestions? I figured you have done so much research, maybe you know something I don’t! Thanks!
Elizabeth, we used our old curtain clips, but we were still a few short. We ordered some extra curtain c-clips from Coleman Pop Up Parts, and you can find those here. BUT… I will say that the price has gone up quite a bit from when we ordered our curtain clips. When we ordered our c-clips, a 10-pack was $4.95. Last I checked, they were $17.95 for 10. 🙁 We would never have had the money for that in our remodel budget. I have heard of people using a small button instead. Find a button size that slides easily in the curtain track and sew small buttons every couple of inches to the top of your curtain panel. I think I sewed my drapery rings about 6″ apart, which would probably work just fine for the buttons. I’m a little bummed that the curtain clips have gotten so expensive, so if you decide to go the button route (or find another method that works well), please come back here and let me know! And, of course, I’d love to see pictures.
Thanks, Larissa! I did find those and they are crazy expensive, even if I only decide to do privacy curtains. I’m brainstorming other ideas, but definitely having difficult coming up with a good (and inexpensive) idea.
On a side note, do you have a tute or link to one for the valances? Thanks!
Hey, Elizabeth! I just saw this on the Pop Up Portal. It may work for you. The clips would be covered by the valance anyway, so you won’t even see them.
I don’t have a tutorial for the valances, but I’ll see if I can take some pictures of them this week sometime. They are super easy to put together.
Whoot! I think that may work, and no worries on the valances. I just like the gathered look of yours, but have never done gathered valances. THANK YOU so much for the link! I have been scouring popupportal but hadn’t seen that 🙂
Yup! I just realized that the buttons won’t work for the Coleman curtain tracks. What a bummer! Hopefully that other idea works out.
For the valances, I cut my fabric about 1.5 times the length of the track. So on my 60″ sides, I cut the valance 90″ in length. I think the width was right around 10″ when cut, 8″ when hemmed. If I can pull out the camper this weekend, I’ll try to get pictures. It’s in pieces as we speak, because one of our projects didn’t go quite as planned. 😉
AWESOME share on these IKEA clips! You are a life saver, Larissa! You rock!
Oh! Did you try the Ikea clips, Andrea? I wanna see pictures!!! 😀
This looks great. We just bought a 1999 Sea Pine with a similar original color scheme. Our original green curtains are in great shape, so I just need to replace the valence and tiebacks and recover the cushions on the dinette and little sofa area. How many yards of fabric did you need for the valence and tie-backs? I love the Waverly fabric you chose!
Your yardage will most definitely be different from mine, Paige. It really depends on if you are doing a straight valance or a gathered one, how tall your valance will be, and how wide your fabric is. I can’t recall the exact amount I used on the valances, but I know that I had about 7 yards cut. I used it on other projects as well, though. Have you picked out your fabric yet? If you are going to JoAnn or Hobby Lobby, don’t forget those coupons! 😉
Ok, last quick question. Did you sew the glide tape flat onto the curtains, and then bunched them (because you used extra material) to make them gathered? Or were the curtains themselves gathered? Does that even make sense? Thanks 🙂
I gathered the valances first by making a casing and threading elastic through it. Then I sewed the glide tape on. The gathers on the front of the valance are a little flat from the stitching, but I didn’t really mind. For me, this ensures that if my elastic starts to get old and stretch out, my gathers (and valances) won’t sag. To each his own, and everyone does it a little differently, but that was my way of thinking. Use a zipper foot on the glide tape and go slowly. It’s kind of a pain in the butt. 😛
I gathered the valances first by making a casing and threading elastic through it. Then I sewed the glide tape on. The gathers on the front of the valance are a little flat from the stitching, but I didn’t really mind. For me, this ensures that if my elastic starts to get old and stretch out, my gathers (and valances) won’t sag. To each his own, and everyone does it a little differently, but that was my way of thinking. Use a zipper foot on the glide tape and go slowly. It’s kind of a pain in the butt. 😛
Do you have any tips for Removing the curtains to wash them? The plastic things that run along the track don’t seem to want to come off…
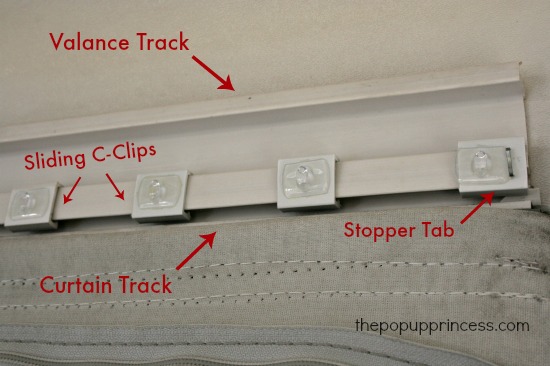
Kaela, our track had a stopper at each end. We had to remove the stoppers and slide the curtains off the end of the track. In our camper the “stopper” ended up being just a curtain slider stapled to the track. I know others have had screws or something similar. Either way, the curtains should slide right off the track once you’ve removed whatever stopper you have on the ends. I wouldn’t try pulling the clips off the track. You’re liable to break a clip or the track that way.
To Larissa and Kaela; (or anyone else who can help)
I too have been wanting to wash the curtains in our 92 Coleman Chesapeake. My problem is that the tracks above the bunks stretch WALL to WALL (literally) with no stoppers in the design. We can not see any exposed screws in order to lower the track; and Hubby is not one for… “disassembling the whole camper just for a lousy curtain”… either. Fortunately they are not stained, or even have a bad odor. It’s just that we’ve had the popup for about 6 years now and well it’s just time to show them a little LOVE. I think they are permanently wrinkled and won’t meet in the middle anymore. It’s just Hubby and I so I pull them down to cover our end and pin them together at night; which then causes them to be “short-sheeted” by about 8-10 inches at one end; over which I also have to pin up a coordinating fabric remnant…each night. That’s just on the long window panel that goes the full length from bunk to bunk; but the shorter window panel across from it has the same issue, just with a shorter remnant piece. SAD picture Huh?
Any ideas on how to clean them?
Also Larissa – I LOVE your C-clip; hook and ring idea. I would strongly encourage anyone to use the EPOXY substitute as well. That 3M adhesive would never hold up in our GEORGIA heat, but epoxy certainly would. Just yesterday; I have found those plastic “Nylon Camper Tabs” online at both campingworld.com and makariosrv.com for under $4 for a 14 pak. I also liked the idea of installing snap heads to these tabs for another easy on/off idea. Epoxy would work great for attaching the snap to the tabs. BOTH ideas would work great for re-mounting curtains….of course FIRST ya gotta get ’em off. hahaha
Any chance you could send me a picture of your track, Kim? I’m having trouble picturing it.
We just bought a new to us pop up so I have been reading and reading and reading your blog 🙂 which is amazing and inspiring by the way! One question…is there a purpose for the valance other than decorative? I removed all the curtains and valances to wash them and realized they are in need of repair. Thank you for your help and I’m looking forward to every post 😉
Thanks, Melisa! I think the valances are mostly decorative. For me, though, they help hide the hook system I use on my curtains. The Command hooks and drapery rings are visible from the top of the curtains, so the valances help hide that. Plus they add a little pop of color and pattern. I didn’t want my curtains to overwhelm the camper, since I was using colors and patterns on the cushions. The curtains are neutral, but the valances add interest. I’ve seen a lot of CUUUUTE pop up campers without valances, though. It’s really a matter of preference. 😀
Hi Larissa
We just bought a 1995 Coleman Fleetwood Chesapeake pop up and are just getting started on the interior remodel. My hubby “Mr. Neversaydie ” is tackling the woodwork of the cabinetry and I get to do the fluff. Lol
My question on the curtain yardage did your 15 yards include the blackout cloth or was that a separate yardage. If it was separate how much did you need?
Congrats, Gina! Pop Up Camper remodels are so much fun. I can’t wait to see what you do with your Chesapeake. 🙂
The yardage for the curtains did not include the blackout liner. Typically, you’ll need as many yards of blackout liner as you did fabric. I found the liner wasn’t all that expensive if I bought it at Hobby Lobby with a 40% off coupon. I think it ended up being around $2 per yard. Remember that your curtain yardage will vary depending on how wide and long you make your curtain panels and how many panels you actually have. My Santa Fe is only a 10 foot box, so it won’t have as much curtain as a bigger camper.
Just found your site and have to say, You Have Inspired Me! Love the ideas you have shared with the curtains. From the photo, saw the white cabinets…I have to do that! Thanks so much for sharing!!
Thanks, Janie! You can find the tutorial on painting the cabinets here. Good luck with your own makeover! I’d love to see pictures! 😉
I just bought curtain panels at Boscovs and hope to replace the curtains with them cut to length. We have a 1993 Colman pop up! How hard is it to sew the material to the tabs that Coleman originally used.
Well, the tabs we have are thick, solid plastic–and I’m pretty sure they are standard Coleman tabs. There is no sewing through those on with my machine–I’d break a needle every few seconds. I’ve heard of people drilling small holes in the tabs and then sewing them on by hand, but that seems like way too much work for me. I’m not much for sewing by hand. You might be able to take them to an awning or upholstery shop, though. They’ll have heavy duty machines that could do the work for you. 🙂
I’m hand sewing the original Coleman clips onto my new curtains. Use a small needle, as the holes in the clips aren’t very big. I’m also using pliers to pull the needle through when it gets tight. I’ve been sewing then on in the evening while watching tv, and I’m not finding it too bad. I’ve been getting faster – it takes me about 3 minutes/clip now. I’m glad our camper is small!
Wow, Tasha! You have more patience that I do! 😉
I’ve also heard of people using a small drill bit to make the holes a little bigger. Then they can use a slightly bigger needle.
My camper’s a lot smaller than yours, and I’m not making a new valance. So that helps! The window curtains had 28 clips between them, and there will be 52 on the bunk curtains. Small needle, pliers, and Netflix are the keys to success!
Hi Larissa! What a GIFT you are to find!! WOW! We just inherited an 02 Flagstaff wide body pop up and omgosh…in need of major help! Totally intimidated and don’t know WHERE to start.It smells of years of smoke, pet issues, curtains, upholstery, vinyl all need to go. We live in Orlando, where it’s SUPER hot so don’t want to begin this till it cools down at least ten degree’s…October! The canvas is in terrible shape too. Is it too old to spend the money on replacing canvas, or should we just patch it and enjoy what life there is left in it? Thank you sooo very much for your thoughts!!
I JUST BOUGHT A 1983 COLEMAN (1 SIDED) PUP. I WENT TO HANCOCK FABRICS TO BUY “PRETTY” MATERIAL TO COVER THE CUSHIONS, BUT THEN I FOUND YOUR WEBSITE AND MY MIND IS BLOWN!! NOW I NEED CURTAINS, ETC AND I THINK I AM GOING TO PAINT MINE WHITE INSIDE TOO.
THANKS FOR SHARING, LINDA
Hi Larissa
We have a Coleman Monterey which as far as I can see doesn’t have a curtain for the Dinette Window.
What does yours look like?. Where is the track for the curtain ?. The valance attaches with poppers and a grommet to the popout support but cant see where to hang the curtain. Thanks.
Berni
PS AWESOME website!!
We don’t have a pop out for the dinette, Berni. Our track runs along the ceiling, just like this picture shows.
I’m afraid I can’t be much help here. Have you tried asking on the Pop Up Portal forums? Maybe someone there would know. 😀
I saw a photo on The Portal which confirmed my suspicion. The rail I found in the garage after we dismantled the storage compartment is actually the missing rail and belongs on the dinette support pole. Just got to work out how to attach it.
Thanks.
Awesome site!! Thank you for taking the time to put this together.
We have a 2000 Jayco Eagle tent trailer and have had issues with mice over the winter. Unfortunately that means I now have to replace a privacy curtain and 2 side panels. Since I am in Ontario, Canada I will have lots of time over the winter to complete this project. I haven’t touched a sewing machine in years so I am slightly intimidated by this task.
The clip system on ours appears to be slightly different than yours as it is more of a glide system. I will be sure to send pics once completed 🙂
Keep up the good work on this site and looking forward to exploring it in more depth.
Thanks, Carol! I know the Jayco systems are different than the Colemans when it comes to curtains. Check out Amy’s Jayco makeover here to see how she tackled her curtain makeover. I can’t wait to see what you do with yours! 🙂
The only part of the curtains in our tent trailer that mice didn’t destroy was the part where the clips were attached. I am planning on hemming them so I just have a strip with the clips on them which will be attached to the trailer. I then plan to sew velcro strips to this material and sew the other side of the velcro to the new curtains I will be making. This way I can remove the curtains every fall. Has anyone tried this?
Do you know if these clips and this way of doing curtains will work on a 1980 something Starcraft? I can’t tell if your clip system is the same… I thought at first it looked it but the hubby is saying its different???
I’m not sure, Gina. Do you have a picture of your clips and track?
you know, I was the one who insisted he close up the camper when we got home from camping ;-O
I’ll ask nicely he open it back up and have pics some time this week…
They are back from the 1980’s … ancient thats all I know 😉
how do I leave a picture
also, can you put valances up if you don’t already have one? hubby says you can’t, you’d have to screw it into the frame or something?
ohhh and last question (at least for tonight)… What kind of paint would you use on the ceiling in one of these things?
I just read where someone uses small buttons instead of the clips, its cheaper to buy 75 for $4 or something like that… Would that hold?
See i fibbed… NOW that was my last question 🙂
Gina
I’m making curtains for my bunk ends and was wondering about the length of the mesh and the fabric above it that is attached to the clips. Can you suggest dimensions? Thanks!
Hey Larissa, what kind of thread did you use? It looks more heavy duty than regular thread?
I used a heavy duty thread on the curtains, Angela, because I was using heavy duck cloth. If you are using regular cotton fabric, you can use standard thread.
Hi Larissa,
Your blog has been a wealth of information for our new pop-up adventure. I’m just getting started on our window curtains, I too would like additional width and length. Was the 46″ you mentioned in an earlier response including your additional length? I don’t have the originals to use as a pattern.
Thanks,
Crissy
Hi Larissa! I’ve been stocking your site for the last couple of weeks because we were gifted a Coleman Santa Fe and it needs some updating! I’m hooked! I’m also in Phoenix. You said you got your curtain fabric at a local upholstery store. I’m looking for one that might have some clearance. Where did you go?
I went to Home Fabrics on Stapley & Baseline in Mesa. Sadly, they have closed down. I purchased my fabric when they were closing out the store. 🙁
Have you thought about checking out HomeGoods or Ross? They often have closeout prices on shower curtains and drapes, which are a good option for curtains and cushion covers. Check out JoAnn and Hobby Lobby, too. I love the outdoor fabric I used on my cushion fronts, and I got that at JoAnn with a coupon.
Excellent post! I’m in the process of redoing our camper and tentatively hung curtains but your solution is much more practical. I have a question about curtaining the area in front of the porta potty unit. I’d like a little privacy and I’ve clipped a long curtain along the door track to hand the curtain. This isn’t very easy to manipulate. Any ideas of how to hang a temporary sliding curtain that would block the potty unit.
What year/make is your camper, Jane? Our camper has snaps along the ceiling for a privacy curtain. I didn’t notice them for a few months, but they are meant to hold a curtain around the cassette potti. Does your camper have a similar system? If not, I’ve seen people use a tension shower curtain rod across the width of the camper. I’ve never tried that, so I’m not sure how well it would work, but it is an idea. 🙂
I wanted to suggest something for people not so gifted with handiness or sewing abilities. You can use industrial Velcro (cut into small squares) to hang all the curtains, you can use fabric glue for seams or iron on stitching for the material for the curtains. Removable & washable. 😊
Thanks, Dana. Good to know! 🙂
I’m really having a hard time finding the right fabric. At first I may have had too many criteria for what I wanted 🙂 but I’ve simplified a lot, choosing a common color and going solid, however, I’m still puzzled or maybe challenged in finding the right TYPE of fabric to use. You said you used duck cloth but without the fantastic deal you got ($2.50???!), it is expensive, even with coupons. I’ve looked at JoAnns, Hobby Lobby, Hancocks (local fabric store), and tried all the discount stores for blackout curtains. The latter option seems just as expensive. I REALLY don’t want to pay $10 a yard (with outdoor fabric being $30 or more! Even with a 50% off coupon that’s expensive!)
I’m wondering what type of fabric people have used.
The original curtains are certainly not as heavy as duck cloth or outdoor fabric. Maybe I’ll take an old curtain in with me and go back to the fabric stores to see what direction they may point me in! 🙂
Beth, are you planning on lining the curtains? I used duck cloth because I liked the weight of it, and it was super cheap. I probably didn’t need to line it because it is so heavy, but I love how it helps with the heat and privacy. If you are working with a small budget, you don’t have to use duck cloth–especially if you are using blackout lining. You can go with a lighter weight fabric. You could also use sheets or shower curtains. I would not recommend those options without a blackout lining, though. You’ll definitely have issues with privacy at night when it is dark and the lights in the camper are on. 😀
I priced out the blackout curtain panels, and I actually think they are a pretty cost effective way to go. You could probably get two curtains out of each panel, which is awesome. You can also check out Erin’s remodel here. She used shower curtains so she could stay within budget, and she was pleased with the results she got.
Thanks for your reply, Larissa. I wasn’t notified that you replied (hmmm), just happened across it while skimming through here again today.
After I commented I finally bought duck cloth. I got it from a local fabric store (Hancock Fabrics, I don’t think they’re a chain except for maybe in So CAL). It was a pretty good deal at 50-60% off (cant remember). I don’t plan to add liner since it’s fairly heavy, as you said.
I finally finished the valances – only 2 but it was complicated with pleats! I felt like such a dunce trying to pleat them and get them to end up the right width! I’m a beginner at sewing, but I finally figured it out.
I’ve decided I can hang the bunk end curtains with spring rods, just not sure yet which method I’ll use for the others.
Thank you!
I am working on curtains for a 95 rockwood. My old curtains use glide tape. Was wondering how the curtain books have worked? I would prefer something that’s easy to remove to wash, plus I am dreading sewing glide tape on all 10 panels. We bought the pop up two weeks ago and we leave in 10 days. I have so much work to do!!! Thanks for your help!! Looks like you got to enjoy my neck of the woods in Oregon. I hope you enjoyed it as much as we do!
Where did you get the faucet for your sink? Will it fit when it is folded over and closed without leaking?
We replaced the old, ugly faucet with a gorgeous brushed nickel bathroom faucet from Home Depot. You can read about that here, Beth. The neck of the faucet gets in the way of the galley handle when we tear down camp, but we just unscrew the neck and place it in the sink. It is a quick simple step, and I wouldn’t go back to that ugly, old faucet to save time. This one is so much easier to wash dishes with, too.
Hello,
I love your site. I have 1987 starflyer. I was lucky that the couple I bought it from had done a lot to fix it already. My future projects will be the flooring and curtains. Ive learned so much from you!
I tried entering for the giveaway but I messed up where I was suppose to leave a comment. I clicked enter by accident. I love the cup of joe cause I can’t do one thing in the morning without my coffee. I have keurig so Im really intrigued on how it works. I also love the lights. I definitely need new ones. Well, I hope this finds you and will qualify me for the giveaway.
Thanks for all you blog!
Glad you like the blog, Siobhan! I checked your entry, and it made it just fine. No worries! 😉
Hi here, I live in Qld Australia and I too am glamming up my pop top camper. I am enjoying looking through and reading about the improvements everyone has done to their campers and of course collecting ideas.
This is a little off topic but the van featured in this cute and easy diy curtain making has a ‘cabinet lifter’ for the sink and it is what I am looking for, for my van. Problem I don’t know what they are called, and have put so many different name variations into google with no results. Looked at hinges, lifts but nothing comes close. So please if anyone knows what they are called I’d appreciate the knowledge.
Keep sending in ideas everyone. I will send some of mine at the end of the revamp.
It’s called a swing galley here in the US. 🙂
Hi Larissa, thanks for the information, I can now continue my search armed with name. Hopefully will be able to find one here. Am just about to replace curtains also, so very informative read. Thanks again.
Hi! I’m looking to make the some curtains for our pop up this camping season. When I tried to click on the tutorial link for the panels from “Just Melissa” it doesn’t go to a site with a tutorial. Can you help me out or direct me to the site if it’s still up? I’ve made some novice curtains before-nothing fancy- but a tutorial with some more precise instructions would be helpful. Thanks!
It looks like that site is no longer running, Kayla. Here’s the exact same tutorial on another blog. I’ve updated the post to reflect this new tutorial. Hope that helps.
Curtain Panel Tutorial
Your website has been very inspiring to me, thank you! We recently replaced the roof and canvas on our pop -up. Of course we couldn’t stop there! I used a lot of the ideas from your website and recovered the cushions, painted the countertop and cabinets and we have a new floor!
Larissa – Help! I just finished sewing our dinette covers and now I’m moving on to the curtains. I bought Duck Canvas as well, and now that it is at home, I’m wondering if it is too stiff. Yours looks so much more moveable. I was planning to line it with blackout also, but now I’m in panic mode that it’ll all be too heavy. I’m thinking about washing the fabric, but then I’m really stuck with it. Any thoughts?
Hubby said that he would hand stitch the curtain clips from the old curtains onto the new ones while I did everything else. He thought he might just use a small drill bit to open up the holes there from the factory sewing machines beforehand. Can you see any major problems with this plan?
Our curtains are much heavier than the original ones, but I really like them that way. You may encounter a little difficulty closing up the camper with the heavier curtains if you have mattress toppers and leave your comforters and blankets on when you close up. We take the bedding off our beds if we are leaving the curtains up.
I attempted to drill out the holes on the c-clips and hand sew them in place. After about two clips, I knew I had to find another way. It’s rough going. If your hubby has the determination for it, go for it! 😉
This is a crazy idea, but would those plastic Christmas light hangers work for curtains that had the loop. We’re still saving up to buy ours (and may have enough in five years if we don’t have any kind of emergency), but I was thinking something like that, if someone was handy and creative, would work.
We just joined the pop up camper family with a 97 Jayco. I see that alot of people have curtains, but I did see one redo that used blinds atleast in the main area of the camper. Have you heard of anyone doing Roman shades? I wasn’t sure how the blinds or shades would do when closing up the camper if they would be in the way or not. I didn’t like the curtains being wrinkled. I can sew and made Roman shades in the past for a large picture window and I think I can make it so that I can take them down to be washed. What are yours or anyone else thoughts or ideas?
Awesome Idea, cant wait to glamp out our recently purchased older pop-up. Quick question… the one we got has badly stained canvas and I was thinking of painting it and came across this… https://www.amazon.com/Rust-Oleum-248919-Automotive-11-Ounce-Fabric/dp/B003CT4ASE/ref=sr_1_1?ie=UTF8&qid=1472952717&sr=8-1&keywords=rustoleum+fabric+and+vinyl. What do you think…?
I get asked almost daily if it is a good idea to paint your canvas, Lauren. I would not recommend it, and here is why. Your canvas was manufactured to repel water from the outside, while remaining breathable. Anytime you add paint, dye, etc. to your canvas, you are affecting its breathability. Condensation issues really become a problem on cool nights when it is warm inside your camper. When airflow is restricted, you’ll have condensation. Now, in the right conditions, condensation can be a problem for any pop up camper, but if you are inhibiting airflow, you’ll have issues much more often. Here is a great article on condensation from Outside Magazine.
Another reason I would not paint my canvas is that it needs to remain pliable to fold up properly. On cold mornings, our canvas and vinyl get a little stiff, and the camper is a bear to fold up. We have fewer issues on warm days when the canvas is more pliable. Adding any type of paint with stiffen the canvas and make it difficult to fold up. Additionally, canvas is expensive to replace–in the neighborhood of $900–so it is an expensive gamble. Why not try a cleaning product like Bass Pro Shops Mildew Cleaner instead? If you’d like to see it in action, check out this post from my friends at Campfire Travelers.
Hi, Thank you for sharing, recently we bought a Coleman Shenandoah 1996, not all curtain were there nor the Shower/Bathroom Assembly, we redid the cushions, and a makeshift shower area with PVC and regular curtain. I am now on to the CURTAINS. I found the “FABRIC” but I can’t seem to find black out fabric. Where did you purchase yours? I am still not sure how I am going to hang it but I may unstitch the old ones and hand stitch it to the curtain.
We bought our blackout fabric at Hobby Lobby, but it is available at JoAnn and Fabric.com as well. It’s called Roc-Lon Black Out Fabric.
Thank you for the link to the valance tape! I’ve been trying to figure out how to put one up since my PUP didn’t come with one. For the curtains I salvaged the clips from the originals.
Now I know what the little black hooks by the door are for. I’ve been trying to figure that one out for a month …
Hello! Thank you for all the helpful info. I am wanting to make some curtains too but a few people I have spoken with say they need to be flame retardant. Do you know if they do or where to find fabric if so?
Thanks again!
Dawn
I don’t know that they “need” to be flame retardant if you are making them yourself. I’m sure that manufacturers are held to different standards, though. Mine are plain cotton duck cloth, and not flame retardant in the least. 😉
hi there
I love what you did to your camper. we are travelling for a month and I would like to upgrade our tent trailer which we bough it used. do you have dimensions of the curtains so I don’t have to pup up the trailer (it is winter here and trailer is parked in the garage!).
Oh, man! Our camper is put away at the moment, and I don’t recall the exact dimensions. I do have a link here to a photo of my notes when I was making the curtains. It might be helpful for you, Shadi. Keep in might, though, that unless you have the same model as I do, the measurements will likely be meaningless. Best of luck! 🙂
thanks for the reply. I have one more question, where else I can but those things you used to hang the curtains.
The Command hooks, drapery rings, or Coleman c-clips, Shadi? Not sure which one you are referring to. 😉
I was just wondering how much glide tape you bought for your valance for the camper? My husband is also installing the digital thermometer. There are severa places on the back to connect the two wires. How doles he need to connect it?
I remember that we bought three packages of it, Katrina, but I don’t recall how much was in each package. Your mileage may vary, though, depending on the size of your camper. 🙂
Thanks!!!
Hey! I have a Coleman elite pop-up camper. I bought new curtains and have the original plastic sliding clips from the curtains. But how do you get those strips to connect to the curtains?
I did not attach the original plastic tabs to my curtains, Karla. I attached them to the track and added a clip. Then I sewed a ring on the curtains. The ring slides over the clip. If you want to attach the original plastic tabs to your curtain, you’ll either need to sew them on by hand or find a heavy duty sewing machine. Alternatively, you could cut the top strip (tabs included) off the original curtains, and sew that strip to the new curtains. If you do it right, you won’t even be able to see it. 🙂
Really dumb question….utter how do I even ge t my old curtains with c-clips attaché do OFF the track?? I don’t want to break them but cannot figure out just how to get the money off. Thanks!!
Our camper is a Coleman, and there was a stopper at the end of each track. We removed the stopper and just slid the clips off the end of each section of track.
Hi! I was hoping you can give me some advice. Our popup doesn’t have curtains so I have no tracks to use. I want to put up curtains and valance. Do you have and recommendations on a track system I could use?
Thanks!
Coleman Pop Up Parts carries curtain tracks, Mariam. You could try one from them. 🙂
POP UP CAMPER CURTAIN TRACKS
Hello
Did you hand see ever ring on individually?
Nope! I used the buttonhole setting on my machine. 🙂
Hello! We just got ourselves a 2000 Coleman Fleetwood I have made curtain panels from flat sheets, I have yet to tackle the valance, i don’t have the original clips ☹️ I was looking at the glide tape and it seems i would need like 7 to go all the way around the inside does that seem right to you?
Gosh, I can’t remember. It’s been so long… but I do remember making several trips to Camping World to pick up more glide tape. It did take quite a bit of it.