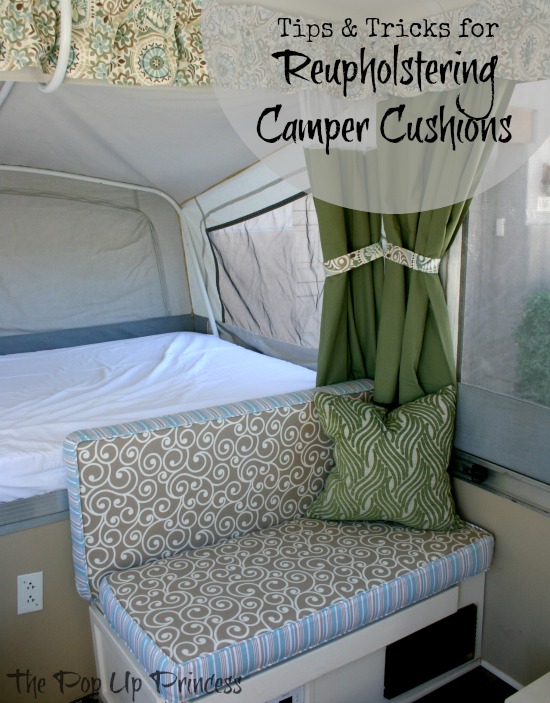
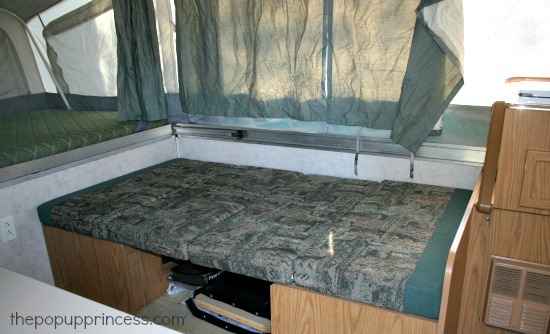
 If you’ve read this blog for very long, you’ll know that I have been wildly intimidated by the thought of reupholstering our camper cushions. I’m a decent seamstress, but cushions seemed to be a far more difficult project than I was ready for. I thought about leaving them the way they were, but this is what I was dealing with. Yuck, right?
When I was putting together a round up of my favorite pop up camper makeovers, I was really inspired. I wanted my camper to look every bit as nice as theirs did. I just knew something had to be done about the cushions, so I bit the bullet and started planning. Planning, for me anyway, always involves a few hours on Pinterest. I came across this awesome tutorial for sofa slipcovers, and it was my bible.
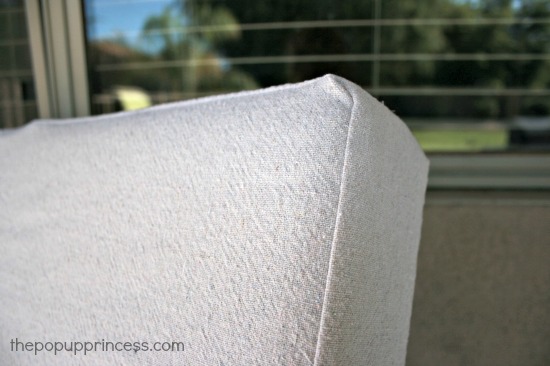
Before I even started shopping for fabric, I made a prototype out of a leftover drop cloth I had lying around. I wanted to make sure I knew exactly how the covers would fit and just how much fabric I would actually need. I considered skipping this step. I hate extra work, in fact, I seldom even baste when a pattern calls for it. I’m lazy like that… but I wanted to do things right this time around. I cannot stress enough how much help having a working example was. It really did make the whole process run more smoothly, because I made most of my mistakes on the prototype. We’ll get to those other mistakes a little later. 😉
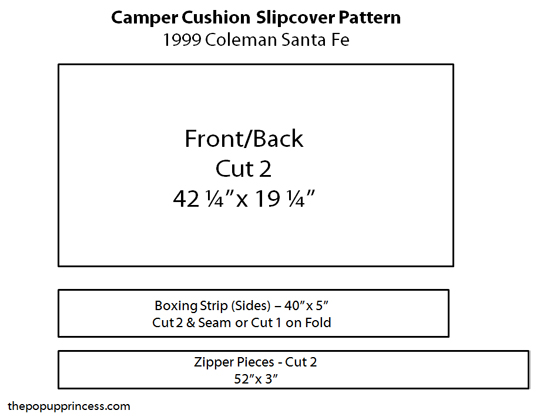
I made a pattern out of freezer paper, using the measurements of my cushion plus 1 1/2 inches for seam allowances. This made cutting out all of my pieces super simple, and if I needed to adjust anything, I could mark it on the pattern piece. If you have a Coleman camper with the same sized cushions, you should be able to use the pattern above to cut your pieces out. Once my prototype was made, I made minor adjustments to make the cover fit the way I wanted it to fit. The drop cloth version was a little baggy, but the fabric had some stretch to it. I only made minor adjustments because the fabric I purchased might not stretch. If I cut off too much fabric, and the covers were too tight, I couldn’t fix them. I could always make them a little tighter.
Armed with my new measurements, I went fabric shopping. I spent the better part of a morning hitting all the fabric stores in my area. I even went to a few upholstery shops. I had really fallen in love with this Better Homes and Gardens outdoor fabric from my local JoAnn, but only one of the stores near me had it in stock–and no more than 2 1/2 yards of it–and I needed 7. I kept searching, but at the end of the day, I really only wanted this print.
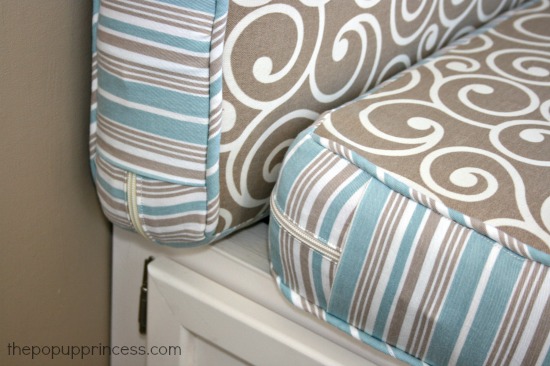
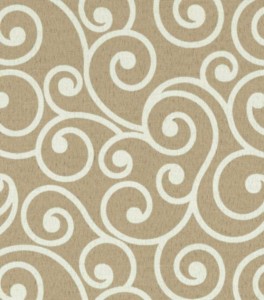 I went back to my local JoAnn, desperate to make this fabric work for me. When I stumbled upon a coordinating striped print, I knew I’d found my solution. I decided to mix and match my prints. For the side panels, I used Waverly Aran Spa, and for the back, I used a heavy duty brown duck cloth.
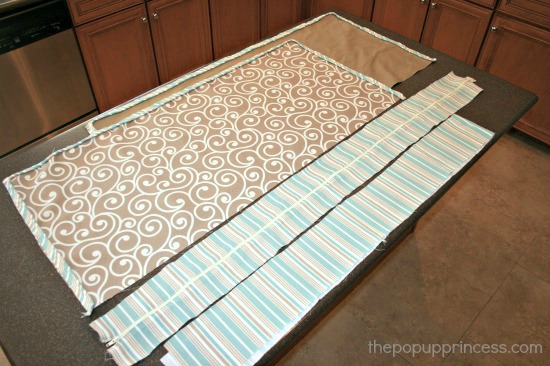
Here are all my pieces cut out. Installing the zipper was surprisingly easy when I followed this tutorial at Honeybear Lane. Because I wanted my zippers to wrap around the sides, I used 72″ upholstery zippers, which I cut to the size I needed. You can find them in the upholstery department at JoAnn or you can find them on Amazon here. I opted to make my own piping out of the striped fabric, and I really love how it turned out. I’ve made piping in the past for other projects, and it is amazing how easy it is–and so much cheaper than buying piping by the yard.
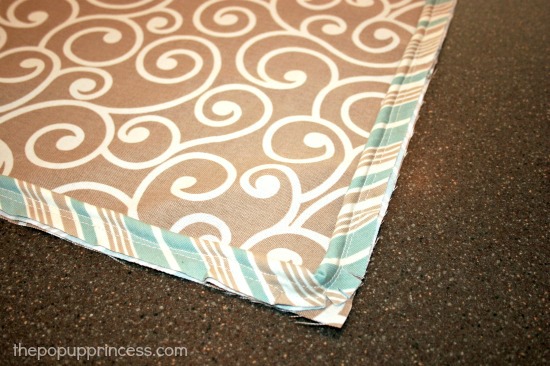 I followed the Honeybear Lane tutorial pretty closely. She does a fabulous job outlining all the steps, and I never felt confused or frustrated. I was a little shocked when I finished my first cover without a single mistake. Maybe this wasn’t so hard after all.
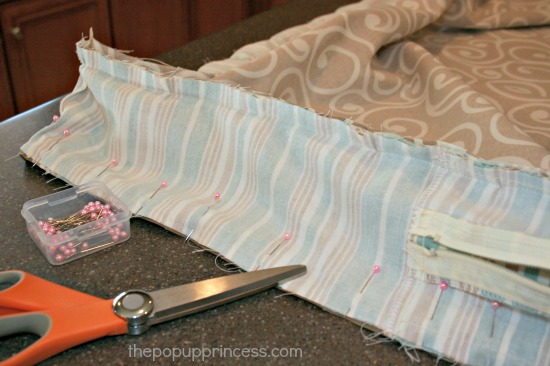 But, no! I spoke too soon. 🙁 Here’s where one of my major mistakes came in… I assumed that all my cushions were the same size because they looked the same size. The bottom cushions, however, are about 1 inch narrower than the top ones. I had three covers made before I discovered this, and I had to spend an entire morning picking out stitches and adjusting my pieces. Lesson learned? Measure all of your cushions… even if they look the same size. On the last cushion, I cut 1 inch off the long side of the front and back pieces, so the bottom cushion measurements were 41 1/4 x 19 1/4.
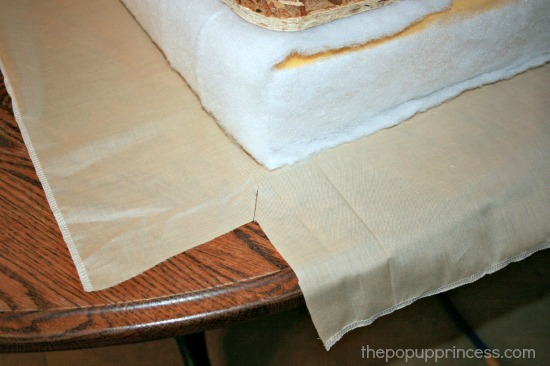 Because I wanted my cushions to be soft and full looking, and Coleman was pretty stingy with the foam in their cushions, I used some high loft batting to wrap the cushion foam. This helped fill out the cover and give it a nice, plush look. Batting is ridiculously hard to coax into the covers, though, so I wrapped the whole cushion in the cheapest fabric I could find to help it slide in smoothly.
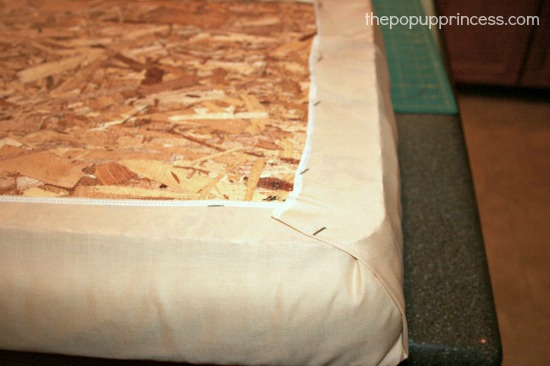
Then I pulled the fabric tight and stapled it to the particle wood backing. I love the thick duck cloth on the back of the cushion, because it is durable enough to withstand friction from the particle board. I feel like the other fabrics would have become snagged or torn easily. That particle board is rough stuff.
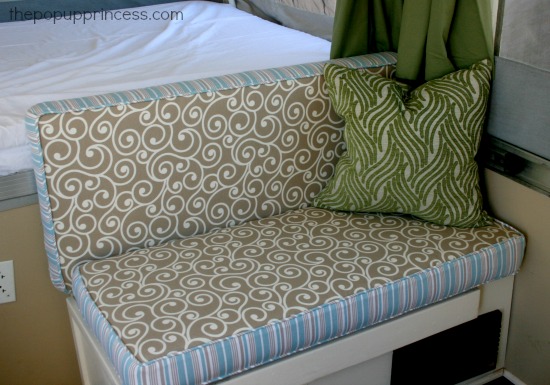
Slide your cushion into your new cover, adjust it to your liking, and that’s all there is to it! The batting fills out the cover nicely and gives it a custom look. The covers are really easy to remove for washing (check the recommendations on your fabric before laundering), and using an outdoor fabric gave me an element of stain resistance, too.
Best of all, I’m loving the new wrap around zippers. The old cushion covers had insanely short zippers, and getting those cushions out of the covers required a strong arm and a good amount of patience. I actually cut the last cover off because I was so sick of wrestling with it. The new covers have these wrap around zippers with a hidden pocket for the zipper pull. I love how easy it is to remove the cushions, and the zipper pull isn’t an eyesore.
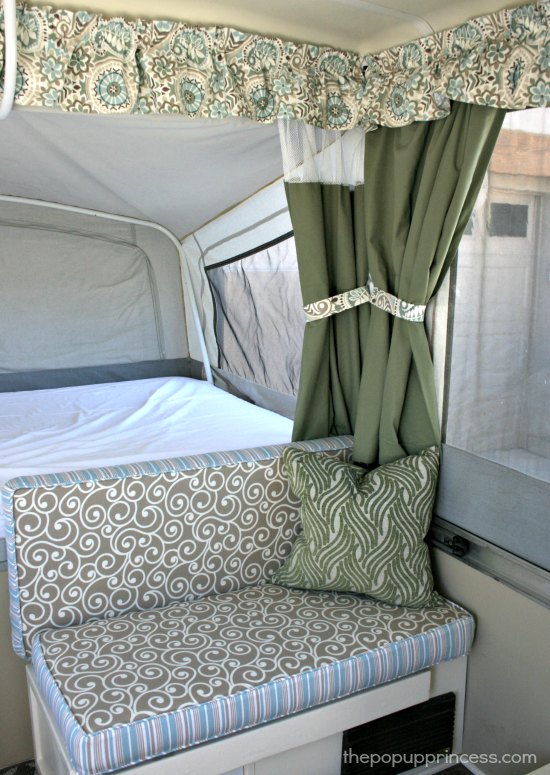 I’m starting to see the light at the end of the tunnel. I think I’ll be able to call this baby finished really soon. Oh, who am I kidding? I’m a sucker for a new project. This trailer will never be finished, but at least it will be pretty. 😀
Happy Camping!
Disclaimer: This post contains Amazon affiliate links. The Pop Up Princess is a participant in the Amazon Services LLC Associates Program, an affiliate advertising program designed to provide a means for sites to earn advertising fees by advertising and linking to Amazon.com. This means that if you choose to purchase an item from a link in this post, The Pop Up Princess earns a small advertising fee to help pay for future projects and posts… so thank you! 🙂
Happy Camping!




Did you press/iron your curtains for the blog post or do your curtains stay nice and crisp when the camper is closed and packed away?:-)
Lynn, I actually took the curtains down and washed them after our big trip. I put them back up for the cushion pictures, but they did stay nice and crisp throughout our two week trip. I don’t have to fight with wrinkles at all really. I guess I just picked a good fabric. 😉
What kind of fabric do you recommend for curtains that shakes out wrinkles well?
I happened to be using a medium weight Linen look Polyester for my curtains. Polyester really doesn’t wrinkle but it can be a pain to sew since it slides all over the place. Lots of pins used to keep it all straight even when cutting. The linen look gives it a drapery feel, although I think this fabric was originally meant for suits or pants.
The camper really looks great!! We just bought a 98 Coleman Cheyenne and I have found a lot of the changes you have made to your camper are things I would like to do to ours – including reupholstering the cushions. I was wondering if your seats had the little stoppers to keep them from sliding off the bases when you are sitting on them? And if so did you just install them back at the end?
Tracey, We didn’t have any stoppers on ours… ??? I don’t know if we just never had them or if the previous owner removed them. How do they attach?
Do your seat bases slide without them? I redid my cushions and those little stoppers are impossible to find!
Also, did you recover the couch cushions? That project seems much more difficult to me!
Thanks!
Jennifer
I think our stoppers must have come out, because we didn’t have them in our cushions. We haven’t had any problem with the seat cushions sliding around, though. Coleman Pop Up Parts has cushion stoppers. Are these the ones you are looking for?
We don’t have a couch in our camper. We have a long storage cabinet instead. What seems difficult about the couch cushions? Are they the ones that are rounded at the top?
Larissa, what is that black box under your dining bench seat? Heater?
That’s our power converter. The heater is in the kitchen galley area. 🙂
put a large strip of velcro on both the seat and the cushion. My camper has that and nothing slides around.
Great idea, thanks!
Was the particle board already part of your cushion originally and you just decided to keep it? My husband and I are renovating our pop up but our cushions in the dining area don’t have boards on them. I’m trying to decide if I like the idea of having the hard side on one side. Did you cover the particle board all the way around with batting or are the back of your cushions just hard?
The particle board was part of our original cushions, Crystal. Since the dinette can be folded down to make an additional sleeping space, the particle board backing is necessary. We didn’t wrap batting around the particle board. We did wrap fabric around the edges of the board to keep it from damaging the new covers, but the back of the cushions are hard. Hope that helps. 😀
How did you do your piping? I’m in the middle of cushion #1 and I can’t figure that part out! Lol! Any links on how to do it? Thanks!
Ramie, I used a tutorial I found at Centsational Girl for my piping. It is actually for a double welt cording, but I didn’t do the extra steps to make it double welt. I’ve used this tutorial before on some of my other projects, and it is clear and easy to follow. 🙂
Found one!
https://m.youtube.com/watch?v=70PJP1lD_Xw
Nice tutorial. I cut all of my piping strips on the bias, though. It will give you some stretch and make your corners look much nicer than if you just cut strips along the width of the fabric. Just a suggestion, though. 🙂
Gorgeous!!! What a wonderful change from the original cushions.
Thanks, Jody! You inspired me! 🙂
Hi Larissa,
I just took off the old cushion covers, yukkkk…..Mine do not have the particle board, which I wished it did, because I could staple gun the new fabric. I think I’m going to go the easy route and just make a simple cover with no zippers. I love the way the cushions look with the piping. Thanks for sharing…
Alice, I wouldn’t skip the zippers. I’m pretty much a neat freak when it comes to the camper, and our cushions still get dirty. I would hate to be without a way to remove them for washing. Be sure to let me know how they turn out. Drop me an e-mail at thepopupprincess@gmail.com. 🙂
Hi Larissa,
I will be emailing you some pictures, we have slacked off this week….Due to my daughter in laws baby shower which I am working on and Halloween, which my daughter (Amanda) who has also commented on your site. Too many things too little time….LOL
I made the cushions and I also made a cover out of muslin and then made the covers.. I wanted it to be comfy and not feel the foam, which we should have added batting, but didn’t want the extra expense (we have spent too much on little things and they all add up).
The curtains are really confusing me…Our camper had NO curtains at all. I bought at Target the 3M mini clips, they are clear. I’m planning on sewing the plastic rings on the fabric and attaching the 3 M Clips to the camper track….Is that right? I hope so, lol… I also haven’t found the right color that I want for the drapes and fabric, I see people really like the light blocking drapes, so I might check out some panels that I have seen at Target, they are 9.99 per panel.. Thanks
Make sure you are attaching the 3M clips to the plastic sliders on the track. Like this…
Attach the rings to the curtains, the clips to the plastic sliders (which stay ON the track). Hope that helps.
And use a gorilla glue or super glue because the little command strip falls right off if it gets too warm in the camper.
We actually use plastic epoxy. It works great and hasn’t failed us yet–five years later. 😉
By the way, our camper is the Ralph Lauren inspired colors…
Perfect! I know exactly who you are! I’ve seen some of your pictures on Instagram. They are pretty awesome! 🙂
Yes, that’s us….LOL..Now I see about the gliders, I don’t have those. I was just going to stick the Commnad Tiny hooks to the track, but DUHH… I won’t be able to open the drapes. Ok, back to the drawing board, need the gliders….I already have the rings and hooks. Ours is a Rockwood, I’m wondering if those gliders are universal..I wish we had a Camping World or any camping store near us 🙁
Hi Larissa,
First of all GREAT JOB and an awesome tutorial!! I love your end results!! My husband and I are about to embark on a camper re-do with a 2004 Fleetwood Utah, fingers crossed! How did you re-attach your drapes? I am going to sew new drapes for ours and the existing ones are attached with plastic clips that hook on the metal “track” around the perimeter of the camper. Were yours the same, and if so, how did you attach them to new fabric? Also, do you remember what weight/fabric blend you bought for the drapes?
Thanks for your time on any advice/suggestions you can give!
Cyndie
Thanks, Cyndie! It’s been a lot of fun. Our drapes were also attached to a track with little plastic clips. I didn’t attach the plastic clips back to the drapes. I mounted them on the track and attached a plastic Command clip to each one. Then I sewed the plastic drapery rings to the panels. Now I just hang the rings on the clips when I set up camp. I like to take my curtains down before I close up the camper, because I am picky about them. I like to keep them clean. But on our long two week trip, we kept them on between each leg of the trip. I took them down at the end of the vacation to clean them.
I used 100% cotton duck cloth on the curtains. It is pretty heavy, especially with the black out lining, but it keeps the light and heat out and gives us privacy. I love them. 🙂
Make sure to send me pictures of your remodel! I’d love to see what you end up doing with your Utah!
Hi! I love what you’ve done to your trailer! You’re so clever!! I do, have a couple questions. We have a Coleman, a couple years newer, and my first issue is the valance. In your pics, looks like you replaced them, their gorgeous BTW, but mine are sewn onto elastic, and then they used a slider contraption that fits into the track. Is that like yours? And how did you deal with that? And how did you figure the fabric calculation. Mine are in separate pieces, and even tho I’ve been sewing longer than I’ve been driving, I’m at a loss. Second, what/where did you find the ring thingy you use to hand the curtains? Product name, code, etc would be great info. Thanks!!
Nora, thanks for the kind words. It was such a fun project. I do have an entire post about the curtains and valances, and you can find that here. We used glide tape, which you can see here, for our valances. I measured each valance, multiplied it by 1.5 to account for gathering, and used that measurement to cut the panels. I gathered the valance first, then I sewed the glide tape to the back of each valance panel.
Here are the drapery rings I used for hanging the curtain panels. I used these clear hooks from 3M and attached them to the plastic curtain tabs. The tabs still glide along the track; the curtains just aren’t sewn to them anymore. I wanted to be able to remove the panels easily for laundering.
Hope that helps!
Love the new look! Did you prewash and iron the fabrics before you cut them? Thanks for a great tutorial.
Thanks, Erin. I did prewash and iron all the fabrics except the outdoor fabric used on the front of the cushions. Outdoor fabric typically has a stain resistant coating on it. When you wash it, you remove the coating. Spot cleaning is generally recommended for outdoor fabrics, but you should always check the care instructions on your individual fabric choice. There is always the rare exception, I’ve found. 🙂
Wow! You did an awesome job!! Thanks for sharing 🙂
Thanks, Danielle! 🙂
Hi again! So I’m finally working on my reupholstering project for our camper. I had to teach myself everything about how to use a sewing machine and I’ve successfully pulled off a practice zipper and practice piping from the links you placed in your blog. Now I need to put it all together. I was looking at your diagrams for the pieces you used and noticed the two zipper pieces. I’m assuming you made the piece with the zipper from the tutorial you linked to and the other “zipper” piece is actually whole and what you put on the opposite side of the zipper. The pattern is a little confusing for me (probably because I’m not fluent in sewer-ese)…both of these you cut the same size but in the picture the one with the zipper is longer and the other side is obviously covering the point where the zipper is hanging. Can you put a few more pictures up with a little explanation, if you have time, please? Also, what are boxing strips? Are they the striped fabric that is already attached in the picture where each piece is laid out separately? How does the piping attach? Do you attach it before putting the entire piece together? Can you tell me in what steps you sewed everything together? Did you use a sewing machine for the entire thing or were there points you needed to hand stitch? Do you have any suggestions for someone who is doing this as her first every sewing project…other than “STOP! Stop immediately! You are crazy! Why?! Why would you ever do this?!” I already covered that and it’s not an option. Thanks so much! I hope to actually do a decent job and be able to submit pictures to you by/before June!
Crystal,
Wow! Lots of questions here, and I’m not sure I understand everything you are asking. I’ll give it my best shot. 🙂 First off, as I suggested in my post, I would HIGHLY recommend you sew yourself a prototype out of cheap material before you cut up your pretty stuff. If you are a beginner, this is a pretty hefty first project. You’ll make mistakes. Make them on the cheap fabric first.
Second, the boxing strips are the pieces that go around the sides (they are the striped pieces in my cushions). They make your cushion cover into a “box” essentially. You have your front piece, your back piece, and your sides. It differs from an envelope type cushion cover, in that you have an actual side piece. You have two zipper pieces, one for one side of the zipper, and one for the other. Once you have inserted your zipper into your zipper pieces, you have essentially made another boxing strip. You’ll sew all your boxing strips together to make one long strip for the sides. I cut all my pieces, sewed on the piping, and put it all together by attaching the long boxing strip (made from the boxing strip piece you cut and the one you made with the zipper) to the front piece and then the back piece. Make sense?
I hope that helps. If you have any other questions, feel free to e-mail me. Can’t wait to see pictures! 😀
Your pattern for the boxing strips say two cut 2 or cut once on the fold. Would the fold go on the short side or the long side?
Hmmm… I’m not sure I understand what you are asking, Elisa. You basically want your boxing strip to be 80″ x 5″ so if you cut the 40″ pattern piece on the fold, you’ll get that length.
FYI: The Honeybear Lane website that Larissa mentioned has very clear directions 😉
I’m just starting this (Scary) process, I have the same “lovely” cushion covers (aka eye sores) that you had! My question is about the curtains. I bought some fabric shower curtains because I loved the print, plus I figured (hoped) the since made for a steamy shower the fabric wouldn’t wrinkle and would tolerate life on the camper well. Did you just sew the new fabric on top of the existing fabric or start over from scratch?
Hey, Kim! Thanks for dropping by. Are you using the shower curtains for cushion covers or curtains? I made both from scratch. The only things I reused from the curtains were the plastic slider tabs and the mesh panels from the privacy curtains. My curtains were pretty trashed, so there was no reusing them. I didn’t bother with keeping the cushion covers either. I threw them away–actually they were wedged on so tightly, that I had to cut a couple of them off. They were ugly and smelled kind of funny anyway, so no big loss there. When I say my whole camper got a makeover, I’m not kidding. We didn’t keep much of the original stuff.
I can’t wait to see what you do with your PUP. Don’t forget to send me pictures. 😉
Larissa, I’m not the best seamstress. Do you think I could sew these and velcroe them onto the old cushions? I’m pretty sure I couldn’t put in a zipper. We have a 1997 Coleman. I love your site. I’m looking forward to trying to spruce our camper up.
If you aren’t confident in your sewing abilities, Mary, you’ve got other options. I have seen where people wrap their cushions in fabric and staple it to the back. If you have hard plywood backs on your cushions, this would work for you. And Jody at Because I’m Me made envelope covers for her cushions. If zippers intimidate you, that might be an option, too. You can check her cushions out on this post.
I’m not so sure about the Velcro idea… seems harder than a zipper. The zippers were really very easy. I’ll bet you could handle it. Just go slowly, and make sure to make a prototype out of cheap fabric first. You might be surprised at what you can accomplish. 🙂
Thank you Larissa, I will let you know how it turns out. i ‘m going to try a couple of different ways on practice material. 🙂
I’ve been wanting to redo my cushions on my 2004 Fleetwood Pecos pop-up trailer. I finally went two days ago to choose fabric samples before going hog wild. I came home with several samples from Joann Fabrics. I just looked up on Google and you popped up…low and behold we picked the exact same materials for the cushions. I’m a little freaked out right now.
Hi Larissa,
You cushions look very nice. I have a travel trailer whose cushions are quite different, the seat and back portions are one piece with a “hinge” of fabric between. Do you know of a tutorial that addresses that? Mine are in desperate need of recovering. Thank you.
Bethany Sanders
I don’t know of a tutorial for those types of cushions, Bethany. Do you sew much? It doesn’t seem like it would be too terribly difficult. Maybe you could take apart the old covers and use them as a pattern. 🙂
WHAT A GREAT TUTORIAL! I HAVE BEEN WANTING TO RECOVER MY CUSHIONS AND THIS WAS MY SPRING BREAK PROJECT. RECENTLY I REPLACED ALL CURTAINS, DRAPES, AND VALENCES. THE UGLY FABRIC ON THE CUSHIONS WAS MAKING ME CRAZY. I WENT WITH DENIM AND MADE MY PIPING. I WAS A LITTLE NERVOUS AS I SKIPPED THE STEP TO MAKE THE PROTYPE. I WILL BE PURCHASING MORE CUSHION STOPS AS MINE ONLY HAD ONE EACH. I THINK I ALSO MAY CHANGE OUT MY LIGHTING FOR LED. THANK YOU FOR TAKING THE TIME TO DETAIL THESE AWESOME PROJETS. HOW DO I POST A PHOTO TO SHOW YOU?
Kerry, I’m so excited to see your makeover! You can e-mail me pictures at thepopupprincess@gmail.com or you can post pictures on my Facebook page! 🙂
Larisa, what type of fabric did you use for curtains and valances? outdoor? cotton? I found some outdoor fabric that i like but even with 50% off i would have to hide the receipt from hubby!
Lori, we used regular cotton duck cloth for the curtains and heavy cotton home decor fabric for the valance. It took quite a lot of fabric for the curtains, so we went with a cheaper, solid colored fabric. We relied on the valance to bring in some other colors and patterns, as it required less yardage. 🙂
SO GLAD I FOUND THIS SITE – BEEN TRYING TO GET UP THE COURAGE TO RE-DO MY CAMPER CUSHIONS AND NOW I THINK I CAN GET STARTED! THANKS!
Awesome, Danni! I can’t wait to see what you do with your pop up. Make sure to send me pictures! 😉
Looks great! I am following your instructions and starting on mine today. How long is the zipper you used? I bought 45″.
Oh gosh, Wendy… I can’t remember. I had to cut my zipper to fit my cushions. It was one of those long upholstery zippers–you can just cut it to fit your cushion.
I’m super excited to see your cushions! Send pictures! 🙂
I am attempting to recover our pup cushions and I am feeling a little overwhelmed yet excited at the same time. I am trying to follow the design already on our cushions so that I can keep the slick, water repellent side and the zipper. Anyways, I realized that I am scratching my head at out how they only used 2 pieces of fabric after ripping apart the cushion cover. So I am going to follow your pattern a little more closely with a slight change to keep the water repellent side connected to the zipper on one side. We shall see.
I love your site. When will you start doing videos? 😉
If you don’t mind me asking, how much was the materials to make the curtains and to cover the cushions? trying to decide if it would be more in expensive to just order the cushion covers. I don’t think it will be too awful expensive to make the curtains.
I bought my curtain fabric at a local home fabrics place that was going out of business, so I got it really cheap. I spent about $30 on the fabric, but I also bought black out liner, which was a bit more expensive. I am not sure about how much it cost to cover the cushions. I bought outdoor fabric on sale for the fronts and sides, but I used fabric from my “fabric stash” for the backs. You can make your cushions as expensively (or cheaply) as you want. It all depends on your fabric choices. 🙂
Hi Larissa!
My husband and I just bought our first pop up this past weekend and I stumbled on your site- LOVE this place! Our camper is in pretty rough shape- going to need some serious TLC before it’s where I want it to look and every idea that went spinning through my head is here- plus more! 🙂
I did have a question– Im pretty new to sewing but would still like to take on the project of reupholstering the cushions in our camper. I have a couple sewer friends who are willing to help too. When I did some brief looking online, it seems like outdoor fabric can be pretty expensive and we have both a dinette and a couch in our camper so there are 12 cushions total to fix up. I was planning on making a sample one just to get a feel for everything before I started like you suggested, but I have no idea how to calculate the proper yardage amount I will need! Do you have any tips on how to do that properly? I don’t want to spend money I don’t have to on way too much fabric. (I tend to overcompensate when Im nervous about things).
Also, if you think Im totally nuts for trying to take that on as one of my first ever sewing projects, please let me know!
Thanks again for all your tips! This site has already come in handy! 🙂
I don’t think you’re nuts, Erin! Everyone has to start somewhere. As long as you have some more experienced friends who are willing to guide you, you should be fine. Are you attempting to use the old cushion covers as a pattern or are you starting from scratch? 🙂
help!! I am remodeling my 1983 Jamestown pup. it is one-sided, so I cannot find any other ones like it to get info. I am in the process of remodeling and I have been using your site like a bible! I totally messed up – I took out the 4 cushions and ripped the NASTY material off and threw it away, BUT I failed to write down how they go back into the benches, I have picked them up and rearranged them a dozen times. 2 of them are smaller with thicker wood and have little plastic “legs” on them. the other 2 are thinner wood, but bigger, what the heck are the 2 little legs for?? do they sit on something?? do you know??
thanks so much for any help, linda in las vegas
Hey, Linda! It sounds like you are talking about the little plastic stoppers on the bottom cushion. This helps keep the cushion from sliding around. Do they look like these?
yes – that is what they look like. since i bought the camper folded down with all cushions laying flat, i do not know how they actually ‘sit up.” like i said before, i have the little model that only opens on one side, so none of the other remodels on your site match mine. i have searched all over the internet for a diagram that i can actually read. the one i downloaded, from popup parts, has such bad photos, i can’t really see anything. sorry if i sound like i am whining!! i reupholstered 2 cushions last night so it is getting closer. painted inside of pup, tiled floor, and my neighbor built me a little cabinet because sink/stove one was missing. can’t wait to get it on the road.
‘
You say that you needed 7 yards of material. Was this for complete coverage of 1 fabric? How wide was the fabric you used? I’m thinking of a pattern for the front and back and a solid for sides of cushions. We have a 2003 Coleman Grand Tour Mesa.
Thanks!
I used standard outdoor fabric from JoAnn for the fronts, which was 54″ wide, Marie. Your yardage will vary based on your cushion dimensions, but I had 4 cushion fronts to cover. I used about 6 yards just for the front of the cushion. I used a cheaper fabric for the backs of the cushions, since no one really sees them anyway. I used standard cotton home decorator fabric for the sides and welting. It was a bit cheaper than the outdoor fabric, but not much. Look for sales and use coupons when you can. It really does make a difference. 🙂
Hi there
We have just brought a 1961 Bedford Bus. At present we are getting it road worthy, but after that we will start on the interior. Which has wrap around seats that turn into a hug bed. This needs recovering, I am going to try and wash the covers but as they may shrink they will have to be done. Thanks for posting such grate information it has given me more confidence to start the process.
Living in Christchurch New Zealand and a limited budget. I am limited with fabric chose but the outdoor fabric is one I hadn’t thought of. And the Curtin hooks are a great idea
Thanks again loved all the photos and ideas
Ruth.
That’s awesome, Ruth! We dream of having a bus someday. 🙂
HELLO, I AM VERY IMPRESSED. MY HUSBAND AND I BOUGHT OUR FIRST POP UP CAMPER, USED OF COURSE. I WAS WONDERING DO YOU HAVE ANY EASIER IDEAS FOR REPLACING THE FABRIC ON THE CUSHIONS THAT DON’T REQUIRE SEWING? I AM NOT A GREAT SEWER…VELCRO? THANK YOU SO MUCH.
I know quite a few people do a wrap and staple method. You can find a couple of readers on this site that used that method on their remodels… Check out Cyndie’s Remodel here or the one from Life With 4 Boys here. Rose used a similar method, but she used snaps instead of staples. You can find her makeover here. 😉
Larissa, are you able to email me privately?
heather
Absolutely! My e-mail address is larissa@thepopupprincess.com. 🙂
I have a 2006 Viking Legend – I need to replace the cushion covers but don’t want to get into the sewing bit, although kudos to those who do. I’m looking for a site where I can order replacement covers to slip on in place of the old ones. Any suggestions on web sites? Thanks,
Hi there! I LOVED what you did (to your entire camper) but specifically the bottom of your cushions. We sold our pop-up and for the same price bought a 33 foot bumper pull and put it on a seasonal. It had been smoked in for over 3o years! We pulled out the carpet, painted every thing white (color to come later this spring) and will also be replacing the stinky fabrics on the furniture. All of the cusions are saggy in the middle. Your idea to wrap more cushion around the existing cushion and place a piece of wood on the bottom was so simple! I will soon be attempting to stitch new fabric over the box cushions so I have been all over the internet looking for the simplest way for my inexperienced hands to accomplish this. This method sealed the deal for me! I am so glad I found this site! 🙂
Do you happen to do this for a fee for those of us who are not quite as crafty?
Hi!
We just bought a camper and I am recovering the cushions. The cushions have a smell and need to be replaced. Any suggestions on where to find more foam inserts for the cushions for inexpensive? I’ve found some but they are pricey. Thank you!
I’ve discovered that foam is pricey no matter where you source it, Mary. You can use coupons at JoAnn and Hobby Lobby, but there again, it really adds up and can be pretty pricey. I think it might be a tad cheaper to buy a memory foam mattress on Amazon and cut it to specific sizes, though. It will really depend on how much foam you need.
I love the end result!! we just bought an old caravan and i’m thinking about reupholstering the banks. 8 cushions in total. I’m not so good at sewing so i thought i would take some lessons and use them to let the teacher help me with the covers 😛
Love your site. We bought a PUP a year ago. My upholstery looks like what you had, I like mine about as much as you liked yours. Been wanting to completely change the look as you have. You have done an awesome job. I love country decor but will probably go a little more generic as it would be better for resale. Thank you for sharing. Learned a lot from you & the other comments. 😊
Larissa,
I thought I was going to reupholster my cushions using your sewing method. I figured that since I have the 2002 Coleman Santa Fe that our cushions would probably be similar. However, when I went to measure the cushions today, I noticed that I have an arc in my seat-back cushions. The middle measures 19 inches in length, and the ends measure about 16 inches. I can’t sew in a rectangle, or I will have huge gaps at the ends. Have you encountered this before? Should I staple the new material over the cushions? I thought about maybe stuffing the ends, so that it forms a rectangle, and then sewing cushion covers. I’m not sure what to do with the arc. Thanks!
Erin made slipcovers for her Santa Fe (see here), and she has the kind of cushions you are describing. Can you alter the pattern to accommodate the curve? Or maybe remove the old cushion covers and use them as a pattern?
Did you serger your seams on the inside? Or leave them raw? Or do something else? I am worried they would Frey over time and I don’t sew enough to purchase a serger. I mostly quilt so it doesn’t matter! Thanks
I serged them, Mickayla. You could always use fray check or zig-zag your seams if you are worried about fraying. 🙂
I love your site! We just purchased a 2003 Viking PUP. And I’m wanting to reupholster or cushions. I found a you tube video from Sail rite that looks simple enough to follow.. I’m a noob at sewing cushions. Our bottom cushions will be a different fabric than our back cushions and I wanted to know how much fabric you purchased in all for your cushions.
And also how do i calculate how many yards I need of each fabric??
I made new covers for my cushions and all was well for the first year, but now my boys are getting older (and there’s a dog now too) so I”m thinking of using some sort of vinyl cover that could be wiped off. Any ideas?
We have started our Pop Up Remodel! Yay! BUT we would like to replace the Mattresses… Any suggestions where to find ones that fit? The camper stores have not been helpful ☹️ Thanks
Have you looked on Amazon? If you know the exact measurements, you can sometimes find hide-a-bed mattresses that fit certain camper styles. It is definitely worth a try, as all the options I have come across are MUCH more expensive.
I’ve just bought a Jayco Swan and I absolutely HAVE to reupholster the seats on the dinette and club lounge (they are a horrendous brown and green plaid!!) BUT I am at a loss as to how to start… the club lounge cushions (the back parts) are attached to the camper walls. I have no idea how to remove them, of if they even can be without causing damage… but that ugly fabric has to go! So PLEASE tell me someone can offer me some advice on this! I’d be so gratefull!!
Larissa,
How did you handle the cushion stop buttons when making a slipcover. I’m running into issues or concerns when figuring out what to do here. Just cut holes in the cover?
Nevermind. I see that you didn’t have any of the stoppers. Any suggestions would be appreciated though.
Hello! I am new to pop up campers and my husband and I are purchasing our first one tonight! Of course, we want to “glamp” up our camper and both my spouse and I LOVE your website. Has anyone ever used mosquito netting for camper curtains? Our camper has darker panels that zip over the screens, and I was thinking a light, airy fabric might be something different. We’ve created mosquito netting curtains for a 2nd story sundeck space at our house and they wash like a dream and give the space a light, playful appearance.
Thoughts?
Sounds intriguing, Lynne. Make sure you take lots of pictures. 🙂
We have had our pup for about 9 months and I am just getting around to recovering the cushions… I too am intimidated and kept looking at the original fabric “well, it’s not so bad”… But the closer I looked, the more I realized they are pretty nasty. I scored some thick chevron upholstery fabric on Facebook marketplace for $20… So I spent yesterday taking the old covers apart to use them as my pattern… I am a novice seamstress and have never sewn anything more complex than a pillowcase. I have to keep telling myself “it’s just a camper” but now that I have ripped apart the old covers, there is no turning back!
We just recently purchased a N2U PUP and I came across your blog. Oh. My. Goodness! I have got the bug. Seeing all these makeovers and how awesome each of them turned out – I can’t wait to get started on my remodel! I have all my fabrics selected and a plan in place for the table. I just need to figure out the floor and the two small end-table tops. Everything came together so easily in the planning stages, I can hardly wait to see it all come together! Thank you for this blog and all of your helpful tips! I’m sure I will be using them frequently as I begin to navigate the process!
Awesome, Aimee! Glad you are finding it helpful. 😀
Lots of great information here. 🙂 Re stuffing the cushions into the covers. At the factory they have metal plates that compress the foam so the cover slides on easily. I washed the cushion covers on a couch I had years ago, and when replacing them I cut pieces of cardboard a bit smaller than the cushion and put in the covers,then slid the cushions between the two pieces of cardboard, and when in position pulled the cardboard out, It made it much easier to get them positioned properly, especially with rough upholstery fabric.
.
Any curtain/cushion suggestions for someone with zero seamstress experience? I don’t own a sewing machine and can barely sew a button on.
You can check out Shannon’s No-Sew Makeover HERE, Lisa. That might be helpful. 🙂
I’m having a hard time understanding how you remove the cushion covers if you stapled them to the particle board? Or am I just reading it wrong? I’m probably over thinking
I haven’t ever stapled my actual covers to the particle board. I just stapled the smooth lining material to the particle board so I could slip the cushion into the new cover. It makes it easier, but you don’t have to do it. 🙂
We just purchased a 88 Jayco. I’m so excited to tear into it, but the upholstery scares me the most!! I will definitely be taking them somewhere to get done. More power to ya girl!!! Looks great
Hey Larissa! New here and just love your site! Such a godsend for those of us who need tons of inspiration to get us going (ME! ME!)!
I’m starting research/planning for our PUP textiles. Of course your site has already provided a ton of ideas I plan to use, so thanks!
For cushions, if I can’t find an outdoor fabric I like, can I use duck and just treat it with weatherproofing spray?
Thanks so much,
Vicki in Algonquin, IL
Sure! The outdoor fabric is totally just a suggestion. I like it because it cleans up easily, but other fabrics work nicely, too.