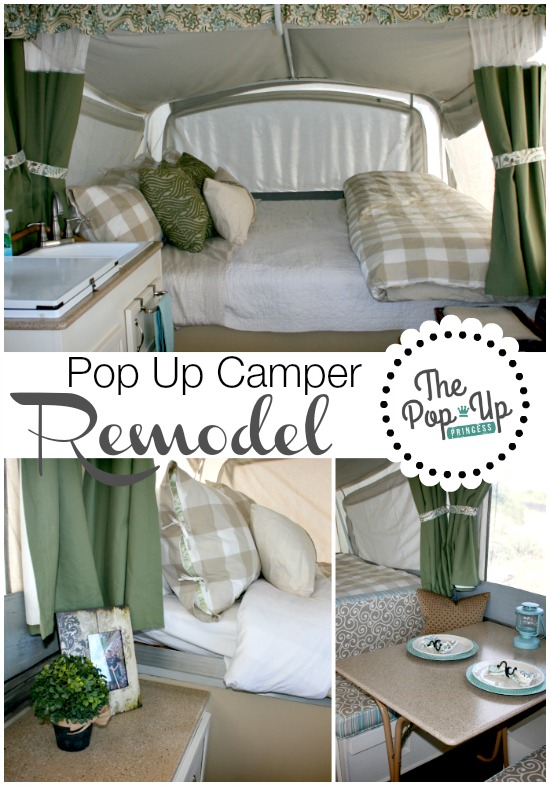
Yes, the pop up camper is finally finished. It actually has been finished for a while, but we haven’t had a chance to set it up and take pictures. This past weekend, we finally got to take the camper out for a quick little overnight trip at a county campground. It was close, the weather was pretty nice, and we had a great time with good friends. Before we packed up, I had Mr. TypeTwoFun tackle breakfast so I could snap a few “after” pictures of the finished camper. I took about 10 minutes to clean the camper up quickly, and then set up for the shots. No, the camper doesn’t usually look like this when we camp… well, except for the beds {I love cozy beds!}, but it was so much more homey and pretty all set up. Mr. TypeTwoFun was rolling his eyes the whole time, but the girls and I love it. So here you go… we’ll show you our camper’s “glamour shots.”
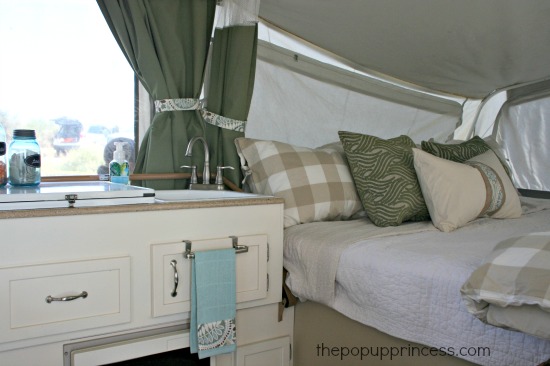
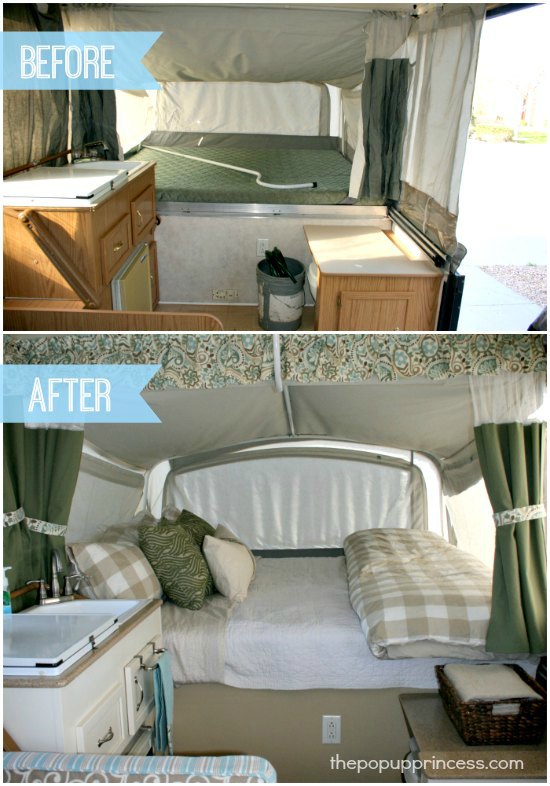
Here’s my kitchen area, which also doubles as our bathroom area. I just love the way the creamy, off-white cabinets lighten up the whole space. I was sure that we’d have issues with everything showing dirt, but the cabinets and walls have held up surprisingly well. I give them a quick wipe-down with a damp sponge every once in while, but that’s it. They are really easy to maintain. Want to know how we did it? Here’s the post on how we painted our cabinets. We mainly cook outside on our outdoor stoves, so the indoor stove serves as a kitchen/bathroom counter space most of the time. A removable towel bar hung over one cabinet door gives us a place to hang dishtowels. The area actually has enough storage space that it remains pretty tidy–even while we are camping.
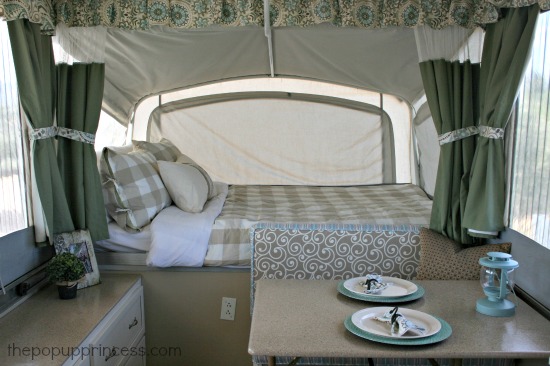
This is the master bedroom area. I love cozy beds { Have I already told you that? 🙂 }, so I use lots of pillows and fluffy comforters. We already had most of the bedding, but the duvet covers and shams came from Ikea. I love that place for bedding. The bedding is really inexpensive, well made, and soft and comfortable. I love that I can remove the duvet covers and pop them in the wash when they get dirty. We all sleep so well in the pop up camper. I put together a post here on how we make our camper beds feel like home, because honestly, I would rather stay in the camper than a hotel. That’s how nice they are.
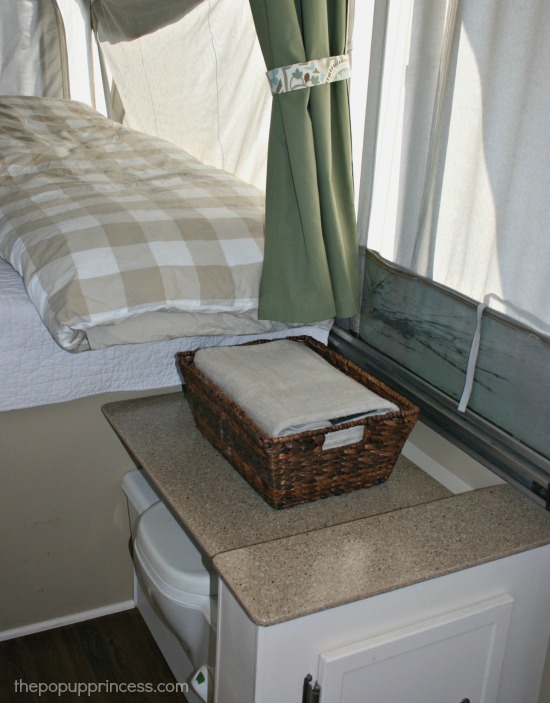
This is our “bathroom” area. We have just started to appreciate the cassette toilet. It’s been helpful for late night potty breaks, especially when the campground bathrooms are far away. Who wants to trek across the campground in the dark? 😉 We also use this area for storage. In fact, we recently built some tension rod shelving to hold all of our bathroom essentials. You can find that post here.
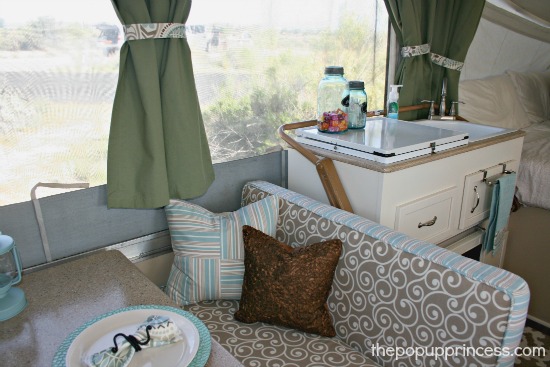
Here’s another view of our kitchen and dining area. I’m really pleased with how the cushions bring the space together. The colors of the cushions tie in with the palette of countertops and table and make the whole space seem warm and inviting. I seriously had to kick the kids out of the camper several times, because they just wanted to curl up on the dinette cushions and hang out. I made slipcovers for the cushions, and if I ever decided to change the color scheme, it will be so easy to make new ones. If you want to see the tutorial on the cushion covers, you can find it here.
We used Rustoleum Countertop Transformations kit on the dining table and countertops, and I have never regretted our choice. The finish is durable, and we’ve had no scratches–and believe me, the kids can be rough on things. You can read all about our countertops here. Although we wanted to figure out a more custom leg for the dining table, in the end, we just used the existing legs. They are pretty sturdy anyway, and we don’t use the table all that much. We like to eat outside as much as possible, so the dinette usually serves as a bed for kid #3.
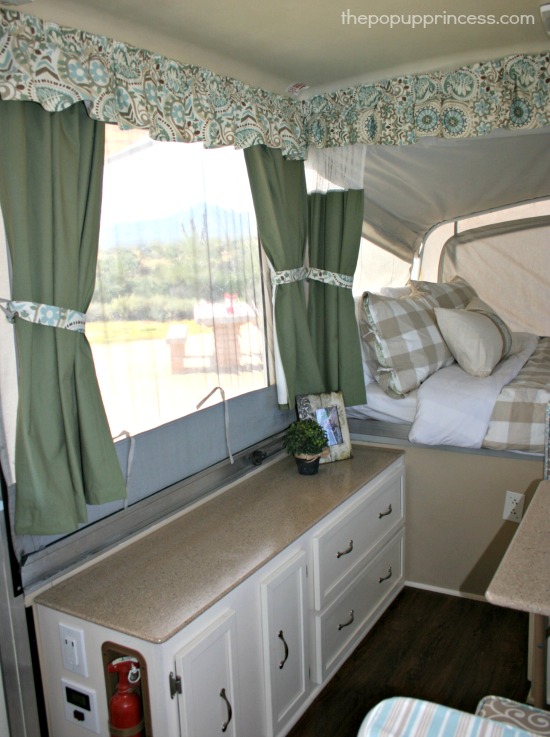
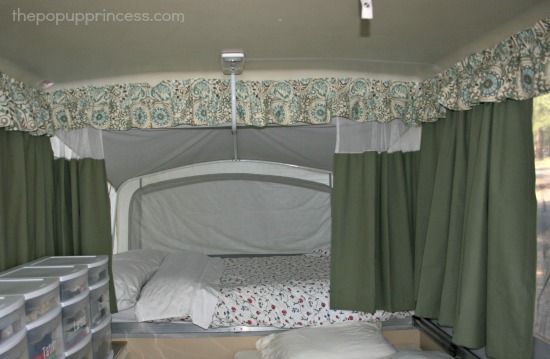
At the other end of the pop up is our girls’ room. They love this space, and we’ll often find them playing cards or reading here. They can also pull the privacy curtains shut and use the bed area as a dressing room. I used leftover fabric from the curtain valances to make tie backs. They secure with Velcro closures and are easy to remove when we shut the curtains at night. I love the system we used to hang them (which you can read all about here) because it makes it so easy to take them down for cleaning.
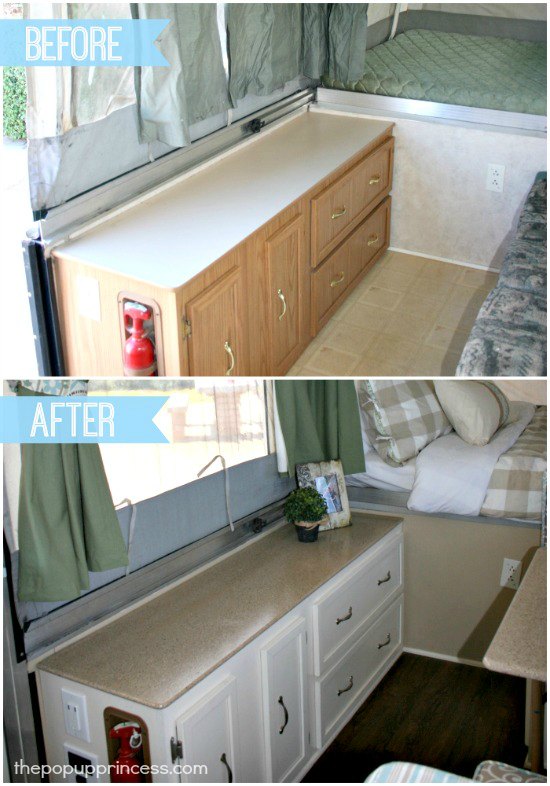
You might remember this long cabinet was falling apart when we bought the camper. We couldn’t get the drawers to shut, and there was zero storage space in the cabinet where the wheel well was. We used MDF to construct a new cabinet, and this new storage space is rock solid. We store our games, trailer repair supplies, first aid kit, and all our dishes and cookware here. We have a lot of storage space in those little drawers, and I love it. It makes packing for a camping trip a breeze. You can read about some of our storage solutions here.
We’ve come quite a long way in a few months. If you don’t remember what we started with, you can catch up here. I’m sure we’ll never stop tweaking and improving the camper, but I’m pretty satisfied with how much progress we’ve made. Just look at the huge difference a little paint and hard work can make.
Not bad, eh? The best part is that we really didn’t spend a lot of money on the makeover. Our roof repair was our most expensive project. We borrowed from the current color scheme of our home, so we used leftover paint and bedding from the house. Using what we already had saved us money on remodeling supplies, but it is also comforting because it feels like our home away from home. We can travel and see places we wouldn’t be able to afford to visit if we were staying in hotels and eating out, and that is probably my favorite part about this whole thing. The camper allows us to have some great family experiences on the cheap.
What’s your favorite part about camping in your pop up trailer? Visit The Pop Up Princess Facebook Page and tell us what you love about camping in a pop up. And if you happen to have a picture of your camper handy–feel free to post it! I’d love to see what you’ve done with your space.
Happy Camping!




Awesome job, Larissa!! But one question… Where does the #2 man in the house sleep?
Thanks, Brant! We usually make up the dinette bed for him. It is actually quite comfy with all that extra padding from the reupholstery, although that kid could sleep through anything anyway. 😉
Love love love the finished project!! We bought a Coleman much like your in August and you’ve given me awesome ideas (despite what the hubs has to say about it!) Thanks for sharing – God Bless!
Thanks, Jen! Mr. TypeTwoFun wasn’t very receptive about the pretty stuff either, but he’s come around. 😉
I love your remodel, Larissa! Fresh and inviting, while still being very family friendly.
Thank you, Lisa! And thanks for stopping by.
Wow! You did a great job! This would make vacations so much fun. I wouldn’t think that a pop up camper would be something to restore or even possible. Makes me wonder about having on for future vacations with my kids. I think it would be so much fun.
Thanks for sharing.
Thanks, Sharon. It really does make camping much easier–especially with teenagers. 🙂
Wow! You guys did such a great job. It’s beautiful. Have you added memory foam toppers to the bunks? We did that and it’s really very comfortable. You have shown how you added doors to the dinette benches and rebuilt the large side cabinets and redid the wheel well… any other organizational shelves (even temporary) inside the cabinets? I’m always on the lookout for packing and organizational tips, especially from other families with 3+ kids. Yours are bigger than mine, though, so I’m afraid our packing woes will get worse before they get better!
Thank you, Kristin! I’ve mentioned before that we use plastic drawers for all the clothes, and it works out really well. I am looking for an easy shelving solution for all the toiletries, though, and if I find something that works, I’ll be sure to post it here. We keep all our food Rubbermaid totes in our car or in the bear box at the campsite. We’ve had a close encounter with a grizzly (and lots of annoying encounters with squirrels), and I’m not looking to repeat that. 😉
Love the redo! I want to restuff my dinette cushions so they are super fluffy like yours! I’m also on the edge of my seat waiting for how to make my camper beds more comfy… A question though – where do you guys keep your clothes when you are camping? We have such trouble keeping the camper tidy because there are clothes and duffel bags all over the place!
Thanks, Mary! We actually keep the camper pretty tidy because we use plastic drawer units for all our clothes. You can see them in this picture…
They are just the right height and fit perfectly on the floor between the long cabinet and the dinette when the camper is folded down. When we set up, I just move them to the top of the long cabinet. We have a pop up hamper for dirty clothes, and all the clean clothes stay in drawers. It actually works out really well. We did a quick overnighter with duffle bags, and the camper was a mess. I much prefer the plastic drawers. 🙂
I’m working on that camper bed post! Keep an eye out for it soon!
I LOVE this! I’m looking into curtains and cushions for my pop-up, and I can’t find anything that I really like. I wanted to get green curtains and I LOVE the color of yours! Can you tell me where you got your curtains and cushions? And are the curtains the block-out type? Thanks for posting!
Julie, I made both the curtains and the cushion covers. You can find the tutorial for the curtains here and the tutorial for the cushion covers here. I did use black out liner material on the curtains and I love it. It helps so much with the light and heat and also gives us extra privacy. I used canvas duck cloth (which I purchased very cheaply from a closeout sale at a home fabrics store) on my curtains. I have seen others use premade curtain panels or even shower curtains and cut them to size. If you are going the premade route, make sure to check stores like Home Good, Marshalls, and Ross for great deals. You can often find just what you are looking for at awesome prices. Best of luck! And make sure to send me pictures when you’ve got it done! 🙂
oh my gosh!! I just love what you have done!!!! I have so got the fever to redo my pop up! We haven’t used it in over 2 years….we have popped it up….the inside is still very clean…just need to update…yours is amazing!! I am definitely going to re do mine now!!!! Thanks for sharing!!
Thanks, Donna! Send me pictures of your progress. I love a good makeover! 😉
I love your remodel! It has helped give me a boost of confidence that I CAN handle a remodel. Like you, I have the ugly wood finish on the cabinets, how did you go about painting them? Are those new pulls or painted pulls?
Also did you redo the floors by chance? I am considering changing mine out.
THANKS
Thanks, Christina! We did paint our cabinets. You can read all about that process here. I thought about painting the hardware, but decided to purchase new pulls and hinges in the end. The gold finish on the old pulls was starting to peel off, and I wasn’t sure how well they would take paint. I love the look of the new pulls and hinges and I’m glad I decided to replace them.
For the floors, we used a vinyl plank flooring. You can read about that here. It really changed the look of the whole camper–especially next to those white cabinets! I’m loving the look.
Best of luck on your remodel. Don’t forget to send me pictures! 😉
Imitation is the sincerest form of flattery, right? I hope so because, although I didn’t intend to, when I walked into Joann’s and spotted the exact same fabric, I just couldn’t walk away. I just had to buy it. I’m picking up my camper next week, and I can’t wait to get started. Thank you for sharing your beautiful pop up & ideas. 🙂
Awww… thanks, Tany! 🙂
Also, what is the name of the fabric that you used for the valance. I cannot tell you enough how fabulous you did on your camper. Just beautiful. 🙂
Here’s the link to the fabric I used for the valance. I just love it! Best of luck with your remodel!
Thanks so much!
You have given me the bug to get our camper cute and ready for all our adventures this spring, summer, and fall. I cannot wait to take advantage of all you have put out here for us newbies to learn with. Your camper is gorgeous! Ok now to just learn to sew!
You can do it, Amanda! Can’t wait to see the results. 😉
Love your camper! 🙂 Just curious…. have you posted a picture of the outside? Even though my husband isn’t the camping type, (he was looking over my shoulder while I was reading your latest post) he said “Oh WOW!!” “They did a great job” “What does the outside look like?” “Where did they get the camper” “Do you think we could do something like that?” WHO IS THIS MAN?? 😉 Congratulations guys. I can’t wait to see your next project. Thanks for having me on your mailing list…. 🙂 TGU 3-7-15
Thanks, Terri! 😀 We got the camper on Craigslist. It was the best purchase we’ve ever made. We’ve made so many great memories in it already. Here’s what it looks like on the outside.
How do you get the kids’ bed to look like/be 2 separate beds? (I seen in one of your pics it looked like 2-single beds side/side) 🙂
Our girls’ bed isn’t big enough to separate, Nikki. We’ve always made it as one bed and had them share. I have seen some people make their kids’ beds separate, and it’s awesome. If the girls were sleeping on a king bed, I’d definitely go that route. One of the people on the Pop Up Portal made something out of PVC pipe to separate their kids’ beds, and you can see a picture of it on this page. Maybe something like that would work for you? 🙂
I too love your reno… It’s very cozy!! I have a 2003 Coleman Cheyene, looking to re-do my curtains and valances. Did your curtains have the plastic tabs to hang or did you devise something different?
Thanks, Donna! We just got back from a quick camping trip, and I was reminded just how much I love it myself.
I wrote a post about our curtains and valances, and you can find it here. I’ve got all the details on how I hung them. You should go check it out! I’m sure it will be easier (and clearer) than trying to explain it here. 😉
OH MY! Nothing but beautiful going on here! You did an amazing job! Thanks for sharing the ideas with us. You rocked it!
Thanks, Cathy! It sure is a fun project! 😀
I love what you did with your pop up camper. This is what we had when our 3 girls were little. Your valances look the same as the curtains that we made for my granddaughters kitchen…from shower curtains we found at Target! Cute job!
Thanks, Judy. I’m liking it a lot. It’s been a great little getaway.
I’ve heard of people making curtains from shower curtains. Seems like they would hold up really well. In fact, one of my readers used them in his pop up camper makeover. You can take a look at that here. Thanks for dropping by!
Really amazing, I think this is precisely what I need to spruce up the Coleman we have. Could you tell me where you got the bedding from I loves these colors, great tutorial!
Thanks, Jennifer! The bedding came from Ikea. They have the best bedding! 😀
Hello. I found this on pinterest. I have the exact same camper and I am currently redoing it as well. I am hoping it will look as nice as yours when we are finished! Thanks for the tips!!
Thanks, Heather! Gotta love that Santa Fe! I’d love to see pictures when it’s all done.
Awesome remodel! I’m deciding what camper to buy for myself and love the pop-ups since they’re spacious yet easy to tow.
My one concern is safety since I think the meeting would be easy to get through. Thoughts?
What kind of safety are you concerned about, Ann? Are you afraid animals will get through the canvas?
We feel pretty safe in our pop up camper, but we were previously tent campers. We follow all the bear regulations to the letter, and have never had any problems. We even had a grizzly bear walk through our camp in Yellowstone, but it didn’t even give us a second thought. We haven’t had any issues with animals–actually, we haven’t had any issues with people either. We have found that campers in generally are pretty awesome people. Of course, we leave valuables at home or take what little we have with us when we leave camp for the day, but we probably don’t even need to do that. No one has ever bothered the camper. I would buy another pop up camper in a heartbeat! 🙂
Fantastic remodel! We are getting our pop up in the next couple of weeks. It belonged to my inlaws and I’m excited about making it “ours”! I see your picture in the driveway. Does your pop up fit in your garage? Ours looks identical to yours and I’m hoping it does so the HOA doesn’t give us any issue.
Yep, ours fits in our garage with plenty of room to spare. That’s one of the major reasons we purchased a pop up camper over a motorhome or big trailer.
Can’t wait to see what you do with your PUP. Don’t forget to send pictures! 🙂
Thanks!! We picked up the PUP 2 days ago and it’s had it’s major outside bath. Working out some electrical issues from the long nap and then they will unleash me on the inside. There’s a nasty stain on some canvas over the bed I need to figure out, but other than that it’s in great shape! How would I add pictures? I’m so excited for this makeover and your blog has been my PUP bible!
Aw! Thanks, Terri! Let me know if you find a good product to remove that stain. Is it mildew? Rust? Dirt?
And you can always e-mail me pictures at thepopupprincess@gmail.com or post them on my Facebook page. 🙂
I have ZERO idea what this stain is. It looks like someone packed the camper and left a blueberry pie on the bed.. but no signs of anything on the bed? Odd…
Major set-back. Lifted the dinette seats and opened a cabinet and BOOM…water damage. Floor rotted out. So you will be seeing some before and after pictures for sure! We have some fixin’ to do!
Hi Larissa – we are in the process of redoing our tent trailer that was given to me from my aunt. I’m just wondering if you replaced your mattresses at all and if so, what and or where did you get them from? The beds in ours are not only on the thin side, but they are also holding a lot of bad odours. I’m afraid just to take the covers off! Any help is appreciated!
Our mattresses were in great shape, so we kept them and added memory foam toppers. You can read all about that here. I don’t have any specific experience replacing mattresses, but I know many people buy thicker memory foam mattresses (like 4-6″) to replace their cushions and mattresses. There are places online that will cut them to fit your dimensions, too. Maybe that would work for you.
I also need to replace one of my mattresses that has mildew damage. Can you suggest a few sites to get them or have custom made?
Also, I would welcome advice for nontoxic mildew stain removal from the canvas tent material. I don’t want to damage it but that stain has got to go! It’s on the canvas wall surrounding the one bed area. Yuck!
What does your mattress budget look like, Stephanie? I’ve seen a few sites that will custom make mattresses, but they aren’t cheap. I’ve never used them, so I hesitate to recommend them. If you are trying to keep costs down, maybe purchasing a 4-5″ memory foam mattress and cutting it down to size would fit your needs. All you need is a straight edge and an electric knife. You could cover them with a fiberbed topper or cushy fitted mattress pad.
As far as mildew removal, it really all depends on the type of canvas you have. I’ve heard great things about the Bass Pro Shops mildew remover, but I’ve never used it myself, and I hear it contains bleach. You can find a stain removal chart for Sunbrella fabrics here. They recommend a mixture of water, liquid dish soap, and bleach. Just make sure you rinse well. There is really not going to be much that is nontoxic that will remove mildew. You might try vinegar water first, though. I’ve heard it sometimes works. Good luck! 🙂
I love what i’ve found on this website…it has changed my view from contemplating a pop up and being severely judgmental at their appearance. to being 100% motivated to get one and unleash my creativity. with that said can i ask how much you guys budgeted to buy your campers with and how much you then sold the first one for? perhaps I’m just in the wrong time of season? because I keep seeing old campers for several thousand dollars that I’m thinking should be worth $1000 top..
Thanks for stopping by, Chris. There are some amazing remodels on this blog by readers who have really put a lot of time and effort into their campers. Most of these campers are a labor of love, undertaken by families that really just want to enhance their camping experiences and make their PUPs more personal. If you are looking to make money on remodeling and selling a pop up camper, you might be disappointed. Having said that, there are good deals to be had out there, but you really have to spend a lot of time searching. Prices are also determined by your area and time of year. You would be hard pressed to find a camper in decent shape for under $1000 here in Arizona–even in the off season. Pop Up Campers are becoming more and more popular. In fact, since I’ve been blogging about pop ups, I’ve seen our prices here on Craigslist increase quite a bit.
As far as budgeting goes, as long as you purchase a camper with no major issues, it all comes down to how resourceful you are and how much you want to spend on the camper. If you don’t have any major repairs (roof, canvas, subfloor), you can spend as little as Cassie did here and get a whole new look. If you have to repair a roof or buy new canvas, you can easily spend thousands of dollars just to make the camper usable. It’s hard to put a budget in place before you even know what you are working with. Keep searching for that perfect camper, and you’ll eventually find it. We had to wait over a year for ours. 😀
Hi There! Thank you for so much perfect information all packed into one place. We FINALLY came home with our first Tent Trailer last night so of course I’m plotting my attack… In looking at your remodel it appears that you replaced the Formica Countertops with some kind of Solid Surface material. I didn’t see that talked about; What kind did you use? Was the cost worth it?
Thanks again and keep up the amazing!
Welcome, Erin! You’ll be addicted to pop up camping (& modding) before you know it. 😉
Here’s the link to our countertop post. I absolutely love this method, and our countertops are still as perfect as day one. The transformation kit is hard to come by, though. Amazon is the only place I’ve found it lately, and it’s slightly pricier than when we bought it. I love the results, though.
I just found your site. I love what you did to your pop up. We have had pop up’s for years now. Our first was a 1971 model, I wish we would have seen this a few years ago before we got ride of it. We bought a Cole man last year and the day before we went for our annual week beach vacation the crank shaft broke. We had to use the tent’s again. I am going to try and talk my husband into letting me remodel ours now that after a year we have finally found a crank shaft. I would really like to make it feel like home.
Awesome, Evette! I can’t wait to see it! 😀
Can you tell me where you got the pole that is shown holding up the canvas. It looks like a shepherd’s hook. I love this pop up camper
It came with the camper, Lori. We didn’t need to replace any poles. If you’ve got a Coleman, you can always check Coleman Pop Up Parts for replacements, though.
Hi Larissa! Let me start by saying I LOVE you PUP, and your blog has been my entire inspiration for my own remodel!! We tackled our own reno over the past month and it came out amazing!! I wanted to ask you a question though, how does your sink faucet fit though when you have the camper closed up?? My husband installed one that is shorter than yours, and went to close it to leave for camping… Beds wouldn’t slide, and he had to install the ugly original faucet for our first trip this past weekend 🙁 he’s a trooper though, he didn’t really even get mad having to change it out as we were trying to pull out of the driveway! Lol So, I’m wondering how you make yours work, I have the same style kitchen that pulls down to the floor with the brown bar. Thank you!! I have pics if you want to see them too!! 🙂
Thanks,
Jamie
Hey, Jamie! I’m so glad you like the blog, and I’d love to see pictures of your camper makeover. 🙂
We have to unscrew the neck of our faucet when we fold up the camper. It only takes a few seconds to do, and we just place the neck of the faucet on a towel in the sink when we pack up. Hope that helps!
Thank you Larissa! That certainly does! Hubby will be replacing the faucet yet again, thanks to your info!! 🙂 thanks for being so helpful to everyone out there!!!
I am just wondering about your taps? they seem a little high to me? How to you get them to fold down or put your trailer down without destroying them and your trailer? lol I want to replace the teeny tiny faucet in ours with something similar but not sure how to do that, also where did you purchase it from?
Thanks!!!
I love your makeover! Everything looks so bright and homey.
How do you get your faucet to fold down when it’s time to collapse the trailer? I just purchased a trail manor and want a real faucet like you have. Thank you!
We have to unscrew the neck of the faucet when we fold down the galley, Shelley. 🙂
I just came across your camper remodel and love it! Did your camper come with a cassette toilet or did you add it? Ours does not have one and I’m wondering if we can add one.
Ours came with a cassette toilet, but you can add one. Check out Shannon’s makeover for an idea of what can be done. 🙂