


This isn’t a new post, but I’ve been hearing from quite a few readers who aren’t quite sure how to level a pop up camper. Since it has been a while since I posted about this, I thought it might be a good time for a refresher. Remember, leveling your camper is a pretty important step. A little prep work before you leave the house (buy a BAL Leveler!) will save you headaches at camp. 😉
HOW TO LEVEL A POP UP CAMPER
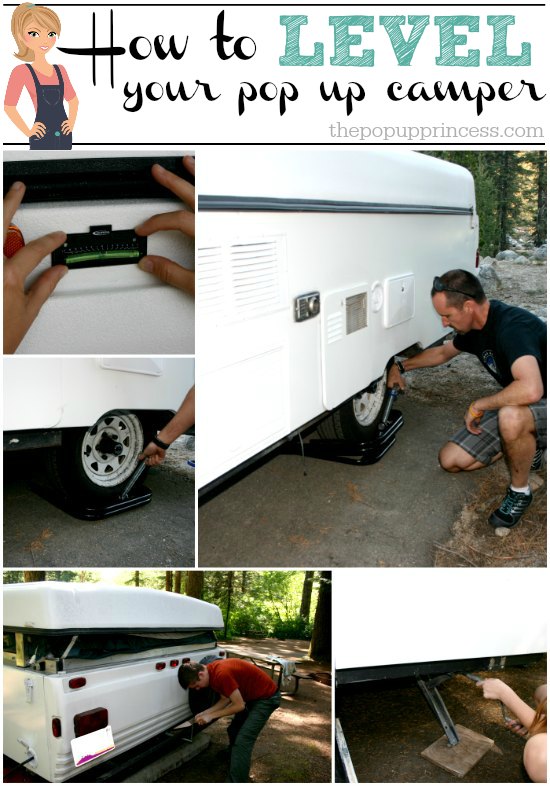
There are a few questions I get asked over and over, and one of them is how to properly level a pop up camper. Keep in mind that each pop up camper is a little different, and you should always refer to your user’s manual for specific information on setting up your folding trailer. After reading through our Coleman user’s manual, we came up with the best way to set up and level our pop up. I thought I’d share that with you, as many of these processes are pretty universal and work for most PUPs.
There are several reasons you want your pop up camper to be as level as possible. The first, and most obvious one, is comfort. It’s a whole lot easier to sleep, eat, and cook on a level surface, but there are other equally important reasons a level camper is a must. If your pop up has a 3-way fridge, you’ll need your camper level for it to operate efficiently. In fact, if you operate your fridge off level for extended periods of time, you could cause serious damage to your system. You can also have problems with the fit of your door and cause unnecessary stress on the frame of the camper if you don’t take the time to properly level the trailer before you use it.
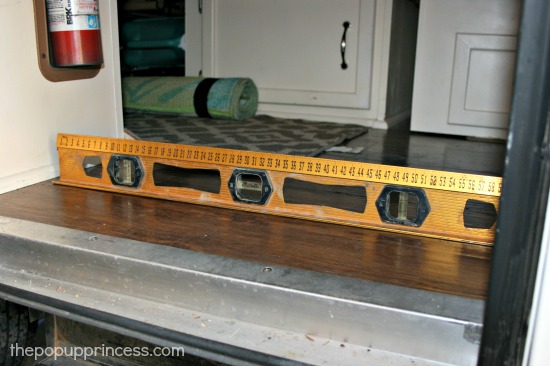
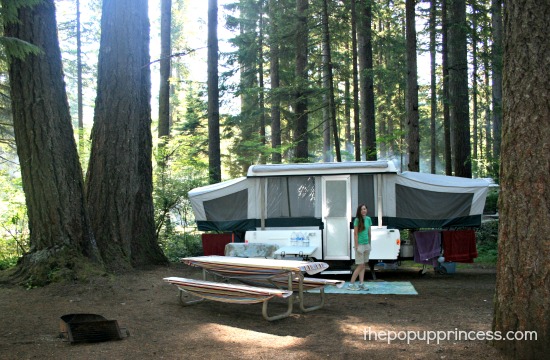
So just how do you make sure your camper is perfectly level when you set it up? In the beginning, I stressed about that a lot. I may have made Mr. TypeTwoFun a little crazy about it. Here’s what we discovered… Depending on where we placed the level, we got a different reading. We parked the camper in a nearly level area to take our readings–for us, this was our garage. The reading from the bumper was completely different from the reading on the tongue. After studying up on this, we realized that the camper didn’t have to be perfectly level, just as nearly so as possible. We decided that since it was most important for us to have the door and fridge working properly, we would take our readings from there. We set set a 2 foot carpenter’s level just inside the door, and one on the top of the fridge. We adjusted the camper until we got level front to back readings on those, which thankfully wasn’t too hard. Then we turned the levels sideways to level the camper side to side.
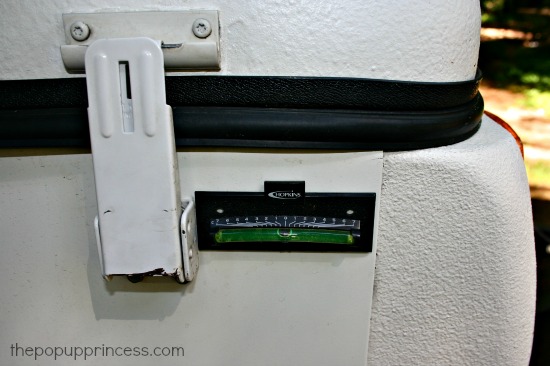
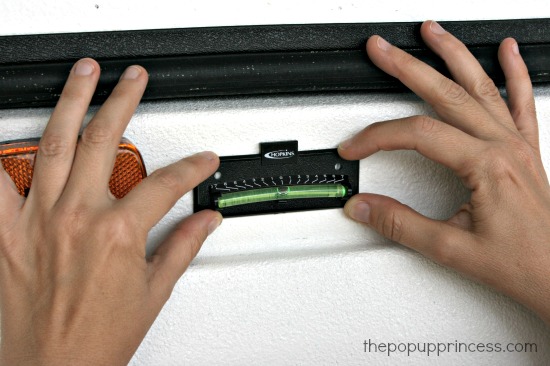 Once we were satisfied with our leveling job, we added these Hopkins graduated levels to the front and side of the camper. Now when we set up camp, we don’t need to bring the 2 foot level along with us. We can just use these mini levels to make sure we are spot on.
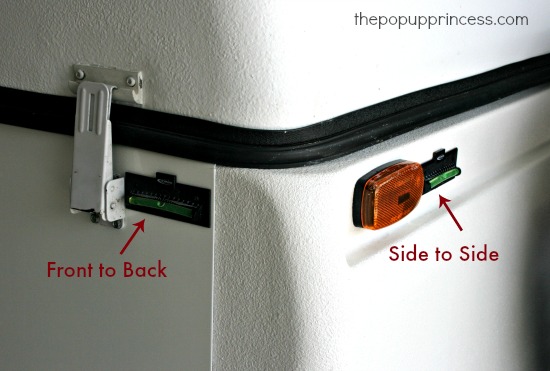 The level on the front of our camper gives us our side to side reading, and the one on the side helps us level the trailer front to back. This makes it so much easier to set up the camper once we get to our campsite. When we arrive at camp, the first thing we do is get out and walk the site to determine where we want to park the camper.
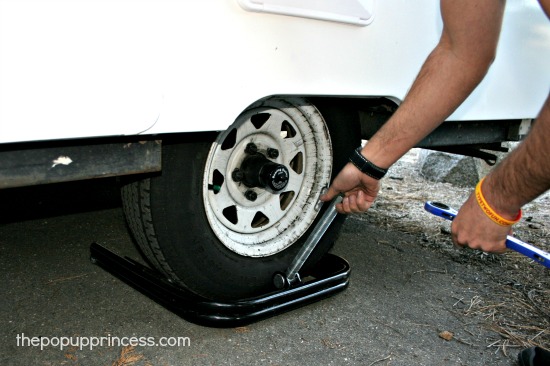
Sometimes, we get an awesome campsite that is pretty near level and there isn’t much work to do. Typically, though, we have to do quite a bit of leveling, especially side to side. One thing that has made this process so much easier is our BAL Leveler. This thing is the bomb! All we have to do is pull into our site, unhitch the trailer, and slide this baby under the low tire.
Our BAL Leveler serves as a chock for that tire, but it is always a good idea to chock the other tire, too. This prevents the camper from moving while you are camped. We typically use a small piece of pine 2×4 or a large rock, but if you want to get fancy, you can purchase wheel chocks like these. We’ve had our eye on these chocks for a while, as sometimes (especially when we forget our 2×4) there isn’t a rock in sight when we pull up to our site.
 Once you’ve got the trailer wheels chocked and the BAL Leveler slid under the low tire, you just use the wrench to crank the leveler to the desired height. Keep an eye on your side to side level, and once you hit zero, you’re done. That’s it! If you don’t want (or can’t afford) to purchase a BAL Leveler, there are other leveling methods you can use– like Lynx Leveling Blocks or a system of 2×4’s cut at varying lengths, but in our opinion, the BAL Leveler is well worth the cost.
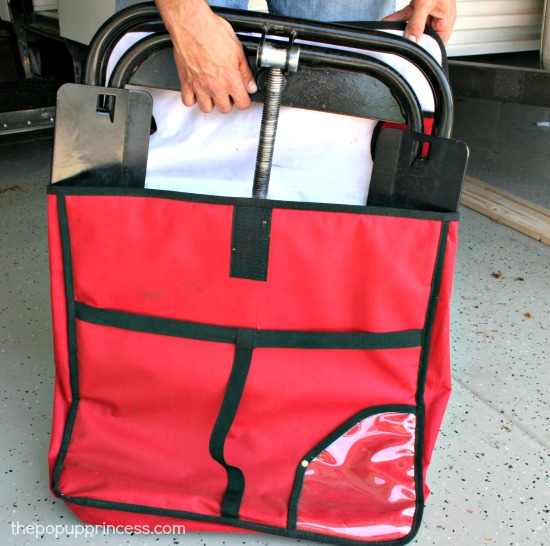
We keep our BAL Leveler just inside the door of the PUP. To protect it from the elements–and to protect the inside of the camper from its metal edges–we store it in a 20″x 20″ pizza delivery bag. It fits perfectly and provides a little bit of padding, too. You can find these on Amazon here or on eBay from various sellers. I highly recommend one for your BAL Leveler. We only picked one up a few months ago, and I wish we would have purchased it in the beginning.
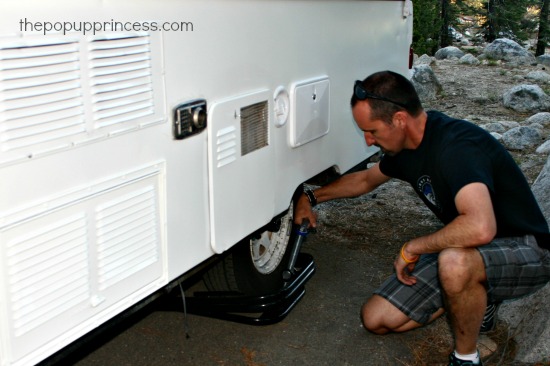
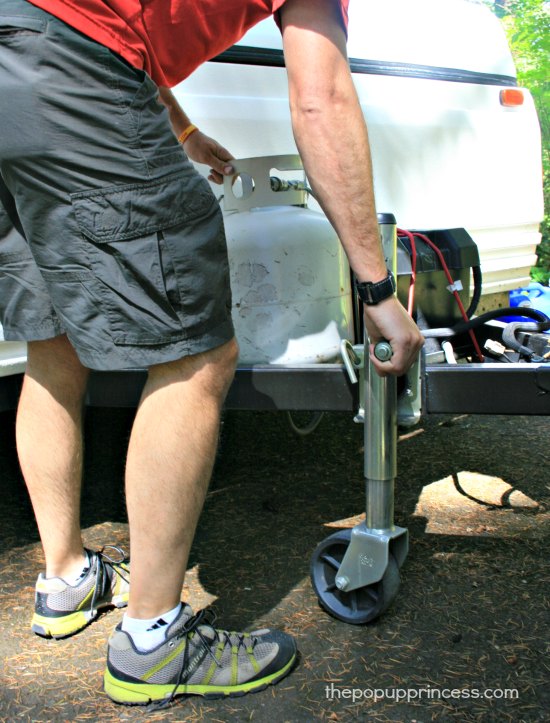 Now that you’ve got the camper level side to side, you can use the tongue jack to make sure you are level front to back. This is a shot of our tongue jack, and yes, it has a wheel. We have never had a problem with it rolling. If you are really nervous about that, you can always set it on wheel dock like this one. When we are all level, we raise the roof.
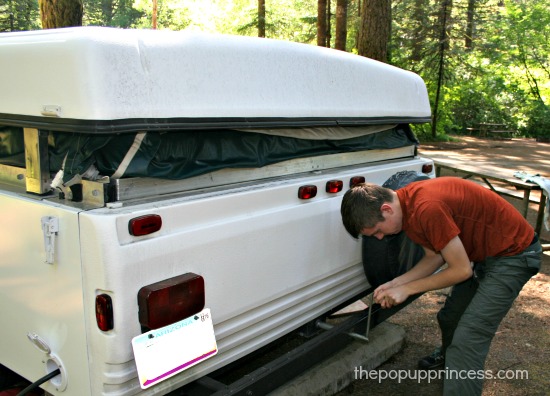
Our manual specifically says to raise the roof before we put down the stabilizers. Putting down the stabilizer jacks before you raise the roof can put undue stress on the trailer frame and lift system and cause premature wear. We always remember “UP-DOWN” when we set up and take down the camper. The roof goes UP, then the stabilizers go DOWN. Once we are folding the trailer up, the stabilizers go UP, then the roof goes DOWN. It makes it easy for us to remember the order.
We raise the roof until the fabric is pretty taut. We’ve gotten a feel for how we like it, so we know how our canvas should look and feel when the camper roof is high enough.
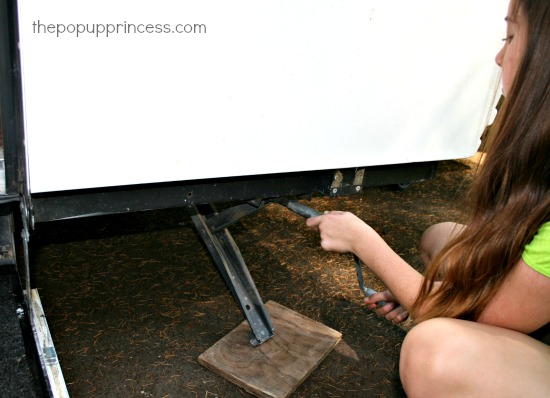 Then we lower our stabilizer jacks. We like to use a flat piece of plywood to prevent the feet of the jack from sinking. You may or may not need to do this, depending on the terrain. Remember, these are stabilizers and are made to stabilize the camper once it is level. Your stabilizer jacks should NEVER be used to level the camper. We crank them down until they touch the ground, and then make sure they are snug. Don’t over tighten the stabilizers, though. It can cause the trailer be off level, and you’ll have problems with your door and fridge. At this point, we make sure to check our levels to ensure we haven’t tightened the stabilizer jacks too much. If we are still level, we’re good.
 Once we’ve got the stabilizer jacks down, we can pull out the beds, put down the door, and finish our set up. We have always taken just a few extra minutes in the beginning to make sure we are level and well stabilized, and it has made all the difference. Our camper always feels stable and secure, and we’ve never had a problem with the door or fridge… knock on wood. 😉
Do you do things differently? What method do you use to level a pop up camper? We’d love to hear from you! Sound off in the comments below.
Disclaimer: This post contains Amazon affiliate links. The Pop Up Princess is a participant in the Amazon Services LLC Associates Program, an affiliate advertising program designed to provide a means for sites to earn advertising fees by advertising and linking to Amazon.com. This means that if you choose to purchase an item from a link in this post, The Pop Up Princess earns a small advertising fee to help pay for future projects and posts… so thank you! 🙂
Happy Camping!

Ok – I am new to this – my aunt and uncle gave me their camper. With no manual! After reading I found one one line – thank you so much for your tips about the stabelizers go down after the top is up and they are not jacks. My newbie confusion is do you keep your jack under the tire the entire stay or do you find a way to slide the yellow lego pieces underneath?
Do you mean the BAL Leveler, Sherri-Ann? It stays under the tire the entire time, as it also serves as a chock. It keeps the camper really stable, and we don’t get much sway when we are moving around inside. We love it. 🙂
Thank you so much for sharing this. Next to backing the trailer into the campsite, nothing puts a marriage to the test like leveling a camper! My husband and I have struggled with this for a few years. I am anxious to try the BAL leveler. Happy trails!
I hear ya! The BAL Leveler has definitely made for fewer arguments. 😉
How did you attach your graduated levels? We just recently purchased a set which has an adhesive strip but I’m unsure if it will stay stuck to the camper. Thanks!
We used the adhesive strip on the back, Mary, and didn’t have any problems with it. In fact, when we took off the front panel to do the repairs, we took the levels off. It was quite a job to get that adhesive off the camper. It stuck quite well. Once we had the camper painted and the panels repaired, we used the same type of auto body adhesive tape to reattach the levels. We live in Arizona, and have never had a problem with the adhesive melting or coming off. If you are worried, you could always screw or pop rivet them on to the body of the trailer.
Thanks! I think I’ll use the adhesive strip. Living in central NY we don’t get the prolonged heat you do but we do get some exceptional cold winters. We are taking the pup up to my in-laws camp near the 1000 islands this weekend before my oldest son heads back to college in the Adirondacks, and I wanted to make sure we could level the camper a little easier than with the gigantic level my father-in-law has. Thanks again!
We were told to put stabilizers down before putting top up. Maybe this is why we still have a lot of movement. Will have to try this.
What type of PUP do you have, Kim? Coleman always recommends raising the roof first. When in doubt, though, check your manual! 🙂
I have a Jayco and they tell you to not pull down the stabilizers until after the roof is raised. The manual states it can cause the lift cable to catch and possibly break. Yikes! I am always careful to follow the Up, Down method too.
Do you have issues with the PUP shaking any time anyone moves? We do, and I’m trying to figure out how to minimize that….Not sure if I’m putting the stabs down too far, or not far enough.
Are you using the BAL Leveler, Erik? We find that helps stabilize the camper quite a bit, and we don’t get the rocking as much.
We have a 1987 Sequoia Colman pop up. Where did you by the bal- leveler ? How much ? I have lever type stabilizers and it’s a pain to get them in the same tension. Thought of putting screw down type on her.
We bought ours on Amazon. It was the best price I could find. Amazon prices sometimes, fluctuate, though, so it’s always good to shop around. 😉
I recenty purchase a 2014 rockwood pop up,around 2,200 lbs. I have a 94 caddy sedan deville. V8 This should be enought i hope to pull this pop up. Please let me know Thanks Roger
Roger, I never recommend getting specific towing capacity information the Internet. Towing capacity is such a big deal that you should check your users manuals for both your specific vehicle and your pop up camper. Make sure that your vehicle can handle the weight of your fully loaded pop up camper, not just the dry weight of the unloaded camper. Happy Camping! 🙂
With one exception “Trailer Life Magazine” does an annual tow rating guide that is amazing. You look up the year and then your vehicle. We had an RV dealership and used this all of the time we saved every year in a notebook. They are all available online now. .
We do a lot of dry camping. On one forest road we literally shook off the front level! I also carry a small level in the toolkit. On our Coleman Bayside we have a small storage area under the stepper door, I have 2 pieces of wood that are 1 X 9 X 22 and I thoroughly coated with the Rustoleum undercoating. We put these down on the BAL side and then center the wheel. This gives you some solid surface to crank up your leveler. We found out the hard way that sometimes if the ground is too soft your leveler just sinks, instead of your wheel rising! lol
That pizza bag is a great idea for the BAL leveler. That leveler has to be one of the best purchases we made.In 5 years we have never been lucky enough to stay in a campground that was dead flat and you are so right about the 3 way fridge they are very temperamental and need to be level to work correctly
Thanks for the update on not putting stablizers down before roof is raised.
We bought our 2009 Sequoia a few months ago and used it several times.
The last time i raised it one end did not seem to raise all the way up, even though the crank stopped.
is there a way to adjust cables? Or should i bring it into a dealer?
There is a way to adjust the cables, Jay. Check out the forums over at the PopUpPortal.com. There is TONS of information over there on how to do it! 😉
I love all the helpful info you have provided! We are first time pop up campers and we purchased a well used older camper. Before we test it out- does it have to be equal weight on each side so it won’t tip over? This may seem silly but I don’t want to be laying with my husband in one bed and have my 6yr old on the other bed and it tip over because of so much weight on one end! Thanks for all you do!
You’ll be fine, Candace. Just make sure you put your stabilizer jacks down. 🙂
You mentioned “We adjusted the camper until we got level front to back…” but what I always struggle with this is the how. What adjustments are you making and how? You mean moving the trailer around? Besides the tongue of the pop-up I don’t understand how to level this without using the stabilizers.
Now that I re-read this article, I think I know more about how to do this. I’ll see how I make out this coming weekend. Thank you
This was the most useful information I’ve read in the two years since I purchased my 1997 Coleman pop-up. I purchased the BAL leveller – best item I have purchased for my trailer, along with the attachable levels and your excellent direction my set-up has gone from 45-60 minutes to 15 minutes!!! And that includes backing in to the site (still perfecting that skill!). I no longer look like a dog chasing its tail since the multiple circling of the trailer from one corner to another then another trying to get the darn thing level. Thank you so much for sharing your knowledge and experience with us. Much appreciated!!!
GOOD STUFF…The ONLY thing different from MY camp trip this year was not buying the ‘pizza bag’ for the newly purchased BAL wheel lift – I just tossed it in the bed of my ’17 Chevy Colorado V-6/Z71 along with the rest of the gear. HOWEVER – go to Sears and get a Craftsman ratchet wrench – the ‘Made In China’ one that comes with it is garbage (and that’s rated G speak). It only worked if you moved slowly and at an angle, otherwise it freewheeled. The leveler itself is great, I had to lift the road-side-wheel about 2 1/2 inches to get me properly propped on my site. Also, I have the same bubble levelers on my 2011 (final production year – RIP) Coleman Sedona, and they are of great assist, rather than trying to find, then move around a loose level. The Camco tongue jack wheel dock is another well spent 10 bucks.
Loving this blog!!! I just searched amazon for the BAL Leveler and found it amusing that in the results were the pizza bag!!! 😂 Obviously now a popular pair!
I bought my pup just a month ago so I have lots of questions. But for this article just one: does the front, wheeled jack stay down as part of the leveling system or is it raised once the camper is level? Thanks.
It stays down. The tongue jack is what levels the camper from front to back, Christie. 🙂
This post made me check my owner’s manual, thinking I’ve been doing it wrong this whole time. But according to my 2010 Viking pop-up manual, you lower the BAL stabilizer jacks and then raise the roof assembly. So do note that not all pop-ups are alike.
This is absolutely true, Zac. Each manufacturer is a little different (as noted in the original post) so check your manual for specific instructions for your particular model. It’s worth noting, though, that a BAL Leveler and stabilizer jacks are different things. The BAL Leveler is a standalone leveler that levels the camper side to side. The stabilizer jacks are for stabilizing the camper once it is level. 🙂
Thanks Zac. I have a 2008 Viking. Just last night I lowered the stabilizers first before raising the Top. Then I read this amazingly great tips this morning and thought I had done it wrong. Now I’m going to double check the manual. Great article Larissa. Thank you for taking the time to point us pop-up newbies in the right direction with all your great hints.
Not all manufacturers give the same recommendations, Jesse, so if you have the owner’s manual, break it out! It’s always best to go by their guidelines–especially if you are still under warranty. 🙂
Hi there. We just bought a 2008 Coachmen Clipper. My wife and I grew up in pop ups, but it’s been many years since we’ve been in one, and we never were “responsible” for setting it up when we were kids. We set it up to clean it and prep it, but we’ve noticed it shakes/sways at the top QUITE a bit! I figured it wasn’t level as we set it up in the dark when we brought it home a few days ago. But after reading your article, we brought it back down to clean the top and to set it up releveled (hopefully). Let me note that our driveway is pretty sloped AND cracking badly, so I’m sure it’s a bad place to test this. A few questions though: 1. Is THAT amount of shake/sway at the top normal? I don’t remember it being that bad as a kid (though we didn’t have a crank pop up). Can we do anything to stabilize that (or should we)? 2. We’ve had trouble putting in the door both times. I know this, too, is supposed to help stabilize it, but it has been a dickens trying to get it in straight, latched and velcro attached. 3. I have wood but also bought the stacking blocks. I know how they could be used for the base of the stabilizers, and even stacked to roll a tire up on. Obviously that needs to be done when still attached to the vehicle. How does one balance side-to-side without that BAL leveler? And,if I got it, you only use it on ONE side, correct? Sorry for all the questions!
Yes, Eric, you only use the BAL leveler on one side of the camper. It raises the low tire and keeps you level side to side. It does a great job of preventing the shaking and swaying that you are talking about, too. For us, it is a no-brainer. It makes setup a breeze, and the camper feels very stable. We think it is worth the money.
Check your owner’s manual to see if there is any mention of adjusting the roof height. I know that we have to check our Coleman occasionally to make sure all four corners of the roof are the same height. It periodically needs to be adjusted, and that helps with the fit of the door, as well. 🙂
Hello,
I only have 12″ tires on my pop up and wondered if there is a way that I can still use the BAL Leveler. Is there a way to add on some planks perhaps to take up that extra inch?
I have seen people do just that, Wendy. They add a piece of wood to the sides of the BAL Leveler (between the tire and the leveler). I can’t comment as to the stability of it, but I do know that quite a few people have had great success with that method. You might jump on the Pop Up Portal and ask from someone that has experience. 😀
Oh this is a wonderful blog to find.. thank you, for the
Just got our used 2006 Fleetwood Niagra, HW Pop up yesterday. I know NOTHING about popups.. lol
FIRST thing this morning I wanted to PLAY with it.. and though it was parked on the driveway.. It was UNLEVEL….now I don’t think I should even crank it up.. what a bummer to wake up too..
I certainly want the BALL LEVEL..ready to get one…
I do have a question: Does the weight of the camper make a difference when using the BALL Level?
Ours weighs over 3000 lbs.. Does that make a difference?
IN reading the reviews, most of these popups are light weight…Um??
THANKS for you help : )
Do you have double axles, Donna? If not, you should be fine, but I’d double check with the manufacturer first. 🙂
We have recently purchased A1980 Starcraft Starlite pop up… what do you mean by low tire? We do not have the manuals and the manufacturer told us they do not have it in the archives. We pick up the trailer tomorrow…it needs a lot of work we look forward to our first trip. Do you have any resources for older manuals that you can suggest.
Usually when you park the camper, one side is lower than the other. You put the BAL leveler under the tire of the lower side so you can raise it to level.
Pop Up Portal used to have a bunch of older camper manuals in their archives. I haven’t been on in ages, and they’ve had a format change, but I *think* they are still there. You might check and see if your manual is in there.
I was wondering as to how you protect your mattresses when you pack up for the winter or do you not really bother. We just bought a new camper and they are covered in plastic which we will most likely rip off. When we are using the camper, we’ll have a mattress protector and sheets on it but what do you do when you pack up? It would seem that just left out and not covered they would get dusty and dirty.
We put plastic mattress covers on them when we aren’t using them, Mary. They are just basic waterproof fitted sheets. We don’t have hard winters, so we don’t really have to winterize our camper. We can use our PUP year round. If you have to pack your camper away for the winter, you might want to look into a higher quality mattress cover. 🙂
Hi there! Great article for the newbie to pop up camping. A question about the roof….our roof always seems to be unlevel in that it looks like it is tilted up in front and down in back. Could this be due to the wright of the AC unit?
Maybe. Have you tried adjusting your roof height yet? Our owner’s manual suggested we periodically measure each corner to make sure the height was the same on all four sides. If there is a discrepancy, you are supposed to make adjustments. Any chance you sto;; have an owner’s manual for your camper?
so we bought our first pup it’s a 2006 Fleetwood element graphite and I was wanting to know where our sink water drains to
I dont see a tank where water would go.can someone help me with this
It usually drains to a port in the back. You can read about our gray water system here.
Hi! Will definitely try the up down method.i have been doin it wrong. I have a 1979 bonair and it says there to pop up the roof the stabilizer jacks go down. Will have to see if it makes a difference. Thanks 😊