


 There is a pretty amazing story behind this next camper remodel. Karen and her family really wanted a pop up camper, but they had a pretty small budget. Once they found one, they had some major setbacks. In fact, most of us would have thrown in the towel at some point, but not Karen! She and her husband, Michael, stuck with their remodel, and by doing all of the major repairs themselves, they were able to stick to their budget. Here’s Karen to tell us all about her makeover story.
Karen’s Pop Up Camper Makeover
About a year ago, my husband, Michael, and I started looking for a camper. We didn’t need anything too fancy, just something that we could corral the kids in. With my brother’s help, we were able to find a pop up camper in the neighboring state of Nebraska for $500, so we planned a vacation and drove up to get our new PUP.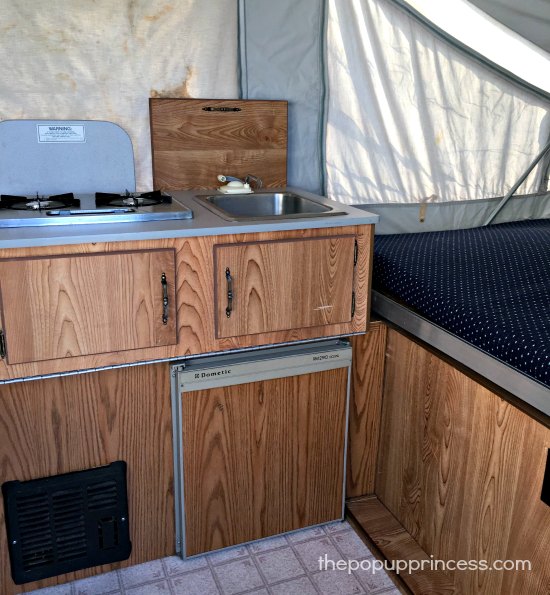
The camper is a Viking SP165 and was in very good condition. There was a minor tear in the canvas and just a few critters living inside, but nothing we couldn’t fix. We had never even seen a pop up camper before, so we were excited to open it up! My husband slowly cranked the camper up–it was a little dusty after being stored in a barn–but it was working. We were so excited… then we heard a loud “POP!” We were all standing around the camper, and paused for a moment as my brother asked, “Is that normal?” Nope. It was not. We had broken a cable.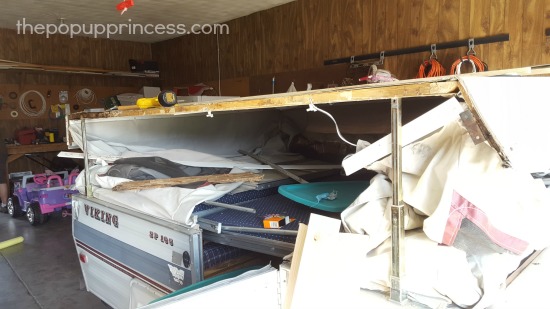
Unaware of how to fix the issue, we thought, “We’ll just ‘undo’ the opening of the camper,” and we lowered it back down. Big mistake! There was no longer a cable attached to one of the arms, and by lowering it, we proceeded puncture a hole in the side wall of the roof. It eventually ripped off the back half of the side wall. We learned two things… 1) Once a cable in a pop up has broken, lowering the roof will NOT lower the arm that cable was attached to. 2) We have terrible luck. 😛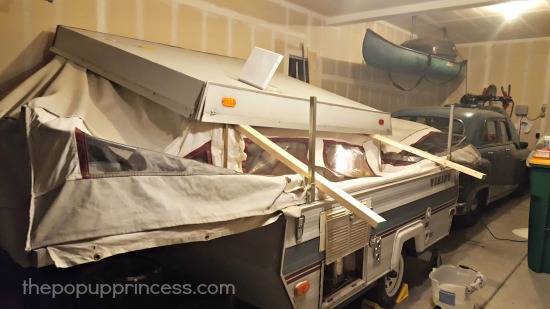
In order to get the camper back to Colorado, Michael rebuilt the side wall and eventually cut all of the cables so the roof would latch down. With a little plastic wrap and duct tape, we were road-worthy. Once home, Michael hoisted and braced the roof of the camper with four 2x4s. He purchased $30 worth of wire from Home Depot, and we were ready to restring all four cables. Unfortunately, there was a catastrophic failure of our temporary support beams. A couple of the 2x4s slipped, and the entire roof collapsed. We were lucky that the garage wall caught the roof from falling all of the way down. If it had not, Michael surely would have required a visit to the local emergency room.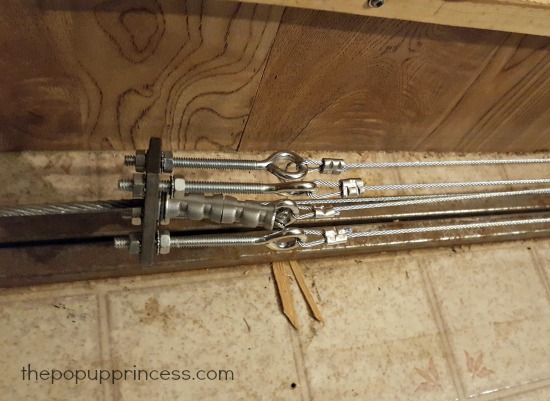
At this point, we were questioning our purchase, but I had become so enamored by all of the remodels on The Popup Princess blog, that we trudged forward. My husband restrung all of the lift cables and replaced the four eyebolts. We estimate that we ended up saving about $250 per line by doing the work ourselves.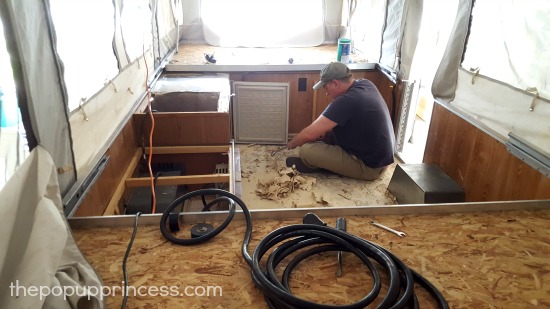
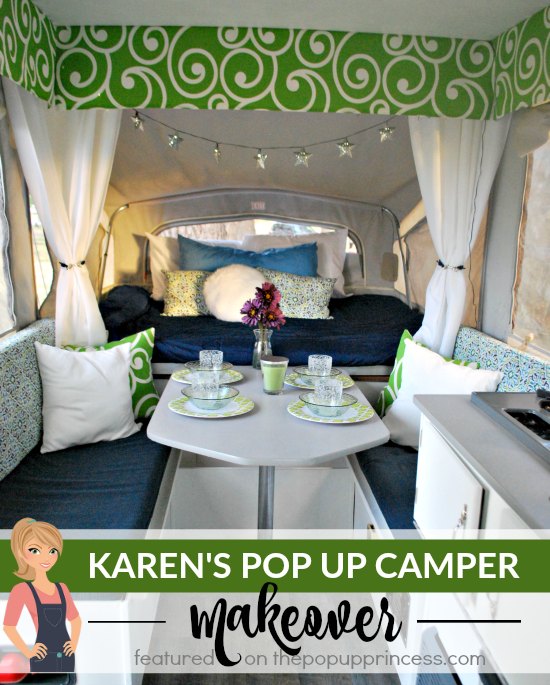
The countertops and table top were already perfect, so we saved some time and money by leaving them alone. We didn’t remove the cabinets to replace the flooring, but we did scrape up all the old linoleum. We spray painted all of the metal in the camper, like the stove top and heater vent, with a heat resistant engine block grey that we found at an automotive store. We painted the rest of the interior white. Since we have so few cabinets, we purchased new brushed nickel hardware at Lowes for about $20.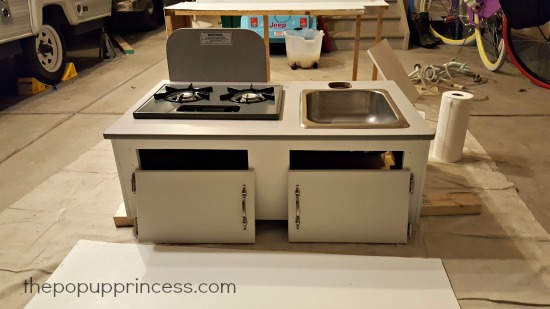
Once all of the walls were painted, we moved on to the floor. With all the old linoleum gone, we had a clean slate to lay peel & stick vinyl planks from Lowes. We used the Driftwood color that I have seen in many of the reader remodels on this blog. They always look so clean and cozy, and I liked that look. Since the camper is rather small, we only used about $40 worth of planks.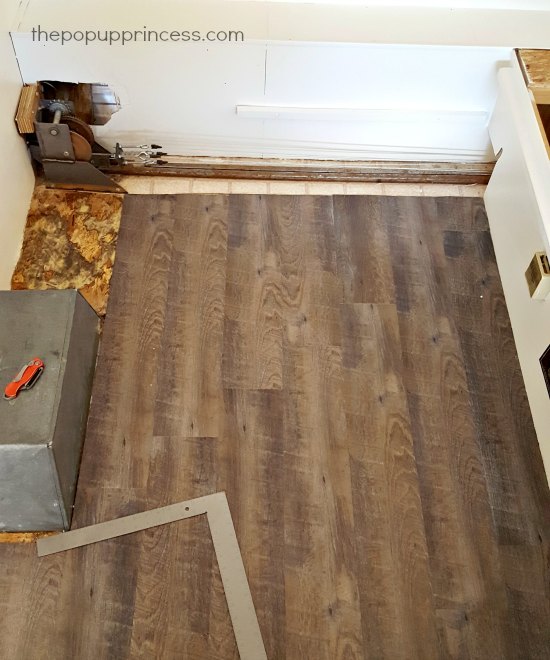
The next step was reupholstering the cushions in the camper. We headed to the local fabric store and spent about two hours trying to decide on the color palette. We ended up with a deep blue, grass green, and white. Unfortunately, we were not as frugal with the fabric as other readers have been, and fabric was our biggest expense at $275.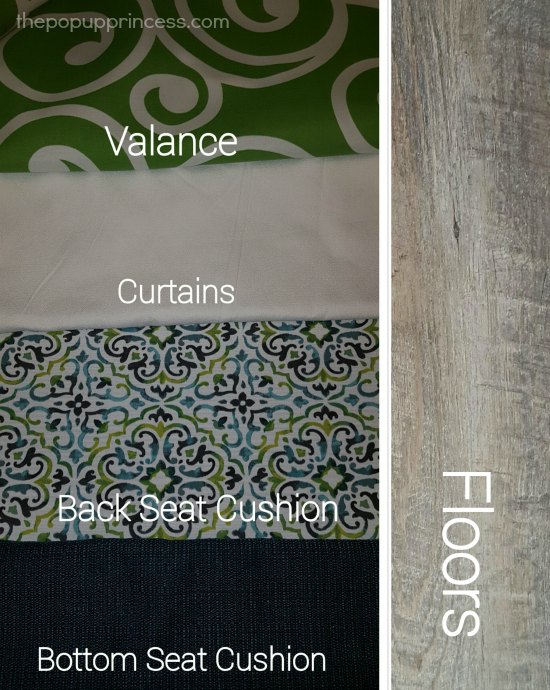
Since I have never reupholstered before, I made it up as I went along. I laid the cushions on the fabric and measured a seam allowance with a compass. Then I traced around the camper cushions. Using the cushion as a form, I pinned the fabric inside-out and then sewed along the pins. Instead of zippers, I cut one side a bit longer, tucked the ends in, and added Velcro to close the opening.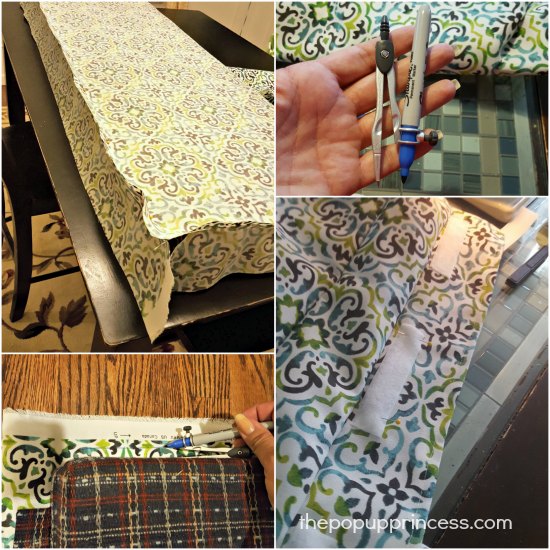
We went crazy with throw pillows and picked up 12 pillow forms from Target and Wal-Mart. We made some envelope style pillowcase covers and stuffed the pillows in. The curtains were probably the hardest for us to figure out, since the camper did not originally have curtains. We searched through this blog and could not figure out what solution would work best for us. We finally discovered a track system that we could staple to the ceiling of the camper. We ordered a SlideRite plastic curtain track and 100 sew-in nylon tabs that would slide into the tracks. In total, the entire system cost about $56. We sewed all of the tabs into curtain panels we bought from Wal-Mart. Since we have taken our PUP out camping, we have broken some of the tabs. They were snapped during the lowering of the pop up. Now that we know of the potential hazard, we are very careful about the placement of the curtains when we break down the camper, but overall this system works well for us.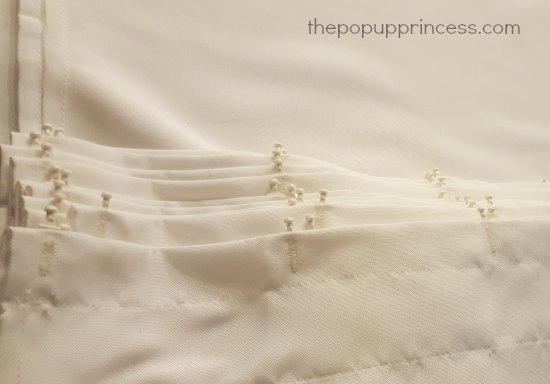
For the valances I cut strips of the green fabric and sewed a simple hem. We attached the fabric to a white wooden trim piece and stapled those to the ceiling about three inches from the curtain track. For tiebacks we decided to introduce a little bling, so my husband used his Boy Scout knot-tying skills and created some nautical-style hooks for us. I followed Larissa’s suggestion from the Facebook page and hit Target during their linen sale. I was able to pick up sheets and comforters for the two beds in the camper. Since the beds are a strange size, I wasn’t sure about how to cover the mattresses. Again, I stole an idea from the blog – shower curtains. I ordered four mildew-resistant cloth shower curtains online and sewed them together leaving the top open. Using the existing holes of the shower curtains, we took clothesline rope and laced the top of the curtains together. We just slipped the foam mattresses inside and closed the new covers up. Voila!
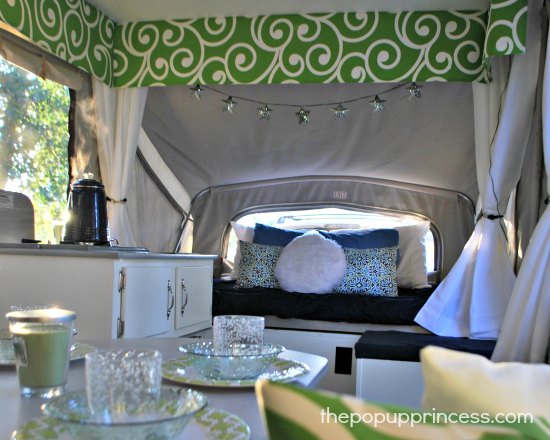
I found two sets of solar-powered lights on sale at Target – another idea lifted from The Pop Up Princess Facebook page. These turned out very cute! They light up the top of the canvas with little stars, and my girls LOVE them! 🙂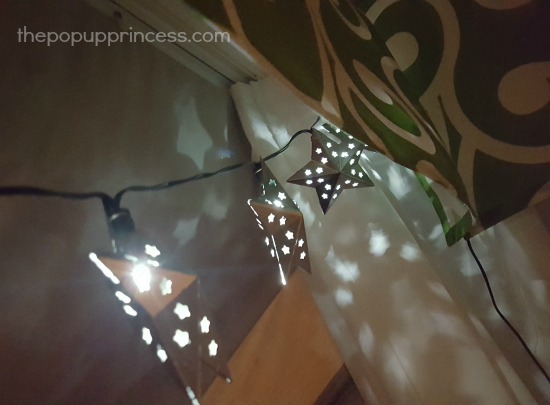
As final touch and to give our makeover a little bit of personality, we decided to add a quote to the door of the fridge. My husband and I chose our favorite Bing Crosby song, Don’t Fence Me In. I cut the quote out on my Cricut machine in vinyl, adhered it to the fridge, and finished it off with four layers of matte finish Modge Podge to seal it well.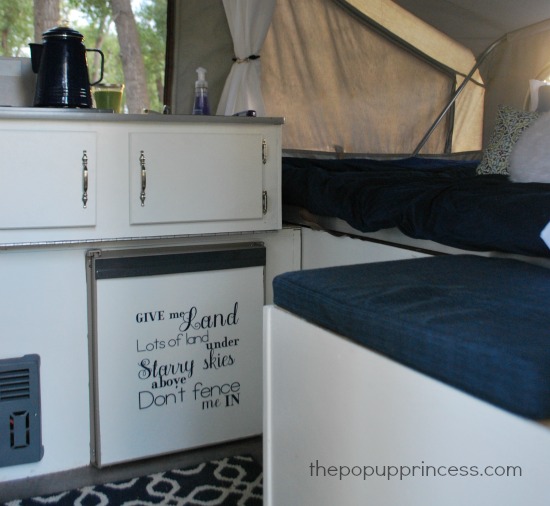 All told, we spent about $500 on the items needed for the remodel. We have gone camping a couple of times, and our girls just love it! We are hoping to get out next summer and make some memories with our little family.
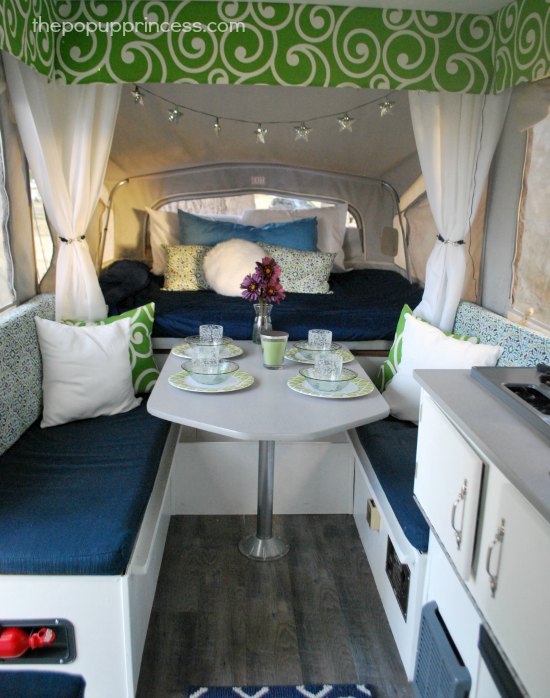
Thank you to Larissa and all of the readers who shared their makeovers here on The Pop Up Princess. You really inspired us and kept us going despite our setbacks. 🙂
Way to persevere, Karen and Michael. I’m not sure I would have had the fortitude to keep going after so many setbacks. I really admire your persistence and am in love with the end result. What a gorgeous makeover! Here’s to hoping you get many years of memories out of it. Thanks for sharing!
Happy Camping!
![]()
Happy Camping!

links to “what to do when cable breaks at camp & how to get home” ?
yikes, i would have done same thing lowering roof.
I need to climb under & check cables.
where do they tend to break?
k
Ours broke at the tree (you can see the picture above with the new eyebolts and wire). But, you can’t just shorten the lines because the cables have to be EXACTLY the right length. You have to restring the whole thing. We found a couple of you tube videos, and it still took a couple of tries to get it right.
Here is one video that helped a lot. https://youtu.be/AjFWKFwIBsU
Sincerely Karen, we just bought our popup and saw this today. You and Michael seriously, SERIOUSLY, win the perseverance award. I would have just bawled.
Hi! Great work. I have a question. I just ordered the same valance fabric except in red. The print is a little bigger than I thought it was going to be, but I love it nonetheless. What is the depth of your valance? I’m debating about how deep to make the drop. It definitely adds a fun pop of color.
Oh geez! I just saw this! If you mean the length from the ceiling, it’s about 9 inches.
Love your make over! My camper is missing the exact table you show in your picture. Does anyone know where I can find one? I have scoured the net and no luck!
I have the purchased the same fabric as the back cushions along with a grass green print for our remod! I’m glad to see it looks fantastic!