


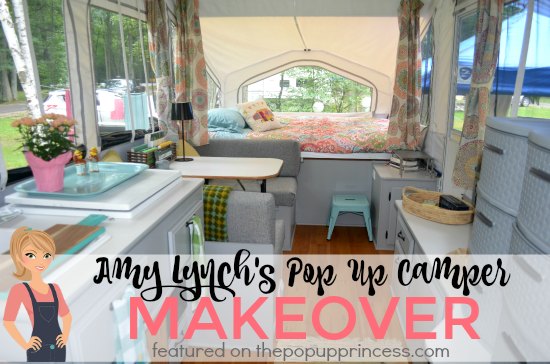
This next reader makeover is so adorable. I love how colorful and happy it is, even though Amy used a neutral gray for her cabinets, counters, and cushions. Just the addition of colorful curtain panels and bedding is enough to completely transform the whole camper. Add the cute accessories, and you’ve got A cheerful–and versatile–living space. Amy can totally change the vibe of her camper just by changing the curtains and bedding. That’s what a great neutral color can do for you. I’ll let Amy tell you all about her little PUP herself.
AMY’S POP UP CAMPER MAKEOVER
Like many of The Pop Up Princess readers, my husband Jeremy and I have always been tent campers. My parents had a pop up camper when I was a toddler, but my memories of that are just from pictures. We borrowed a 1968 vintage pop up from my aunt and uncle about 15 years ago and loved it. It’s been in the back of my mind for years to get our own someday. Last winter, we started talking about it more seriously, but all of the campers I was seeing were just not my style. We’d found the Pop Up Portal, but until we found The Pop Up Princess, we just didn’t know how fabulous a camper could be. 😀
I spent most of the late winter and early spring drooling over camper remodels here on the blog and on Pinterest, while Jeremy looked at used pop ups on RV Trader and Craigslist. Our annual winter trip to the RV show took on a whole new significance as we decided what we wanted, didn’t want, and what floor plan made the most sense for us. After months on Craigslist, and lots of emails, we finally went to see our first camper. It ended up being the camper for us. We bought it that night. It was a 2005 Flagstaff that was in really good shape. We named her “Ruthie” after my late mother-in-law. My husband lost both of his parents last year, and his mom would have loved that we bought a pop up with a bit of the inheritance.
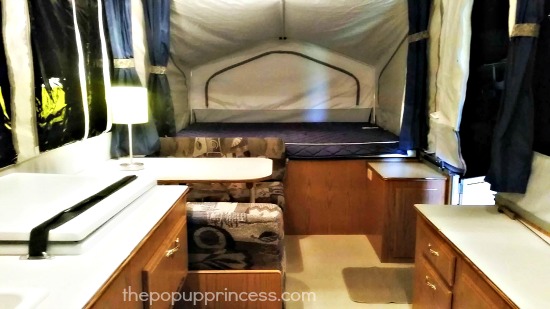
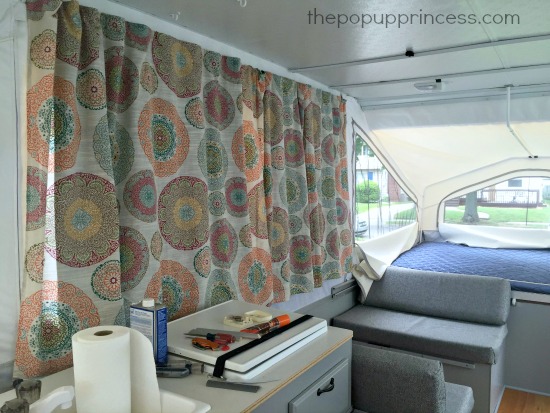
 She was in such good shape and camping season was imminent, so we thought we might just camp in her the first summer without a big renovation. We’d just do a good cleaning to the inside and wash the curtains and cushion covers. They did wash up pretty well, but I didn’t love them. The weekend after we brought her home, we took her out to clean her well, but once we had everything out, we decided to go full steam ahead! We followed Larissa’s tutorial for prepping and painting the cabinets, however we chose to roll on a Zinsser primer instead of spray it on. It was so helpful to have tutorials to rely on. Prepping was key–cleaning, sanding, filling, and priming made for a smooth and easy paint job. We used a light gray Behr Alkyd Semi-Gloss Enamel at the suggestion of our local Home Depot. They told us that it covered like oil based paint, but cleaned up like enamel. We were very happy with it. We bought new cabinet handles, and painted the existing hinges black to match.
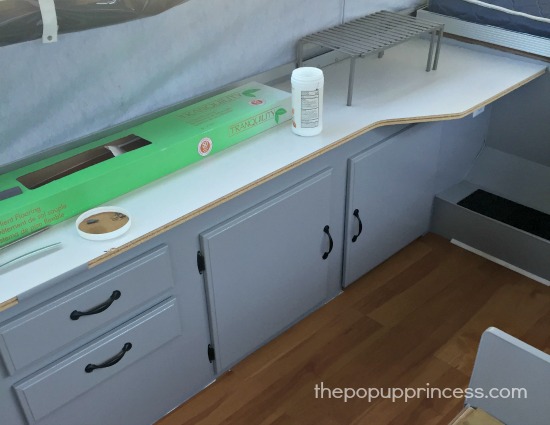
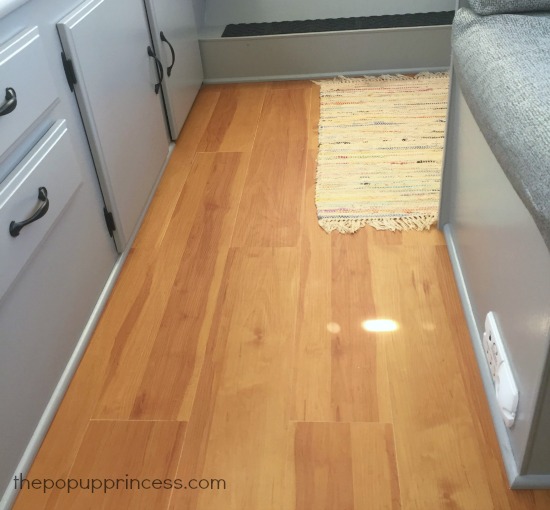
Once we had the cabinets painted, we started on the floor. We bought one box of peel and stick flooring from Lumber Liquidators for under $40.00 with tax. My husband didn’t love this part, and it’s a pretty tight space for two anyhow, so I did it myself. I spent two evenings working on it, and was so pleased with the results. I was nervous toward the end, because I’d made a few bad cuts and thought I wouldn’t have enough planks, but we were able to finish the floor with one box. We weren’t super cautious about the edges being perfect, because we were going to install quarter-round that would hide any mistakes. Jeremy primed and painted the quarter round before installing it. After a few backward cuts, we finally got the hang of it, and I think it looks pretty good. 😉
The t-trim on the countertops was gold and wood and didn’t go with the new cabinets. We considered painting it, but after reading about how Larissa did hers, we decided to just replace it. We bought it through T-Molding.com. They have a great selection and will send you samples of the colors you like. We had them send us three shades of gray, and a chrome look. One of the grays was an almost perfect match to our cabinets. I wasn’t sure if I wanted it to match or contrast at first, so having the samples in the camper made the selection process easy. We bought 20 feet of trim for $10.00, plus $6.50 shipping. The difference it made was well worth it. We did have some trouble with the gap being a bit large after we pulled out the old trim, so we used some construction adhesive to get the new trim to fit right.

Then it was on to the fabrics. After getting discouraged over the price of curtains and fabric, I ended up ordering eight table cloths from Walmart to use for window panels. I was sure they looked familiar once I got them, and sure enough, they were in Becca’s camper makeover. Hers was one of my favorites, and a big inspiration. I cut each tablecloth in half and had enough to make the two pair of window curtains and a pair of curtains for each bunk end. For the window curtains, I sewed the new panels directly to the existing curtains. The tablecloths alone would have been too sheer to provide privacy at night. For the bunkends, I cut the curtain tape out of the original curtains and sewed that onto each end of the new panels to make them wider than the existing curtain.
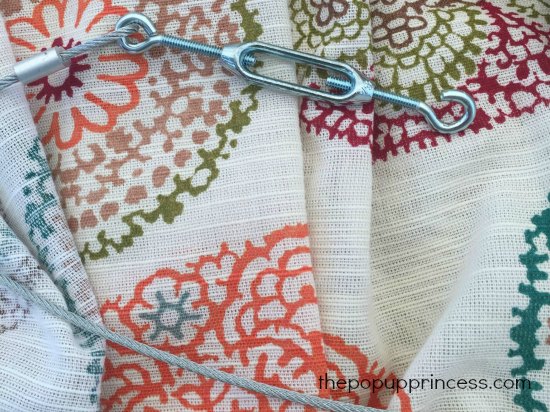
We hung the bunk end curtains with wire. Jeremy bought wire, turnbuckles, and hardware from our local hardware store. He used this tutorial for that project, and we’re really happy with how it turned out. I had considered not doing bunk end curtains, as we’re normally camping with just the two of us, but they do add more color which is nice. They also give us the option of closing the end we’re not sleeping in if we have stuff stored there that we don’t want to see.
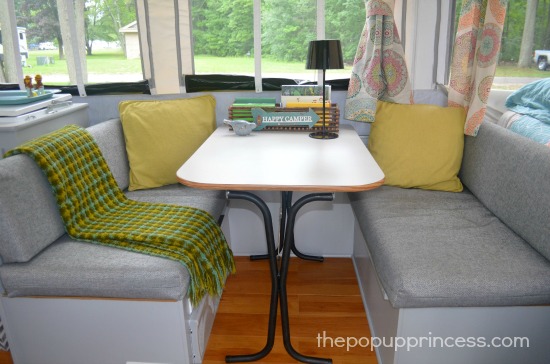
I already had a roll of upholstery fabric that I picked up last year from a great office furniture outlet. I’d planned to recover dining room chairs with it, but since I already had it and had gotten such a good deal on it, I used it for my cushions. It’s made for office furniture, so it’s very durable and easy to clean. I used this tutorial to make slipcovers for the cushions. It was very simple, and since I had already washed the original covers and put them back on the cushions, I put the new covers right over the original ones. I have yet to do the final step of adding the Velcro closures, so the ends are folded and secured with large safety pins for now.I had planned on doing something to change the front of the refrigerator, but once everything else was done, I didn’t mind it so much… maybe next summer. 😉 I still have a few more little projects I’d like to do eventually, like decoupaging the inside of the door, removing the vinyl decals on the outside of the camper, and adding a custom tire cover on the back that says “Ruthie.”
 I had planned on doing something to change the front of the refrigerator, but once everything else was done, I didn’t mind it so much… maybe next summer. 😉 I still have a few more little projects I’d like to do eventually, like decoupaging the inside of the door, removing the vinyl decals on the outside of the camper, and adding a custom tire cover on the back that says “Ruthie.”
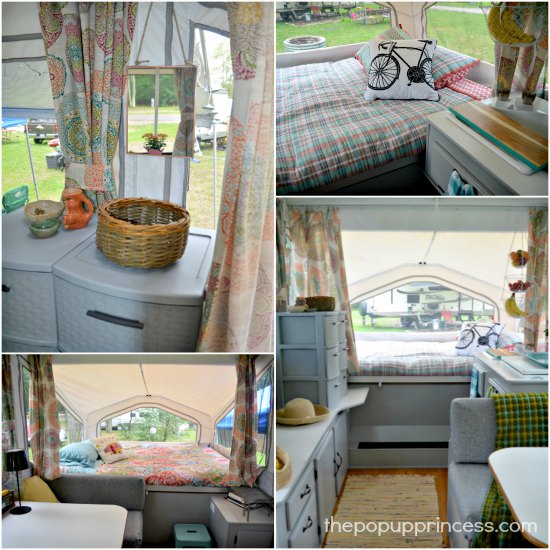 It took us about four weeks to complete the makeover, and our first camping trip was five weeks after we bought it. We’ve made lots of small changes since that first month. We purchased new bedding–the plaid quilt is from TJ Maxx on clearance and the paisley quilt is from Walmart’s BH & G line. Most of the knick-knacks throw pillows came from our home, but we did add a few accent pillows from Target. We also did some cabinet organization and a deep cleaning of the canvas and vinyl windows, and we switched to LED lighting in all of the ceiling lights.
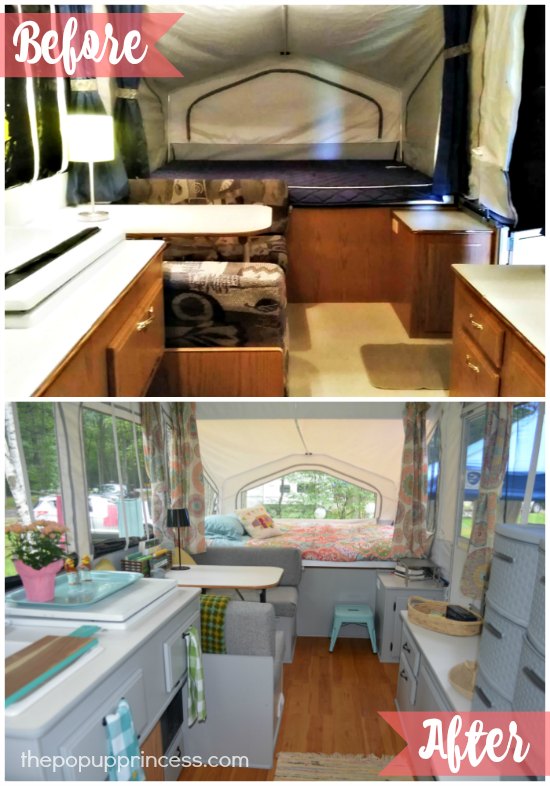 We’ve camped at five campgrounds and a music festival this summer, which is a record for us. We’re just in love with our pop up and couldn’t have done it without The Pop Up Princess. We relied heavily on Larissa’s posts and the fabulous reader makeover features. Thank you all for the ideas and inspiration. Happy camping!
Awww…. I’m blushing. Thanks for the sweet words, Amy! And thank you so much for letting me share your journey here on the blog. I know you’ll be an inspiration to others, just as the earlier reader features inspired you.
Have you been inspired by the reader features here? I’d love to see your makeover, too. Read here for the low-down on how to have your camper makeover featured on the blog. 🙂
Happy Camping!
Disclaimer: This post contains Amazon affiliate links. The Pop Up Princess is a participant in the Amazon Services LLC Associates Program, an affiliate advertising program designed to provide a means for sites to earn advertising fees by advertising and linking to Amazon.com. This means that if you choose to purchase an item from a link in this post, The Pop Up Princess earns a small advertising fee to help pay for future projects and posts… so thank you! 😀
Happy Camping!

I’ve been seriously considering repainting the ugly brownish cabinets in my pop up, but can’t wrap my head around removing the goucho sofa and swing- lift portion of the galley to reach the areas behind them. Thoughts anyone?
I was hoping I had a picture of what we did for the swing lift galley, but I don’t. We didn’t really paint under the sink/stove cabinet, or at least not the parts under that don’t show when the galley is up. We swung the galley down. Taped off the portion that wouldn’t show when it was back up, and painted around that big square area we’d taped off (so just the parts that would show around the edges). It was less painting that way. After that dried, we swung it up, and painted the top cabinet. The hinge was our biggest question. We ended up just painting it as well. It’s holding up well so far, and we can always touch it up. Just make sure it’s good and dry before you swing it down again, we learned the hard way. 🙂 The hinge was dark brown, so it would have stood out too much for me if we didn’t paint it. The only time it shows is when we tear down and set up, and then it’s still a tidy square of brown with gray around the edges, since we taped it off. I hope this helps! We don’t have the gaucho couch, so I’m not sure what all that would entail.
Thanks for the reply…sounds like a good plan. The goucho sofa has a similar issue, some parts show when up, but not down. Has a lot of spring and release mechanism that I don’t think I can handle.
Just wAnted to say hello from Nebraska, my childhood camping,exposed to my child 30 stay-place, kids college grad gift jayco popup, (HUGE ♥️ For his folks, my free spirit folks had a jayco pop up). Plan to pimp out with my daughter and show places accross Colorado, west coast, etc…where are u camping??
I painted all of my cabinets in situ. It probably does not look as finished or polished, but it is a small space with lots of stuff to hide those details. The hardest part is having to put down a lot of tape and plastic along the edges.
Thank you again for featuring our camper, Larissa! 🙂
Those towels are super cute! Did you make them? Or find them somewhere? Seems like there is a lot of cute décor etc out there with vintage campers, but not so much showing pop ups. Looks great!
Hi Bonnie. Sorry it took me so long to reply. I have a super crafty friend. She was making adorable retro camper towels, but said she’d love to try pop up towels. She also made a super cute pillow to match. She does custom orders, and is an amazing seamstress.
https://www.etsy.com/listing/470154141/retro-kitchy-pop-up-camper-kitchen-towel
My husband & I recently bought our first (albeit much older) pop up. It had the original dark forest green & Wine interior.
People like you and all those on this website have inspired me so much. We are taking her out on a maiden voyage in 2
weeks and I knew I would be unhappy living with this drab color scheme for a whole week. So I am in blitz mode and
giving her a fresh update. Thanks to finding the pop-up princess (Larrisa) and all who have gone before, I know I can do it.
It’s so fun, and so neat to see what everyone does to make each their own. Good luck!!
I love how you did the privacy curtains. Could you elaborate on how you sewed over the existing curtains?
+1. I’d love to read more about the wire hanging method you used! Was it hard to drill them into the walls of the camper? On your curtains did you use hooks or thread the wire through a pocket you made? your camper looks great!
I love that color gray. Do you happen to remember what it is called?
Hi Larrisa,
My pop-up is almost exactly the same inside as Amy’s except that our table is where her lower counter top is, our sink cabinet is where the table is and where her sink is, we have a bench set up that houses storage and our water tank (which is kind of in the middle of the trailer on that side.). Long story short, I am curious as to the location of Amy’s water tank because I really like her layout better, and I am wondering if I might be able to make a few switches of my own. We have not yet done any modifications to our trailer, but plan to soon. Thanks.
I’m not sure where Amy’s water tank is located, Tanya. Anything is possible, but it might be quite a bit of work to switch around the location of the tank. It really depends on where all your water lines are. I’ve seen some pretty creative solutions from some of my readers, though, so if you end up moving things, be sure to take lots of pictures. I’d love to see it. 🙂
Sorry, I haven’t looked at comments in a while. Our water tank is mounted under the camper.
Beautiful!
Did you install the peel and stick right on top of the old floor or did you pull the old flooring up first?
Sorry for the late reply! We went right over the old flooring. We washed it well, and applied it right to the old linoleum.
And, thank you!!
Do you know the exact color of the cabinet paint? We are looking to go gray also and that color is fantastic! Your camper is beautiful. We are starting our renovation soon on a 1998 Flagstaff!
Hi Amy,
I love the Walmart table cloths. You said you bought eight. Do you remember their size? They are still available at walmart, and come in sizes:
52×70
60×84
60×102
I would like to follow your lead and use these for curtains, but want to make sure I get the right ones!
Thank you!
Sorry for the late reply. I don’t get a notification when someone posts. 🙂 I bought the 102″ ones, and cut them in half. That worked for the length of my curtains. You’ll want to measure yours to be certain. Good luck!