


 This next makeover is such a great one, because not only is it beautiful, it is functional. When Carolyn first sent me pictures of her camper, I was floored at how much storage space she had managed to create in her pop up. She really has a solution for everything… and if you have camped for long in a pop up camper, you know that is a big deal. Space is definitely at a premium in a PUP. Here’s Carolyn to tell you how she made her camper a gorgeous, organized little getaway. 🙂
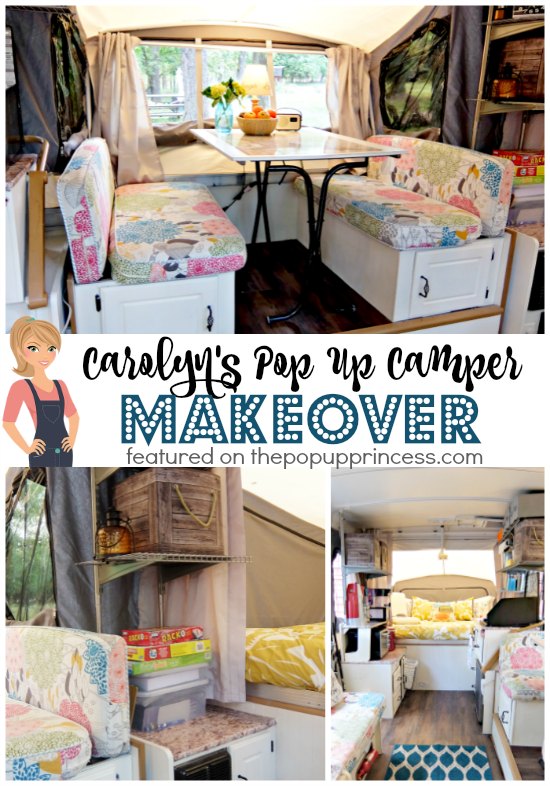
Carolyn’s Pop Up Camper Makeover
My family started camping in a pop up camper when I was just a little girl. I grew up in Florida, which meant we could camp nearly year round. It was an experience that has stayed with me, even now that I am well into my 40’s, and something I wanted for my little family. We only have one child, but even at seven years old, he is all about his electronics… all.the.time. Because he is an only child, we cut him a lot of slack, and honestly, my husband and I spend just as much time in front of various screens as he does. We needed a great way to unplug and breathe. Camping seemed like the perfect solution.
My husband is a city kid. He enjoys nature, but he likes his amenities. I knew that this would be a grand experiment, so I did not want to buy a new towing vehicle or spend five figures on something new. There are precious few campers that a Honda Pilot can pull, and most of them are incredibly small. That lead us to research pop up campers, which lead us to my two year obsession. I spent hours upon hours on Pinterest, Google and YouTube camper shopping, and THAT is when I discovered The Pop Up Princess. 🙂
One day in Fall 2015, while I was browsing Craigslist as I did religiously, I found her–a 2001 Coleman Grand Tour Elite Niagara. What a perfect beauty! She had two king beds, a kitchenette with fridge and pantry, slide out dinette, air conditioning and heat, hot water, dual propane tanks, a storage trunk, and an outside high pressure gas line for the grill. She had a little bit of damage–mice had gotten to canvas, and there was some water damage to the interior wall adjacent to the trunk. She also had the dreaded ABS roof, but the price was right. I even negotiated away $500, and we decided despite her imperfections and potential problems, as a starter camper she was perfect, so we bought her.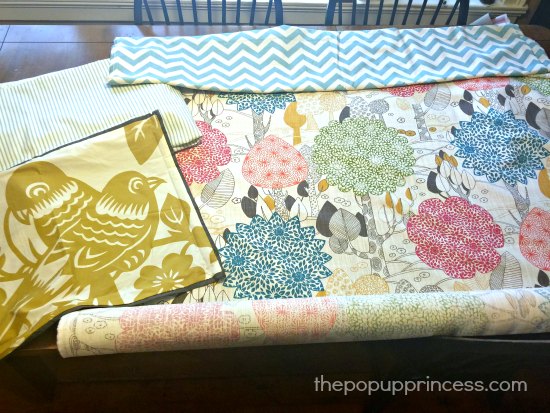
I’m a planner. I plan. So as soon as I had my camper, I started planning a color scheme. I decided to buy new canvas, so I worked around that. Bear Creek Canvas was offering a 10% off sale for the end of the season, and they had fantastic reviews, so I felt comfortable ordering from them. I went with the gray colored canvas, and from there I was on to find coordinating fabrics. When I found the cushion upholstery fabric, it all just fell into place.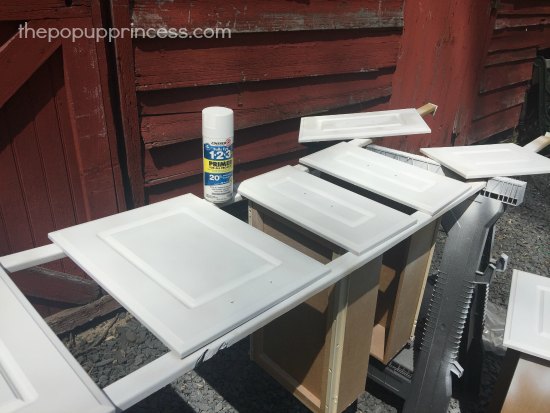 We set our little camper up in the driveway for awhile, hanging out in the evening and playing Uno or just chilling. We wanted to get to know her. 😉 When the time was right, I got to work in earnest. I took out the table, removed all the cabinet doors, pulled the drawers out, and started cleaning her up. Then I used masking tape to tape everything off and gave all the cabinets a good coat of Zinsser 1-2-3 Primer. It took quite a few cans and was more expensive than rolling it on, but it was a time saver. For paint we chose a Rustoleum 2X Heirloom White spray paint in a satin finish. I also attempted to spray the original hardware with an oil rubbed bronze paint. I know it worked for some, but no matter what I did it chipped and peeled. I found some great handles on sale at Lowes for $1.50 each, so I bit the bullet and bought new hardware.
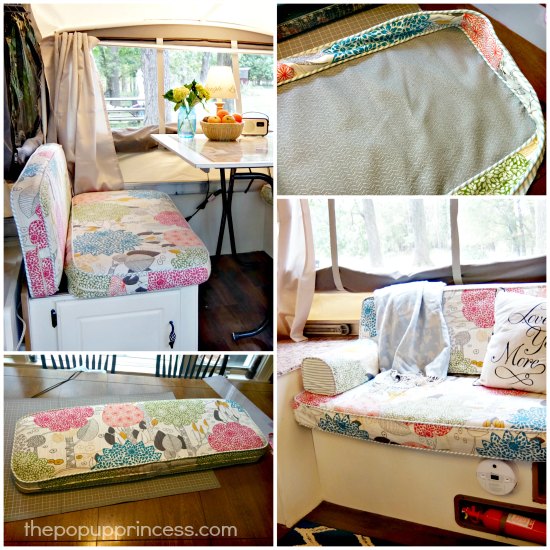 The painting process was tedious and smelly and made me hate everything, so I took a little break and moved on to upholstery. I must have watched 100 YouTube tutorials on box cushion covers with welting–even after going over The Pop Up Princess how-to article 100 times. I made piping from the blue ticking fabric and purchased extra long upholstery zippers for the closures. I wrapped them around even farther than Larissa did, reaching half way around each cushion. This made getting them on and off a breeze. I actually left the old ugly covers on as a lining, as they didn’t really did smell bad after airing out for a few weeks. The main print was expensive, and I wasn’t convinced it could withstand the abuse the backs of the cushions would get, so I used a different fabric for that. I found a great heavy material that was thick, stiff, and kind of horrible, but it was perfect for the back side.
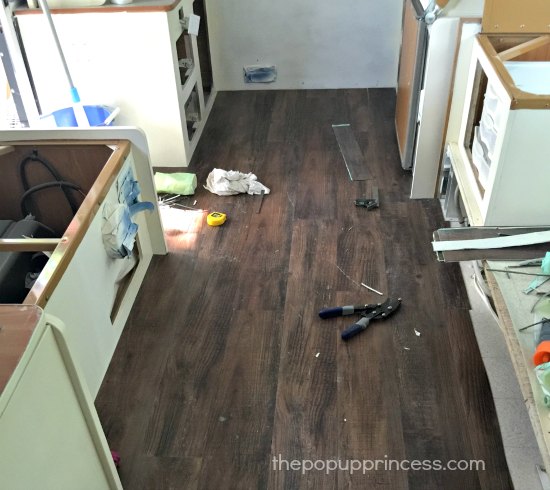 Once the cushion odyssey was complete–and honestly, it took over a month–I was ready to get back inside and tackle the rest of the makeover. I used peel and stick plank vinyl flooring from Lowe’s that was on sale as an out-of-box clearance. There were just stacks of loose planks for $1.00 each. I found all that I could in the color “Old Hickory” and ran with it. I think I spent in a total about $50.00 and had what felt like a thousand planks. It looked so good with my creamy white cabinets, and was definitely worth it.
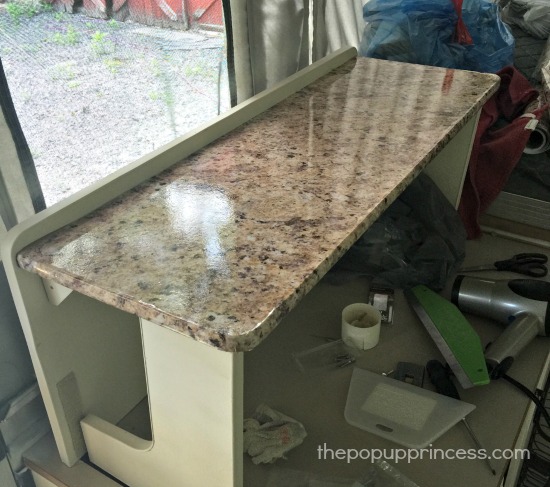 The next big project was the countertops. After being asphyxiated by the paining process, I decided I didn’t want to do anymore painting, so I chose a product called Instant Granite. Here again, I watched lots of YouTube videos. Instant Granite is a product that’s a lot like contact paper, but triple laminated and made for countertops. The installation was sticky, but fairly easy, and while its not perfect, its a million times better than what was there. Since we’ve had the camper out a few times, I’ve noticed that the Instant Granite peels up where it didn’t adhere well–namely the edges. It sticks like a miracle to the old Formica though, so in the future, I will play with other adhesives to hold the wrapped corners. I do not regret using it and will likely just re-glue the edges whenever they need it. I was able to cover all the countertops in the whole camper for just under $100.
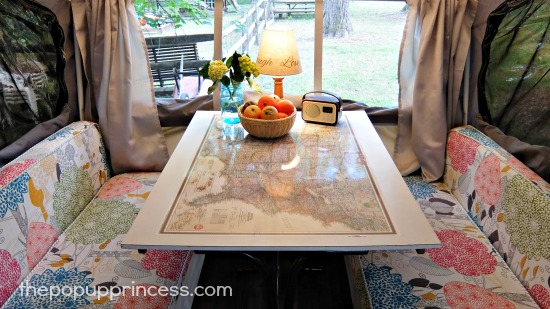 To give the table some personality, I purchased a Wall Pops dry erase map decal from Amazon (you can find that here) and adhered it to the top. I found my curtains on sale at Homegoods. I didn’t want to start from scratch, and since the Bear Creek Canvas has privacy flaps all around, I only needed something light and decorative to contrast against the grey canvas. I found panels in sets of two in the clearance aisle for $8.00! SCORE! 🙂
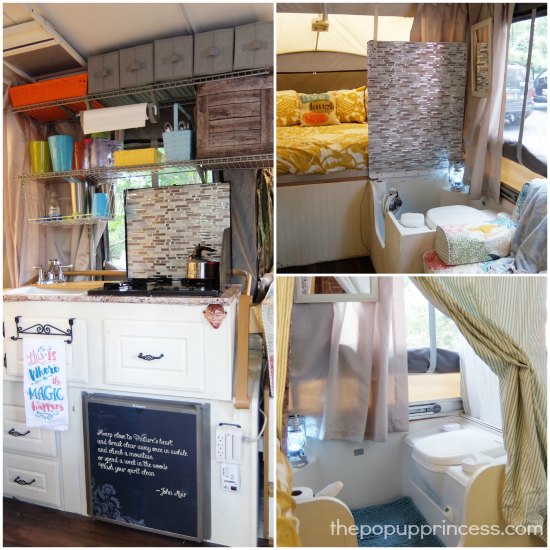 I also added chalkboard vinyl to the fridge and vinyl Smart Tiles to both the inside lid of the stove and the shower/toilet combo. (You can find Larissa’s tutorial here.) I made a new privacy curtain for the bathroom/changing area, reusing the original mesh and snaps from the old curtain. I used the blue ticking fabric for that curtain to add a little contrast and tie in the piping.
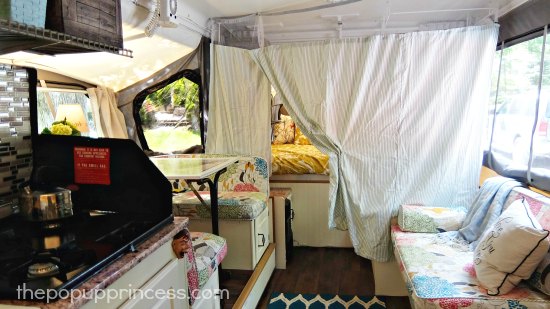 We’ve had our new PUP out several times, and I love how it stays organized while we are camping. We have a place for everything, and we’ve been able to keep things pretty tidy on our trips. There are only three of us, so there is usually some bunk space to store luggage, and we used the tension rod shelving tutorial to add shelves to a couple areas around the camper.
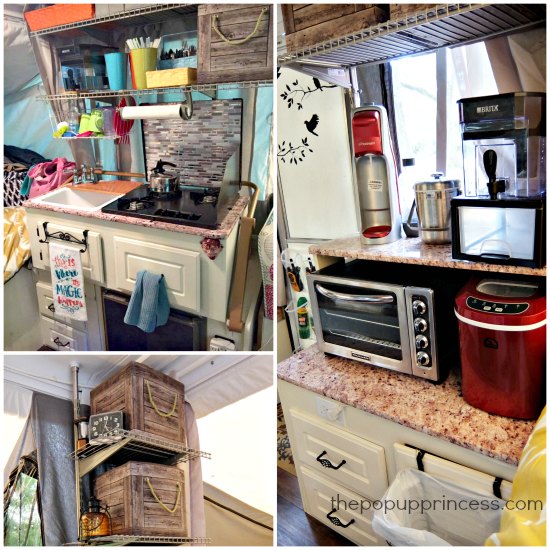 We purchased this ice maker, which stays on a shelf inside. We’ve also got a Brita pitcher, toaster oven, and a Sterilite drawer for coffee, tea, and such, and they all store neatly over one of the cabinets. The small area over our heater serves as storage for all our games, and the shelving unit above the kitchen galley holds food, utensils, paper towels, etc. I *love* how everything has a place.
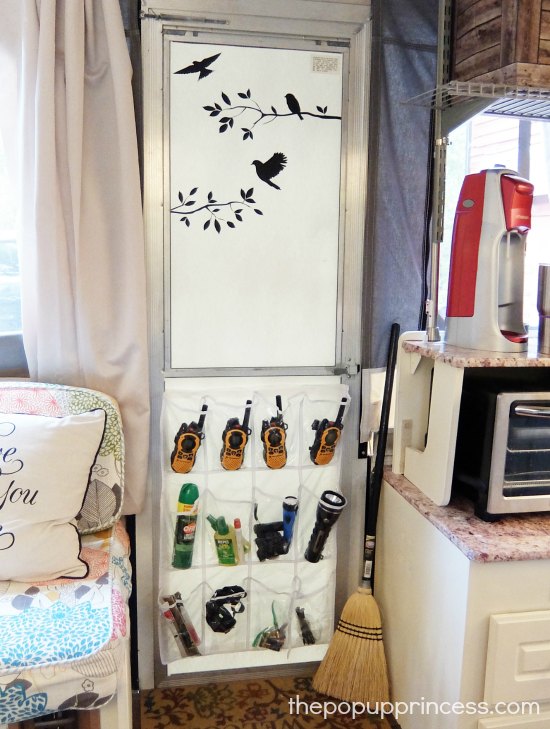 All those smaller items have a home, too. I added a clear pocket shoe holder to the back of the camper door to store things like handheld radios, bug spray, and flashlights. To add a bit of personality, I purchased these bird decals on Amazon and adhered them to the door. Cute, right? 😉
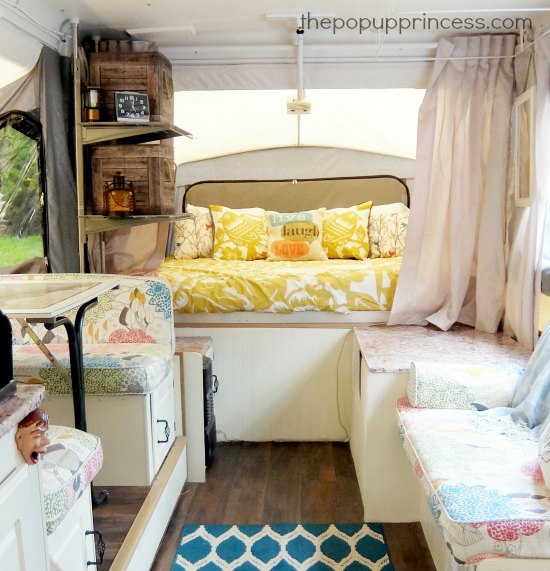 This whole experience has been so worth it! Buying our PUP was like getting a vacation home and being able to take it wherever we want. Like I said earlier, my husband was never a camper and feared that the experience would be uncomfortable, but now with the ability to plug in and have air conditioning in the summer, two king size beds, a little kitchen and a private space to call our own, he loves it. He says it’s like Harry Potter magic when you open this little box up, and it becomes a home. As for unplugging… well, we do our best. We can still be found every once in a while on our phones, mainly posting pictures of our camping trips, but it is just enough removal from reality to allow deep breaths and much-needed relaxation.
Isn’t that awesome? I love all those fabulous storage solutions. In fact, I may have to steal the clear pocket door organizer for my own camper. We are always digging around to find the small items–especially sunblock. I would be awesome to have it easily accessible like that. I also love hearing that Carolyn and her family get to reconnect outdoors. It makes all the hard work worth it. Beautiful job, Carolyn! I’m so honored that you let me share your makeover here. 😀
Happy Camping!
![]()
Disclaimer: This post contains Amazon affiliate links. The Pop Up Princess is a participant in the Amazon Services LLC Associates Program, an affiliate advertising program designed to provide a means for sites to earn advertising fees by advertising and linking to Amazon.com. This means that if you choose to purchase an item from a link in this post, The Pop Up Princess earns a small advertising fee to help pay for future projects and posts… so thank you! 🙂
Happy Camping!

How is the shoe holder organizer attached to the door? That solution is genius!!!
Great makeover! Thank you for sharing.
How did you hang your mirror above your bathroom area?
We have that ice maker too & we love it. I let my parents borrow it for their travel trailer, and they enjoyed it so much that they have one now too. I would definitely recommend that ice maker to any camper, especially popup campers 🙂
Awesome job! Love the table!!
How did you hang the clear pocket door organizer on the door?
at the time of this photo, it was attached with industrial strength velcro. Since then I added grommets to the top and hug it from self adhesive hooks then secured the sides and bottom with the velcro. All the use and gravity was just too much fro adhesive alone.
I love all of your storage solutions. And that cushion fabric is beautiful! Great job!!
The bins that look like wood crates, are they fabric or wood? From the pictures they look like they could be fabric and I would LOVE to know the source!
Carolyn told me they came from the Christmas Tree Store–which we don’t have over here on the West coast. I would love to find them, too. 😉
I was wondering what she used for the back of the bed to make it look like a headboard. What a nice touch and it looks ideal for more privacy!
Its just the pillows set up for the picture against the zipped up window panel. With enough pillows you can sort of prop up in bed, but you cant lean back. Thats something Im working on and have seen a couple of solutions. If I figure it out, Ill let you know 🙂
Turn a dorm bed bolster upside down to make a wedge. Pull it away from the canvas then prop pillows against it. You can put the waffle type shelf liner under it to keep it from sliding
doesn’t all the extra storage have to be taken down to close the pop up?
Yes, but it doesn’t take long. Our tension rod shelves only take a few minutes to put up and take down. With all the extra storage I get, it is a small price to pay. 😀
Hi where can you purchase the tension tod shelves? I just purchased and old pop up and we start renovations this next weekend! Very excite and looking at all if the ideas!!!
Thank you
Lynn
You can make them yourself, Laura! They are really easy. You can find our tutorial here.
Your makeover is absolutely beautiful and I love all the storage ideas. We just came back from a 7 day trip and though we have one of the biggest pop ups out there, I always felt cramped. I can’t wait to add storage to ours the way you did (I have a 2010 Coleman Niagara and love it!). I love how you have a secondary counter top – I can’t wait to see all your pics on my computer instead of phone!
Thanks Olga!! The extra storage takes a bit of time to set up, but we think its worth it, I get a little nuts when stuff just starts to pile up all over the place… especially in tight quarters, so it was a must for me 🙂
Love this! My question is about the “bathroom/changing area”: in the pics above it looks like the bathroom area is different in each pic. The one has the tiled wall, the mirror and commode in one position and corners are squared off. In the pic directly below it, the tiled wall is gone, the mirror is moved, the commode is positioned differently and the corners are rounded off and it shows the striped curtain. are these two different areas?
Its all the same area. The “wall” is also a lid. It folds down to create a large counter surface. We seldom have it down when we are camping because you just have to move stuff around all the time and we are totally comfortable with it up. The curtain can either be used as a surround or can be snapped to the ceiling across the length of the bed to create a changing area. The mirror is hanging from a super strong magnetic hook on the canvas door side.
There is no way that is the same area, unless the original cassette toilet was replaced with a toilet/shower combo.
It doesn’t seem possible, right? The “before” picture in the post is actually of the opposite side of the camper. The cassette toilet/shower combo is on the other side of the camper and isn’t visible in the “before” shot. 🙂
This is a 2001 Coleman Niagara. It’s the same area 🙂 it is a Shower Toilet combo. I wish it was just a cassette toilet, it would take up so much less space and I doubt we will ever use the shower. If you like the layout you should have a look at the floor plan. Here is a picture of the area unrenovated: https://www.pinterest.com/pin/11188699050745575/
We have this exact same PUP. It is the exact same area.
Oh Carolyn! I love love love your makeover! I love so many of your “little” details! I am in the “process” of transforming mine, paint asphyxiation and all, and cannot tell you how many times I come back to your pop up post to figure something out! I am struggling with the counter tops right now, trying to figure out the easiest, fabbiest looking option! Haha, as if! Anywho, thanks for sharing!!
wow! Thanks for the love!!!! Im so happy that some of my ideas are making it into your Niagara! Hows the makeover going???? I can totally recommend the Instant granite if you don’t try to wrap it around the T-Moulding like I did, It sticks to the old formica like a charm!! and no stinking pain and mess. Cant wait to see what youve done!!
Wow! This is amazing! I’m wondering if this is really under 1500 to be towed with the CRV. I’m dying to find one I can tow with my CRV but am finding it impossible.
Carolyn has a Niagara Grand Tour Elite, and the trailer weight is around 2750. Once you add gear and people, you are going to be well above that. You are going to have a little trouble finding a pop up camper your CRV can tow. You’ll need to go REALLY light weight, which will mean a small trailer with very few amenities–and you’ll have to go light on the gear and passengers. For instance, a Coleman Taos weighs right around 1000 lbs, but once you add gear, water, propane, etc. you are well above that. Any chance you can upgrade your tow vehicle? 🙂
I thought the same thing when I read this post, Susan. The Niagara is one of the heaviest campers that Coleman/Fleetwood made, and I know it would be over the tow weight for our minivan, which is why I just passed on one in our area. But in the post, Carolyn says she has a CRV and then says they bought a Niagara. Maybe they upgraded to a different towing vehicle in a process and forgot to mention that. You would need a much higher towing capacity to safely pull it. Still love all of the great ideas!
I believe Carolyn did upgrade tow vehicles, Lee. 🙂
I made a critical typo w/ “CRV”…. we drive a 2010 Honda PILOT 4WD. We have the towing package whic includes additional engine cooling, installed rear suspension cushions and have a very nice break controller. The Pilot 4WD is rated at 4500 lbs total and the additions give us about 500 lb. margin. Even with all that we’re on the edge…
Please remember that a tow vehicle must have sufficient tongue load capacity as well. I made a fatal flaw when I purchased a 2012 Outback with the largest Subaru engine. 3000 lb towing capacity, but no more than 200 lb tongue capacity. Yeah, numbers didn’t work. It’s gone and now we have another truck. Be careful with tow vehicles that do not have “real” frames.
Great makeover!
I absolutely love your makeover! If you don’t mind sharing, where did you find the tree fabric you used on your cushions?
on Fabric.com. It’s funny (not funny) because I chose the fabric and waited a long time to buy it. By the time I got around to it, it had been discontinued!!! I spent days combing the internet for scraps and bolt ends and ended up buying the rest of a bolt from a decorator that had some remaining from a project. I got VERY lucky!!!
Hi Carolyn from Caroline!
Awesome makeover! I especially love the cushions in that fabric. Did the quarter-round side pillows on the ‘sofa’ come with the camper? I want some pillow forms like that but haven’t found any yet. Also, have you had any problems with your smart tiles being so close to your stove burners?
Thanks, and happy trails!
Caroline
Hi, Caroline!!
That pillow came with the pup… it was standard on my Niagara and we were lucky the owner still had it!
I have had no trouble at all witht he tictac-tiles. I read the warnings but decided that since I only used the stove for boiling water and making eggs that I would chance it. AND if they did melt, I’d deal with it until it became ugly enough to replace it… its cheap!
I’m in love with this makeover! We’ve bought our first PUP, and I’m having so much fun renovating it. My layout is very similar to yours, Carolyn, so this has been so helpful for me! I had a few questions: where did you get those “wooden” bins from? I LOVE it! I have 3 daughters, but my husband is calling this PUP the son he never had. So with the decorating, I’m trying to get a good mix of masculine & feminine. Those bins add the perfect bit of masculine/camping! Can you please share the link!?!?
Also, I love all the tension rod shelving you did in here. Where do you store it all when you’re traveling?
Thanks!
Thanks so much Meagan!
The “wooden” crates are foldable fabric and they came from the Christmas Tree Shop. It is only in the NE and is a subsidiary of Bed Bath and Beyond. I never saw the before and have not seen them since. I feel like I should have bought them out and resold them to all the lovely folks who have admired them on here 🙂 This store does have an online shop and often has GREAT stuff you can’t find anywhere else at great prices. Check it out!
The tension rod shelving pieces all travel on the mattresses. I am going to upgrade the seal to something thinker this season, but it fits tightly now. When we close up, my husband will sit on the corners while I latch if it’s a bit bulky… but we also leave every bit of our bedding on in-season including comforters… only pillows are stowed.
I would like to know what brand toaster oven you have. Thanks.
It’s a KitchenAid KCO253CU 12-Inch Compact Convection Countertop Oven. I bought it on sale on Amazon (https://www.amazon.com/KitchenAid-KCO253CU-12-Inch-Convection-Countertop/dp/B01K4NLM72/ref=sr_1_1?s=home-garden&ie=UTF8&qid=1493225634&sr=1-1&keywords=kitchenaid+toaster+oven) We loooooooooove it! (will not work on battery power and you must choose between a/c or the oven or the circuit blows lol).
I love all the organizational ideas that I have seen on your blog. I would love to see how the shelving units are packed down for when you are traveling and how long it takes to get everything set up?
We just bought a travel trailer but have decided to keep our 1994 Palomino Stallion pop up. I am as pumped about restoring and decorating the pop up as our new little home on wheels. Right now our plan is to keep the PUP and let our adult children use it. But at some point sell. It. Love everything you all have done.
Hi
We recently bought a 1999 Coleman Utah… And we have a similar problem with needing to replace some of the Floor area under the linoleum in the space that is adjacent to the trunk. How did you handle that?
I was wondering the same thing. We have a 2003 Coleman Utah and the same exact problem with the flooring under the linoleum adjacent to the trunk. I would love to know how Carolyn fixed the water issue.
Hi!! Your camper is awesome. I want to know how you did your table? What products did you used to laminated the table? Thanks
I was wondering the same thing as I love the map on the table idea! Please let us know how you adhere to it. This will be so fun for my kiddos to mark and our travels on the map.
Where did you get your fabric for the cushions? I am in love with them!
Carolyn, we have the same model camper! I’m so excited to get started! Do you know how much flooring you ended up using?
Hi Carolyn! Absolutely stunning makeover, so cheerful and airy. We are the proud owners of a new to us 2001 Coleman Niagara Elite and are in New England, as well. I’ll be returning to this post for inspiration! Planning a trip to Christmas Tree Shop this weekend for new camper dishes, their summer melamine stuff is coming out! I love your storage solutions, particularly the kitchen area. My question is about clothing storage. I am also a stickler for everything having a place and with two kiddos, it would be nice to have an option that won’t require them digging and pulling everything out to get to the must-have sundress at the bottom of the pile. How do you store / access clothing items? I didn’t see anything obvious in your post. Thanks for the post and inspiration. Hopefully I’ll be able to share our reno once it’s completed in the coming months! Cheers!
Hi! Where did you buy the hanging thing for your door? I found some but they are all way to long fro my door. Did you cut yours?