


I’m thrilled to share this next makeover with you. Caterina contacted me awhile back and told me she was so inspired by all the makeovers on the blog, that she had decided to get a pop up camper of her own. I was so excited, because I knew her makeover was going to be amazing. Caterina and her partner have a little company called Pate-Meadows Designs, and they design patterns for home decor projects. She didn’t disappoint me. Let me show you what I mean. 😉

Caterina scoured Craigslist until she found just the right pop up camper. She knew she wanted a little extra room, so a slide out was a must. When she spotted this cute little 2002 Coleman Niagara, she knew it was the one. She went to see the camper all by herself, fell in love, named her “Daisy Jane,” and towed her home. It was love at first sight.
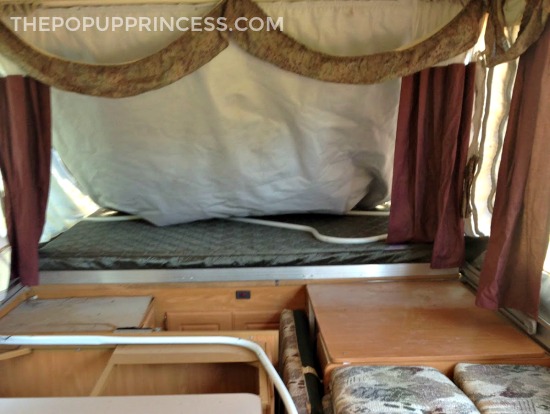
Daisy Jane had good bones, but she was terribly ugly. She had been used as a “hunting cabin,” so she was pretty dirty, too. Caterina spent two days cleaning her from top to bottom, then she took her out camping that weekend. She had such a great time, she knew this camping thing was going to be right up her alley. She got home from the trip and started working on the makeover.
All the cabinets and countertops got a coat of primer followed by a couple coats of Amy Howard At Home Furniture Lacquer in Vendome Grey. Caterina left the dining table project for another day. She hasn’t quite decided what she wants to do with it yet, and the original table works well for now. She also left the original flooring… for now. She plans to update it at some point as well.
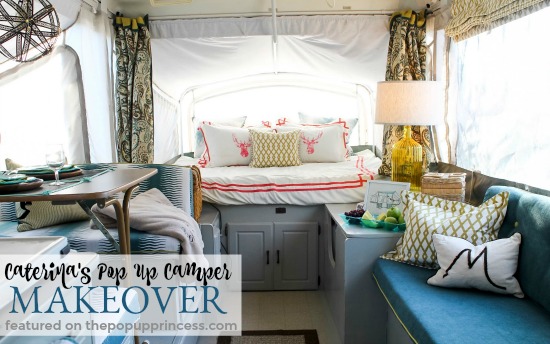
But she did sew slipcovers for all her cushions–and the textiles are where she really shines. I love the way she used different textures and prints throughout her camper. Those cushions are amazing, right? Caterina used the old cushion covers as patterns and modified them a bit. She plans to put her cushion instructions on her blog at some point, so keep an eye out for that.
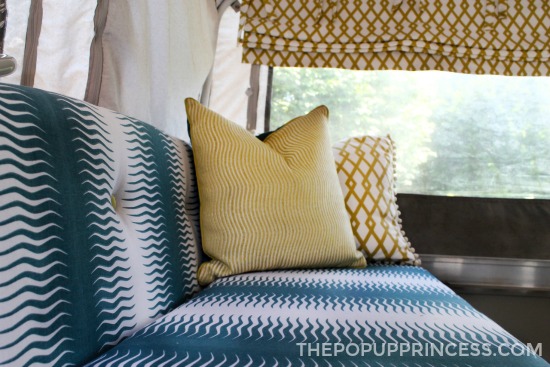
Caterina’s original cushions were tufted with fabric cover buttons, and she liked the look, so she added them to the new covers as well. She used tufting twine to put the buttons back on, adding a dab of hot glue on the knotted twine in the back. When she needs to wash the covers, she just clips the cord from the back, takes the covers off, and gives them a wash. Then she puts the covers back on and threads the buttons back into the cushion again. Caterina thinks they are so much cuter with the buttons and wishes more people knew how easy they were to add.
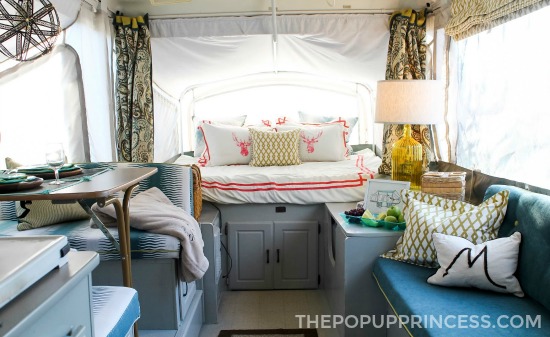
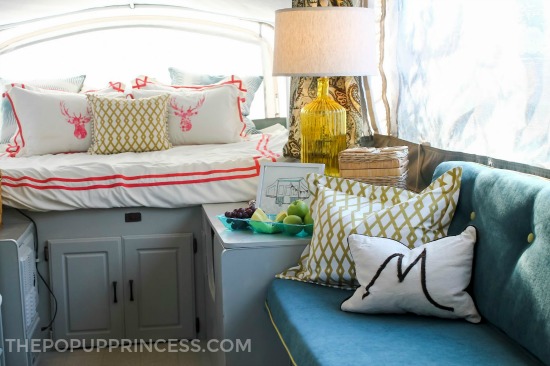 The pull-out sofa got the same treatment as the dinette cushions, but in a durable ultra suede fabric. I love how Caterina tied her fabrics all together with throw pillows in coordinating prints. I know many of you think throw pillows are frivolous items when camping, but we actually use ours quite a bit, so I really appreciate that Caterina made her throw pillow covers removable. She can toss those into the wash when needed as well.
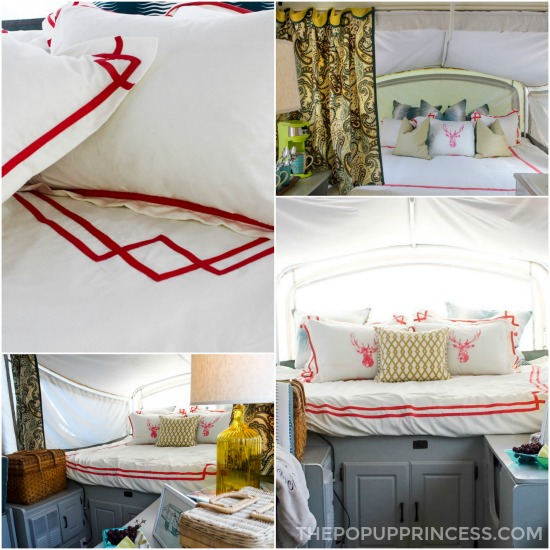 And can we talk about that bedding? Gorgeous, right? Caterina simply took inexpensive white duvet covers and shams and added melon bias tape to give it some flair. She also added coordinating deer silhouettes on the pillow shams. Extra pillows in coordinating fabrics tie the beds into the rest of the design and make it them the perfect spot to curl up with a book or take an afternoon nap.
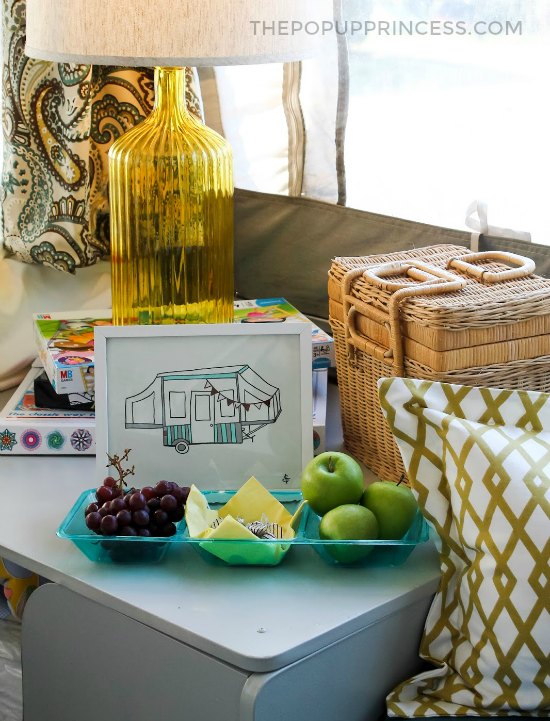
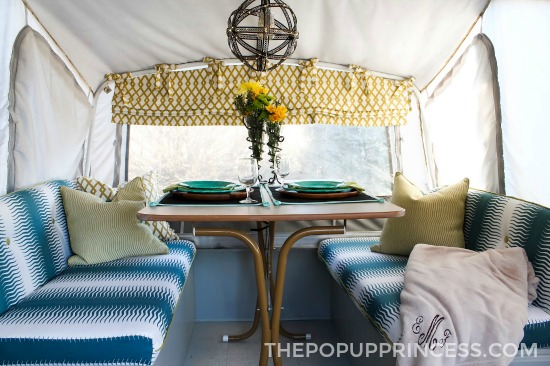 Caterina added a chandelier to her dinette, which she made from a $4 decorative orb from HomeGoods and some battery operated twinkle lights. She hung the fixture with chandelier chain looped over the shepherd’s hook of the pop out. But my favorite detail of Caterina’s entire makeover is her amazing Roman shades.
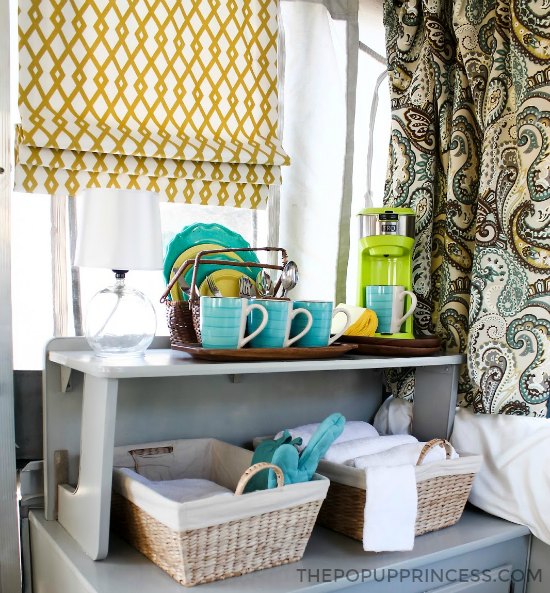 Caterina used an ingenious method of magnetic strips to construct cordless Roman shades for her pop up camper’s side windows. She made a flat panel of fabric and reattached her original curtain clips to the top. Then she added magnets at regular intervals across the panel to allow the shade to be raised. And if you are thoroughly confused by my explanation, you can find Caterina’s instructions here. 😉
She even put a short video up on her blog, so you can see that awesome shade in action. You can also get a quick look at the inside of Caterina’s camper. I’m in love. It is just as cute in the video as it is in pictures.
I hope you enjoyed seeing Caterina’s camper as much as I enjoyed sharing them. Make sure to swing by her blog if you would like to see more pictures. Thanks for sharing, Caterina! I hope you enjoy your new little home away from home.
All images are courtesy of Pate-Meadows.com. Pate-Meadows retains the copyright on all images, and they may not be used without permission. Thanks for letting me share your gorgeous pictures, Caterina. 😉
Happy Camping!

Beautiful! I especially love the Roman shade idea. I’ve only just purchased fabric for the seating elements for our makeover and am thinking ahead to the curtains. Perhaps I’m going at it backwards as our pop up came to us missing one set of curtains so it’s “lights off” before undressing at night lol.
HA!!!! We did the same thing! Changing all hunkered down behind the shower/bathroom door! I thought about those roman shades before we even got the camper. I’m so glad I did them ! Happy camping !
Those Roman shades are amazing!! That will be my first pop-up project once I finish graduate school and start camping again.
Thank you Sweejen! Let me know if you have any questions. I’m happy to help. I know you can’t wait to get into the woods!
My parents had a drapery shop where I worked many years. I thought about Roman Shades to replace the ubiquitous curtains with tie-backs for our pop up. I’m inspired to give it a go after viewing Caterina’s makeover. I was thinking placing them into the open position before closing the pop up might mean less wrinkling too.
Hey Cynthia, that’s exactly what I did and it works great! Im so excited to be an inspiration! Can’t wait to see what you do !!!!
Love the magnetic Roman shades!
Hi Caterina. Have you painted the canvas inside the camper? If so, what do you recommend.
Mine has ugly green canvas. I look forward to hearing from you
Cheers
Linda
No, Linda, Caterina did not paint her canvas. That is the standard 2000’s Coleman canvas color. I personally would not recommend painting any pop up camper canvas. First, it needs to remain breathable. Adding a layer of paint will inhibit airflow, and you will have to deal with condensation issues. Second, your canvas needs to remain pliable. If you’ve ever tried to fold up the canvas in the cold, you know how hard it can be to wrestle with rigid canvas. Adding a layer of paint will definitely cause problems in that area. Third, at some point, your canvas was waterproof. Some of that treatment (if not all) likely remains in the fabric. It could make painting or dyeing your canvas difficult, as the fabric will not likely take in the dye/paint evenly. You could be left with a splotchy canvas. You can always replace your canvas if it is old and you just can’t live with the color. Check out Bear Creek Canvas or Canvas Replacements for some great options there. 🙂
Wow! Me encanta la gama de colores!!! la convinacion de telas es hermosa!!! Felicidades!
I know I’m late to the game with this post.
2 things…Can you show a picture of your chandelier. I’m having trouble figuring out how to attach it to the ceiling
Actually I just figured out how to play the roman shade video so my mom can see it and help me!!
Thank you!