


 Pop up camper remodels have become a bit of an obsession for me. I could look at them all day long–and some days, I do. 😉 That’s why I am super excited to share a makeover from a reader who is equally obsessed. This feature comes to us from Devon and her family.
Devon’s obsession with pop ups started when her friend wanted a “mama break” for her birthday. She borrowed a pop up camper and invited other mamas to join her for the evening. Devon had never been in a pop up and loved the idea of glamping. Comfy beds and a toilet while camping? Yes, please! 😆 When she got home from that trip, she knew she needed to find a PUP of her own. In her quest to find a camper, she found that in her area, they can be expensive and often sell quickly. (For tips on purchasing a pop up camper, make sure to check out our guide here.)
 After searching for a few months, Devon finally found a 1997 Coleman Sun Ridge. Since she’d already found this blog, she knew all about ABS roofs and knew this could be an issue. She saw the cracks in the ABS, but the camper was perfect for their family otherwise. It had everything they needed, so they went ahead with the purchase. They didn’t even have a tow hitch on their van at the time, but they were so excited to be camper owners. The seller was kind enough to tow it to their house, and their journey began.
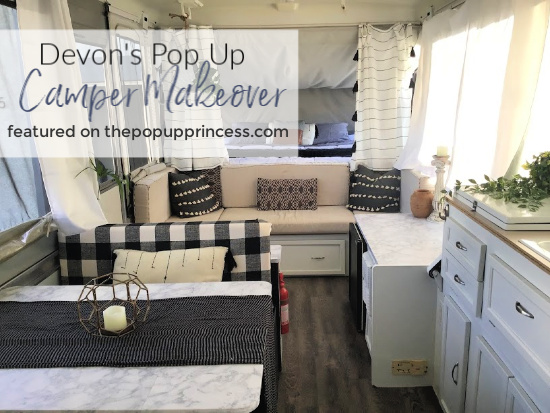
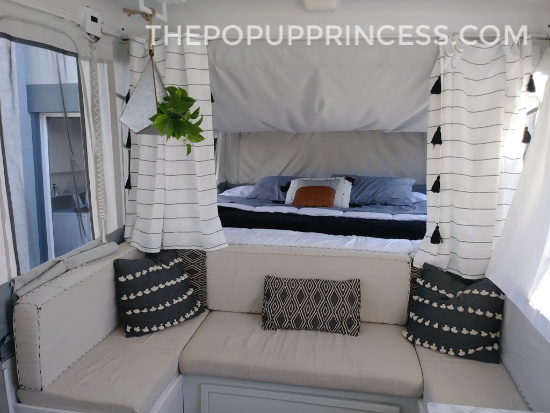
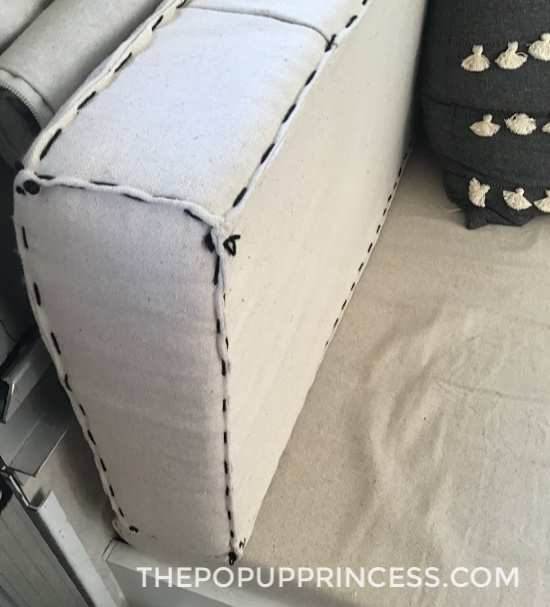 Devon was intimidated by the roof issues, so she concentrated on the interior instead. Inspired by Proverbs31Girl’s camper makeover, she selected a black and white theme with neutral tones. Devon created the cushion covers for the back of the couch using a canvas drop cloth. She made envelope style cushion covers first. Once she got the foam inside the covers, they were pretty loose. This worked out well for Devon, because that meant she had enough room to use the embroidery stitch around the edges. She used black embroidery thread to sew the stitches in by hand. It took a long time, and her fingers hurt by the end, but she loved the end result.
 Since this was quite a bit a work, she opted to do it on the backrest cushions only. For the bottom cushions, she just used the wrap and staple method. She used the same drop cloths but did spray the fabric with Scotch Guard to protect it. Devon found a patterned West Elm curtain at a thrift store and used it to make several throw pillows. The two black pillows with tan tassels came from Hobby Lobby. She had a few off-white pillows at home, but they were stained. The leftover black embroidery thread was perfect for embroidering lines down the fronts and adding tassels. Devon says it took forever, but it helped hide the stains and made the pillows usable again. Genius!
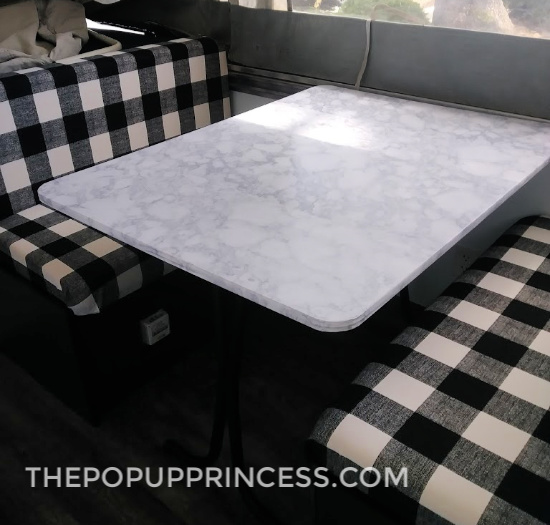
 Devon also used the wrap and staple method to cover the dinette cushions in a buffalo check fabric. She scrimped on it, so she had just enough to cover the front of each cushion. Since the back was so exposed, Devon took a piece of faux leather she already had and glued it to the back of the cushions. It also helped add some warmth to the black and white palette.
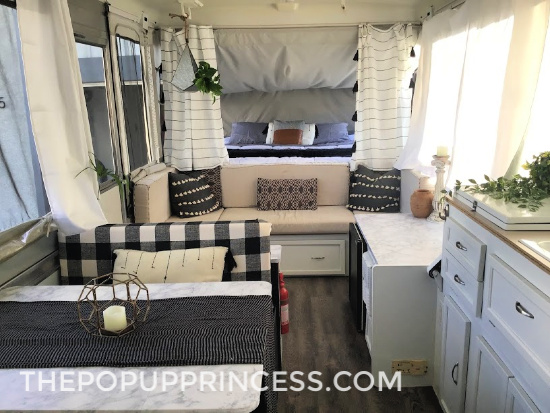 The previous owner had already painted the cabinets white, so half of the job was already done. Devon just had to paint the walls and galley white and the dinette black. She also replaced the t-trim on the dinette with new black trim. Marble print Contact paper worked well to refresh the countertops and table. The curtains were purchased at Target. Devon cut them in half and hemmed them at the appropriate length. To hang the panels, she used our Command hook method. (You can see more on that here.)
 The last interior project was the flooring. Devon and her kids selected a wood look vinyl plank flooring at Lowes. Then they installed it together. Devon thought it was hilarious when a friend of her husband’s came over and found her installing flooring with a beer in hand. When he asked where her hubby was, she pointed him in the direction of the kitchen where said husband was cooking dinner. 😆
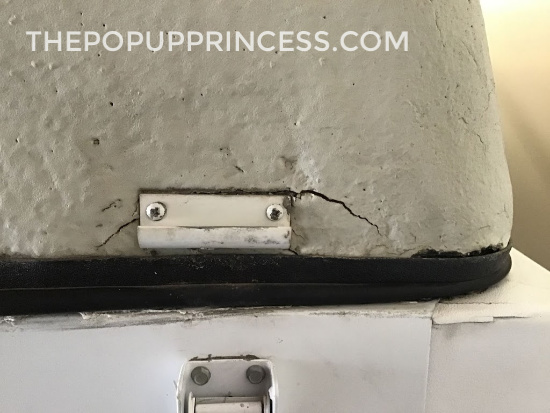 With the interior finished, Devon knew she needed to tackle the roof. Oh, man! Talk about exhausting! This was the most difficult part of the remodel for Devon. The previous owner had attempted to repair the roof, but hadn’t done a very good job. Devon had to repair the cracks, patch them with fiberglass cloth, and recoat the top with bedliner. Then she replaced the rubber roof seal with a new one she purchased online. If you need tips on how to repair a Coleman ABS roof, be sure to check out our repair post here.
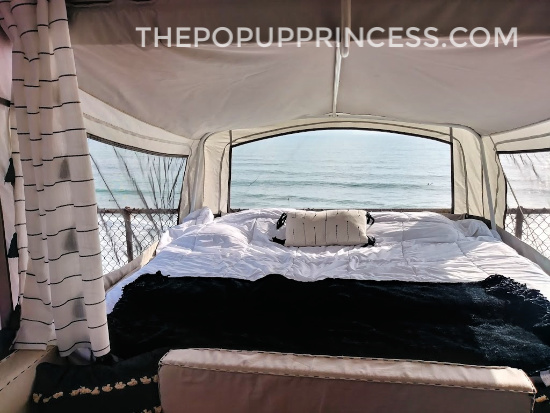 Now that all the hard work was done, it was time to enjoy the fruits of their labor. This a picture of Devon’s pop up camper in action on their first–and only–camping trip. They sadly had to sell their Sun Ridge shortly afterwards. Devon said she and her family didn’t really understand Gross Vehicle Weight Rating (GVWR) when they purchased their camper. They were so excited to find a PUP in their price range, they didn’t realize that it was too heavy for their van to safely pull. After putting so much time into their remodel, it was really hard to say goodbye. Devon knows it was the right thing to do, though, and she has learned so much. She’s ready to take on a smaller camper remodel really soon.
Thanks for sharing your journey with us, Devon. I’m sure the new owners of the Sun Ridge are enjoying their new glamper, and we can’t wait to see your next project. 🙂
Happy Camping!

Looks great!
Where did she find the t-trim molding? I’m re doing a 1991 Coleman, and it has the ugliest brown trim. The edge’s on it have a little ditch running down the middle where the trim attaches to the edge. Is her trim the same? I’m finding a few options for T Trim molding but can’t figure out if it will work for my camper.
This site has been a great source of inspiration.
Thank you !
Have you looked on Amazon? They have it in several colors.
We have a 1997 Coleman and purchased our t-trim from t-mouldings.com!
I love it! Such a beautiful design. I’m envious of all of these creative remodels.
I love how bright and cheery the remodel was.
Curious if Devon was able to recoup her cost in purchasing and remodeling the popup when she sold it so quickly after working on it.
You nailed texture! Your design is an example of vignette perfection in every direction you look. thanks for sharing.