


 I’m in love with this next reader feature. It is simple, but gorgeous. And the best part? Jacque did this all by herself while her husband was away. Way to go, girl! 😀
This wasn’t Jacque’s first remodel project. Jacque and her husband were concerned that their three kids always had their heads in video games and never went outside to explore and play. They decided to fully remodel their fifth wheel and turn it into their home. Now they live in their camper full time at an RV resort. Jacque told me that the kids now know how to swim, as they have a lake in their front yard. They ride their bikes and fish when they get home from school. Right before they leave for school in the mornings, they feed the cows and donkeys behind their tiny home. Jacque doesn’t remember the last time they played video games, and now that they have less “stuff,” they experience more of life.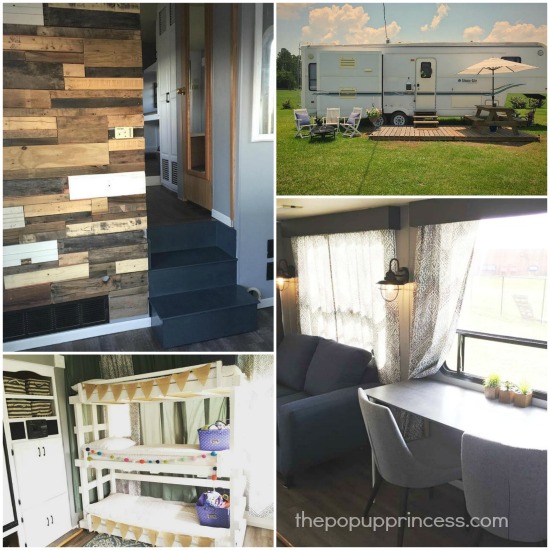
It took Jacque eight weeks to fully renovate that fifth wheel. She did it while her husband was at work and the kiddos were in school. It’s been their home since March, and ever since she finished that project, she’s been itching for another camper renovation. She wanted to work on something quick, something that didn’t have a lot of plumbing or electrical work, and had very little square footage. Of course, a pop up was the first thing that came to mind, and off they went.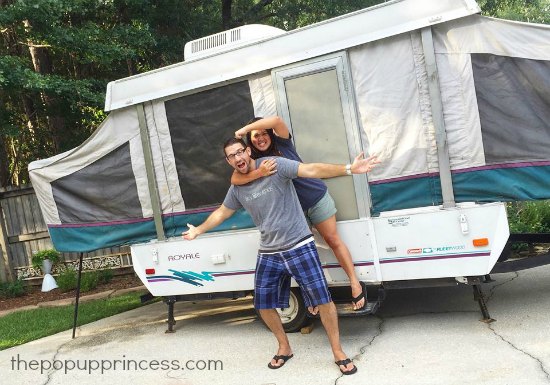 They purchased a 1995 Coleman Fleetwood Royale. It was used as a hunting camper, and the seller said that every person that came to look at it turned away because the canvas was terribly stained. It certainly was bad, but when Jacque looked at it, all she saw was gorgeous potential. She bought it on the spot!
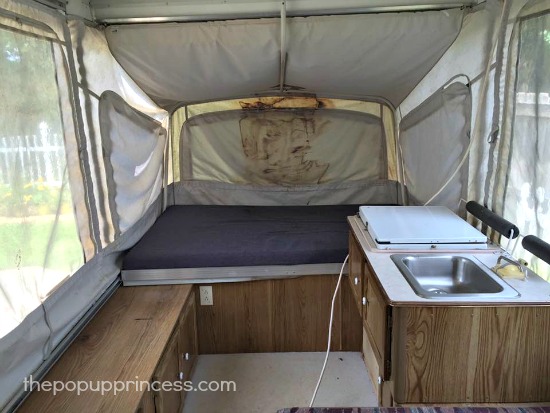
The first thing Jacque tackled were the horrible stains. She used Zep’s Mold and Mildew Stain Remover, which she bought from Lowes. It worked miracles! Jacque tells me she would spray it, and the most of the stain would just would disappear. For the more stubborn areas, she used a bucket, sponge, and a scrub brush. The canvas turned out beautifully and looks brand new again.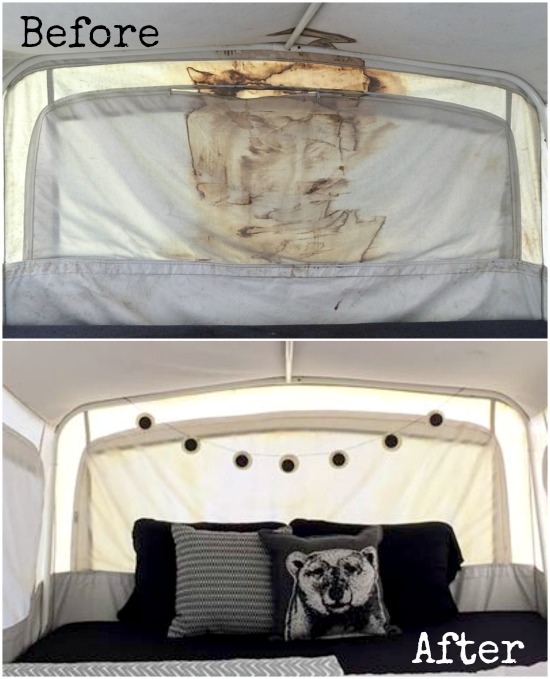
After cleaning the whole camper, Jacque’s next battle was the cushions. She used tips from this tutorial to construct her covers. She says the process was very easy–almost like sewing a pillowcase and closing it up after the cushions are put back in. Where Jacque lives in Alabama, she has a place called Dirt Cheap, which is a salvage store. She says it is her favorite place to go for all things decor, and she fully decorated this camper and the fifth wheel she is currently living in with budget friendly purchases from Dirt Cheap. Jacque is BIG on decorating and designing beautifully without breaking the bank. That beautiful fabric on the cushion backs is actually a black out curtain panel. She loves it, because it is thick, has a protective lining, and is easy on your sewing machine. It’s also very durable and only cost her $3 per curtain. The bottom cushion fabric is also a curtain panel, but in a dark gray tweed.
For the cabinets, Jacque used her go to formula for painting RV cabinets. She taped everything up and start spraying with Zinsser’s Bullseye 123 Primer and then finished it off with Lowe’s Olympic One paint in a white stain finish. Jacque tells me she painted her cabinets in their fifth wheel with this formula and even with three small kids, it has held up like cement. Jacque sprayed the AC, cabinet knobs, and icebox white to give everything a crisp, clean look. She tells me her goal was to make it look like a winter cabin in the woods–probably because temperatures were in the high 90’s at the time. Haha! 🙂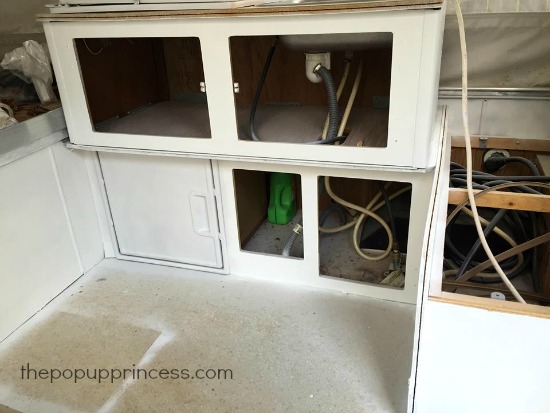
The floor was a plain white linoleum, so Jacque covered it in Lowes Style Selection peel and stick plank vinyl in the color Driftwood. At $.98 per square foot, that was a great deal, especially if you only need about half a box like she did. She also discovered that you can buy it by the individual plank at Lowe’s instead of having to buy the whole box, which is awesome for smaller pop up campers. Once again, this was the same flooring Jacque used in her fifth wheel, so she was very familiar with this product, and installation was a breeze.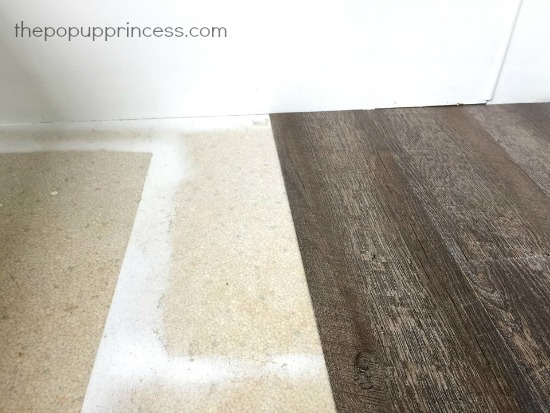
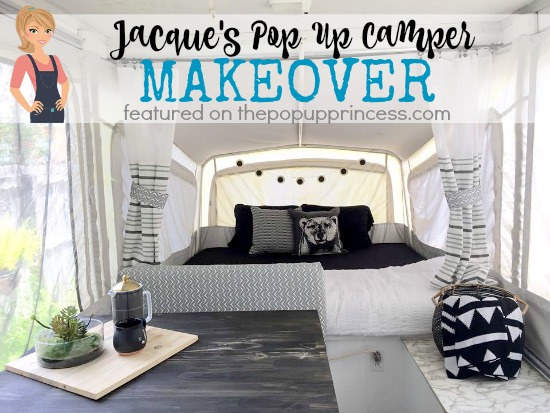
For the curtains, Jacque bought a beautiful cream and black colored shower curtain from Target. She cut it into four smaller panels, and for air circulation reasons, she sewed sheer fabric at the top of the curtains. She used leftover fabric from the cushions as curtain tie backs, and hung the bunkend panels from a tension rod above the beds.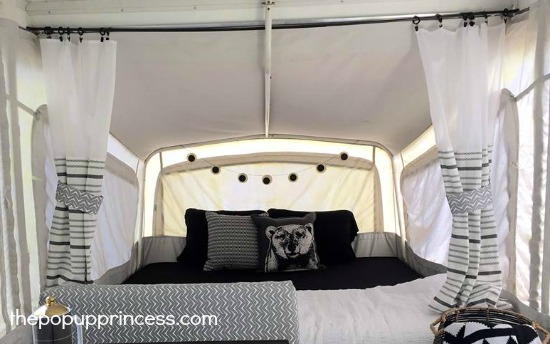
For the countertops, Jacque used a tip from Jess’s makeover and bought a peel and stick marble contact type paper from Amazon. This product has rave reviews, and Jacque says you can add her name to the list of satisfied customers. It is super durable and very thick. Because it was so thick, Jacque says it was easy to work with and didn’t crease or fold easily. She just slid a razor along the edges to cut where she needed. To finish the trim of the counters, Jacque replace the t-molding. She followed our tutorial here and purchased this white t-molding. Installation was easy-peasy, and the results are amazing. Gorgeous, right?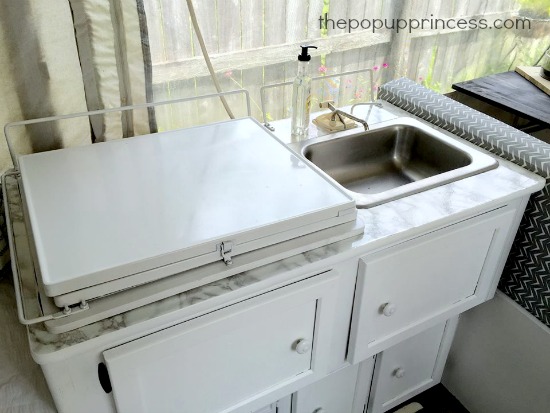
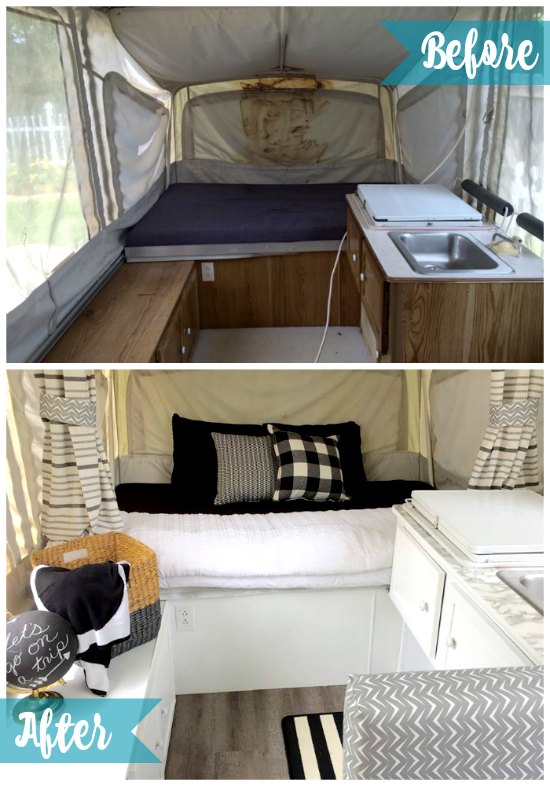
Jacque’s husband went out of town for a week on a mission trip to Latvia and her goal was to start and finish her camper makeover to surprise him. Can you believe she actually did it? How amazing is that? And since they specifically bought this pop up as a project for Jacque, she had planned on selling it when it was finished. She expected to be able to camp in it a handful of times before it sold, though. Nope! This baby sold less than an hour after it was listed and now Jacque is addicted! She’s already bought her next camper, and can’t wait to get started. 😉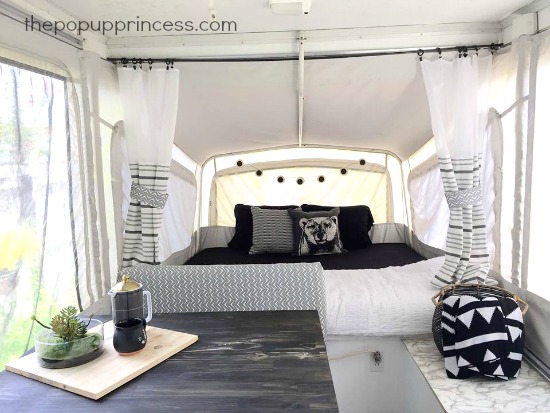 What a gorgeous camper, right? I’m so impressed with Jacque’s creativity and ingenuity. I’m sure this camper will make a lovely retreat for its new owners. Thanks so much for sharing, Jacque! We can’t wait to see your next project. 😉
Happy Camping!
![]()
Disclaimer: This post contains Amazon affiliate links. The Pop Up Princess is a participant in the Amazon Services LLC Associates Program, an affiliate advertising program designed to provide a means for sites to earn advertising fees by advertising and linking to Amazon.com. This means that if you choose to purchase an item from a link in this post, The Pop Up Princess earns a small advertising fee to help pay for future projects and posts… so thank you! 🙂
Happy Camping!

I love the black!!! The table is AMAZING!!!! Way to go, cannot wait to see your next one, I’m inspired.
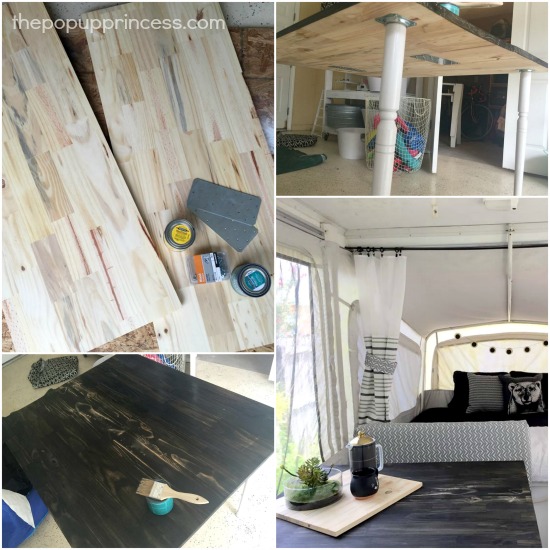
Where did you find the pre-sanded planked plywood?
I love this transformation 🙂
^^Elizabeth, I had used the same sanded plywood. I bought it from home depot. I used it for replacing all of my counter tops and the table. Bring all the dimensions you need, they will cut it for free!
Thank you Chris.
What did you sell your PUP for? In in the market for a pop–up and would love to buy one of yours.
It is so pretty. love love love the table.
Favorite makeover EVER. Where can I see more of her fifth wheel renovation, too? Those first few photos look amazing! Great taste and impressive execution.
Where did you purchase the bear pillow from? I want one!
How has the plank peel and stick worked out? I used the squares that look like stone and they peel up from the heat. I was disappointed because I did such a good job fitting the tiles.
We bought the same peel and stick planks as Jacque last November and installed them in our Coleman Pioneer, but when we opened it up this spring, planks had popped up, so we are pulling it all out and replacing with a floating floor version which hopefully will stay put. So maybe buyer beware on these.
Thank you for the tip on the thick PVC contact paper. I did look on Amazon and eBay but then found the manufacturer has a site direct. Less money, free shipping, free installation kit. I can’t wait!
Does the Zeps stain remover contain bleach? We have mildew spots on our new to us pop up and I read that bleach is too harsh on the canvas. Looking forward to hearing back from you. We are going to re-do our camper as well. Can’t wait for the snow to melt so we can get started!
It really depends on what kind of canvas you have, Kathy. If you’ve got Sunbrella, a bleach mixture is fine. In fact, Sunbrella recommends it (you can find their stain chart here). You are going to need it to kill the mildew anyway. I have heard vinegar sometimes works, but I don’t have any first-hand experience (or reader stories) to back that up. You can find our post on cleaning your camper canvas here.
I AM REDOING MY FIRST PUP, I AM GOING TO HAVE TO MAKE A TABLE AS WELL THAT I NEED TO BE A BED TO. WHAT BRACKETS DID YOU USE FOR THE FLOOR AND TABLE TOP TO HOLD THE LEG? SO GLAD I SAW THIS POST HAVE BEEN SEARCHING! GREAT JOB!
Jacque used table leg brackets from Home Depot to attach the legs. You can see them in the collage picture of the table here. The legs do not attach to the floor of the camper. Hope that helps, Brittany. 🙂
Bought a used PUP and because of your posts we are giving it a makeover. My husband hates Pinterest! Anyway, was wondering if you should spray and clean the inside or outside of the canvas? We have some really stubborn stains, but they don’t look like mildew.
Did the counters peel after a while? How long did they last?
Hi! Our camper interior canvas has very similar stains. They are driving me crazy. The top (ceiling area) and end of the canvas on the inside that’s stained is more like a cloth or cotton fabric. It’s not the sleek like vinyl on the outside or other inside areas in the camper. Do you think it will still work to use the Zeps?
How did you end up getting this cleaned? I have the same cloth/felt liek material on the ceiling over the beds and looking for suggestions on how to get this cleaned.
SO beautiful! I love the marble countertops! My husband and I just bought a pop up with a very similar sink/stove set up and I think I want to use the same vinyl paper. How did you get it to look so nice around the sink? Did you take out the sink or just trim close to the edge?
Yes! I have the same question regarding the sink. Did you remove it or just trim around it?
Love it! My only concern is the cleaner used on canvas. I made that mistake. It ruined the waterproof properties and it leaked, well flooded every time there was rain. I would use a rv canvas cleaner designed for it.
Any time you use a cleaner on your canvas, Angela, you will need to reapply a waterproofing agent. Age can also make your waterproofing less effective. It’s a good idea to reapply it every couple of years. You can find our post on that here.
Great post, and your pop up trailer looks great! We just bought a pop up trailer ourselves and it needs much TLC. I was looking for ideas to clean mildew from the canvas. Found your post and I will give it a try. I’ll definitely apply a waterproofing agent after. Thanks for your tips.
I just cleaned my pop up canvas with Zep mildew and mold stain remover. Amazing how the stains really just vanish…some needed some wiping. I have noticed that the window canvas picked up a yellowing. Anyone experience this and have a solution for it??
I have read that any cleaner with bleach in it (and most mildew cleaners contain that) can react with the mineral content in your water and sometimes turn fabric yellow. I’m not sure if there is a solution to fix it once it has occurred. I’d love to hear if anyone has found one, though! 🙂
Can I just say I am praying blessings on you all! We just popped open our, gifted, pop-up to find an overwhelming amount of mildew. I read this blog, bought the Zep cleaner and I have not touch one inch of the canvas. Stains are gone! I keep hollering at my husband to come and look like it’s going to come back. Lol
Thanks for taking your time to help out others on their remodel adventures!!! I wish I could add pictures! It’s truly amazing! Yes it’s the little things that make me happy!!!