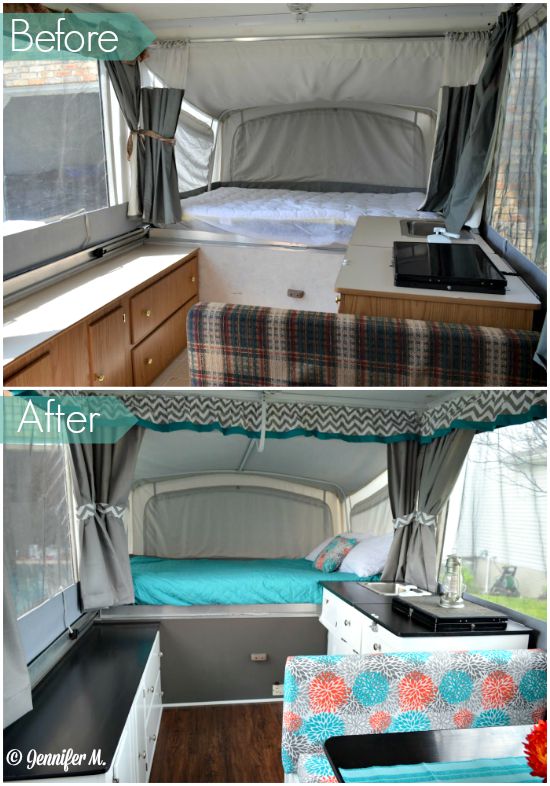
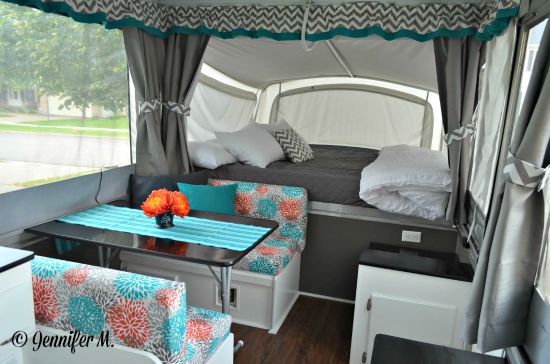
 You guys are going to love this next pop up camper makeover from a reader named Jennifer. Jennifer and her family were gifted an AWESOME garage-kept 1999 Coleman Santee pop up camper. It was in great shape and really didn’t need anything fixed structurally, but it was completely outdated. They decided to make it their own by giving it a little makeover. They painted, reupholstered, and altered a few things to modernize the look and make it a little more functional for their family. Jennifer says it is still a work in progress, but I think it looks fabulous right now!
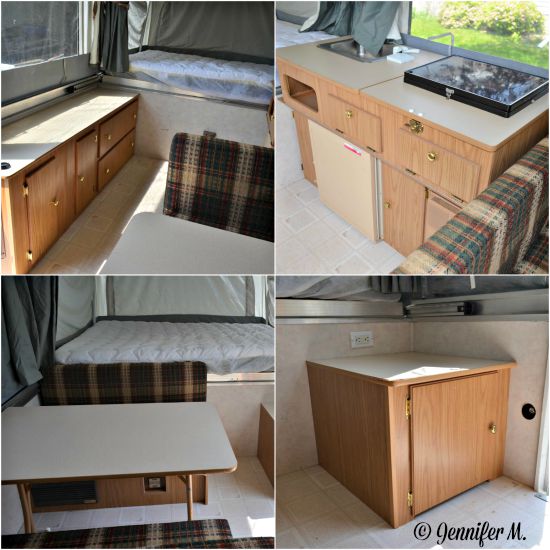
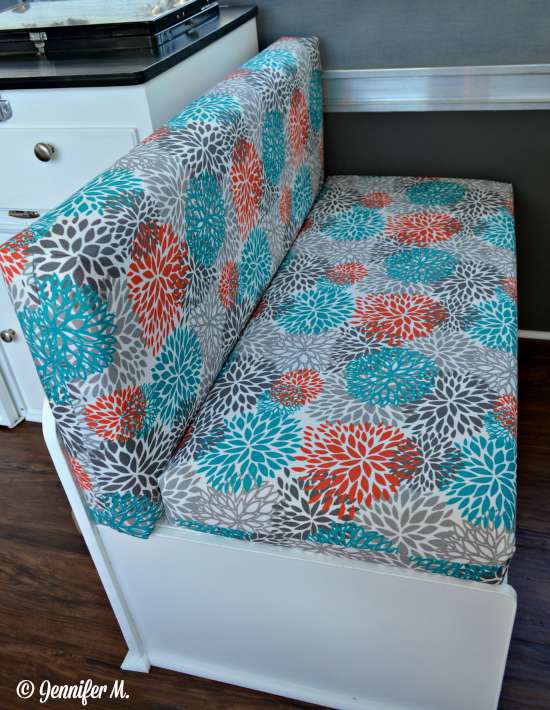
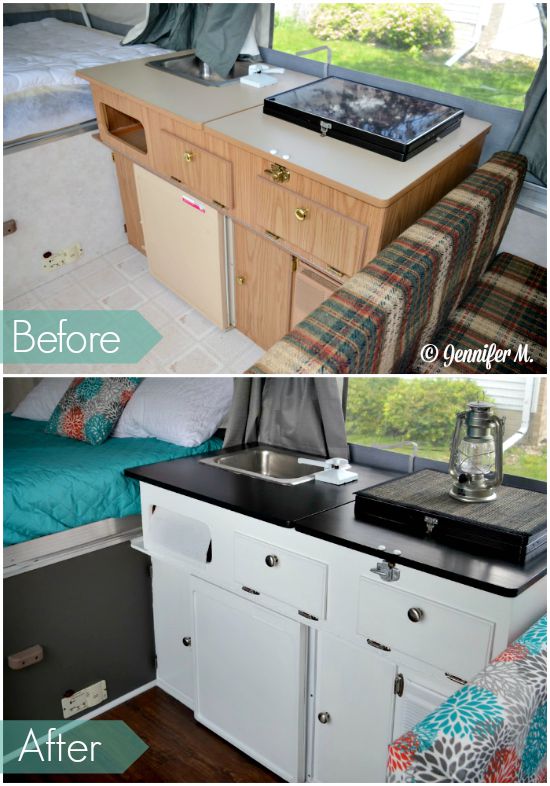
This is what Jennifer started with–standard Coleman color scheme. Yuck! She found a flowery outdoor fabric at Hancock Fabrics, which she used to determine her new color palette. The fabric worked great for the bench cushions, as outdoor fabric is really durable. You can simply wipe up spills with water. This was essential for Jennifer, who has three kids and two large dogs.
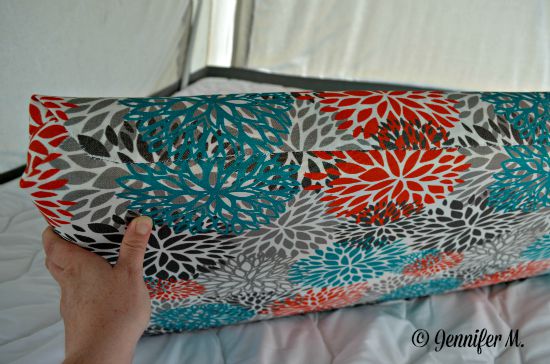
Sewing the cushion covers was intimidating for Jennifer because she had no sewing skills. She searched the web for the easiest way to sew cushion covers and still get a tailored professional look. She didn’t want to do the fold and staple method because she was worried that the staples on the backs of the cushions would be visible. She came across this tutorial for cushion covers, and it was exactly what she was looking for.
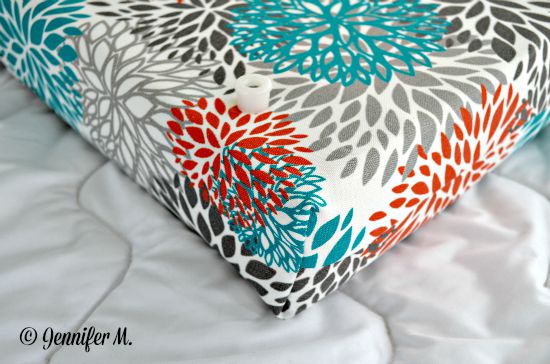
Jennifer said this method was so easy, and she highly recommends it for covering pop up camper cushions. If you can sew a straight line, you can use this method. Once she finished the covers, she screwed the plastic stoppers back on to the bottoms of the cushions to keep them from sliding around.
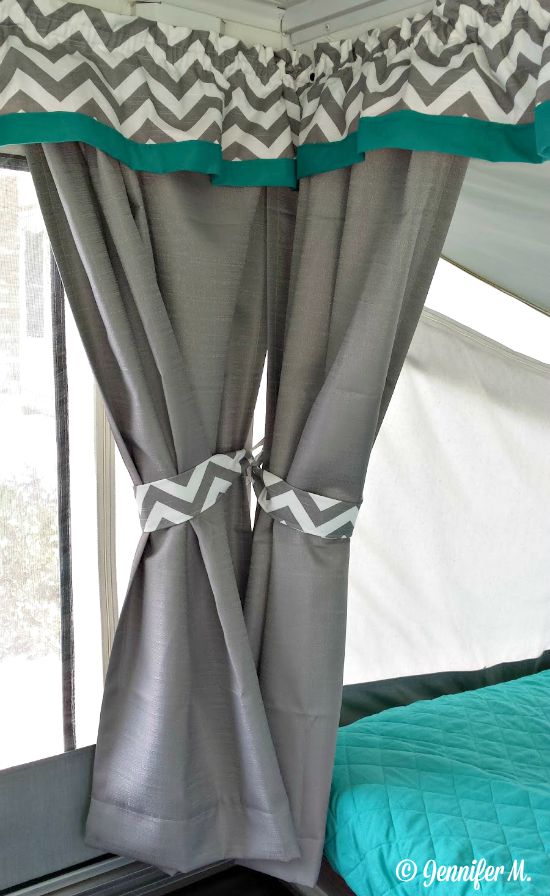
Jennifer picked out grey and white chevron fabric for the valances. She cut off the portion of the old valance that had the clips on it and sewed it on to the back of the new valances. Then she made a 1″ casing in the back of valances for new elastic and threaded it through. Jennifer says she found this project the most frustrating, but I think they look fabulous! 🙂
For her curtains, Jennifer bought Eclipse black out panels in grey from Walmart and simply hemmed them to make them the correct length. Hanging pop up camper curtains and valances can be quite challenging due to the curtain track system used. It is very hard (& expensive 🙁 ) to find replacement clips that fit on the Coleman track. For the curtains, Jennifer ended up re-using the clips and following the hook and ring method we used. You can find that tutorial here. She found that her drapery rings kept popping out of the command hooks when she was adjusting the curtains or lowering the pop up, however, so she bought a package of small clear hair rubber bands and tied them on the command hook over the drapery rings. This worked great! Now the curtains stay on the hooks, but they are still removable for washing.
Jennifer decided to use the same flooring we did–Allure Ultra in Vintage Oak Cinnamon, from Home Depot. They installed quarter round to hide the gap from the floor around the edges and finish off the look nicely. They laid the new floor over the existing vinyl flooring without removing the cabinets. Doesn’t it look great?
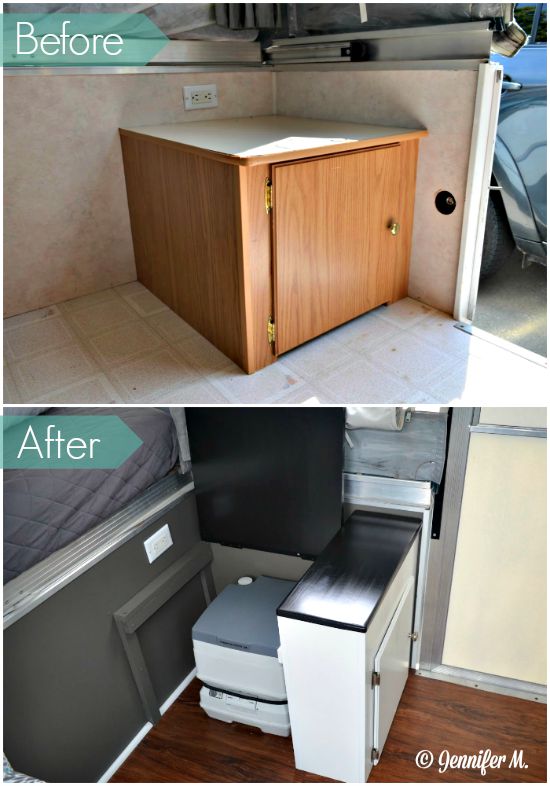
One of the major changes Jennifer made to her camper was the addition of a “potty cabinet.” Having a functional porta-potti was essential for her family, and the original cabinet just wasn’t cutting it. Jennifer was inspired by the “bathroom” in our PUP, so she decided to try to build something similar for her camper. She didn’t have any wood working skills at all, but she was determined to give it a go anyway.
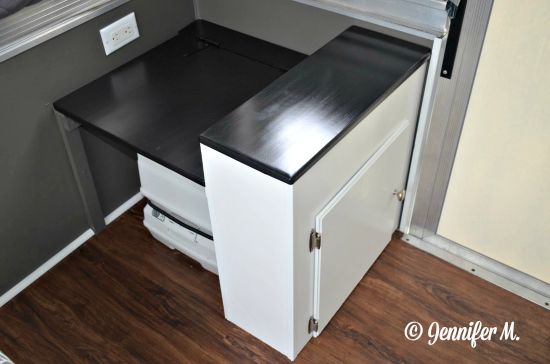
I’m so impressed with Jennifer’s ingenuity! Her new “potty cabinet” has a storage area with a hinged counter top/lid that lifts up. Now her kids can simply lift up the lid and use the potty in place. It is so much more convenient for her family. I just love seeing the unique ways you guys modify your campers to fit your needs. It is really inspiring!
The cabinets in Jennifer’s camper got a coat of white primer, and then three coats of Dutch Boy Cabinet and Trim paint in Ultra White. Her husband changed out the old brass hardware for new brushed nickel knobs and hinges. They bought the contractor pack of cabinet hardware to keep the cost to a minimum. The counter tops were sanded and given several coats of Rustoleum Spray Paint in Black. They finished them off with five layers of polyurethane to protect them.
To complete the remodel, Jennifer spray painted the old table legs metallic silver. She finished the top like she did the counters, with black spray paint and a few layers of polyurethane. Because Jennifer was worried about how painted plastic would hold up in her camper, she bought some black t-trim to match the paint and installed it around the edges of the table top. Now she doesn’t have to worry about the paint scuffing off.
Didn’t it turn out beautifully? Nice job, Jennifer! 😀 I hope you enjoyed peeking inside her camper as much as I did. If you’d like to see more photos and hear from Jennifer in her own words, be sure to check out her blog here.
And keep those remodels coming! You guys rock!
Happy Camping!



Oh I love it! Great job!
It looks great, but I have to admit I love the original ugly plaid fabric on the dinette cushions. I’m currently on the hunt for a plaid upholstery fabric that my husband will agree too.
Love everything about it, especially the colors!!! Great job!
Is it gorgeous, Chelsie? Jennifer did an awesome job!
OK, LOVE the potty cabinet! We just bought a PUP and my hubby is building this cabinet for us (well, me! 🙂 ) today! Would love a tutorial but he’s figuring it out. Thanks for sharing!
So cool, Beth! Be sure to post pictures! 🙂
Great job, Jennifer! I love the colors! You gave me some insite on how to fix up our ‘new to us’ 2010 Rockwood Freedom. It needs some sprucing up.
I was really excited as to how you put in your porta potty! But when I went out to check ours, it wouldnt work for us, shoot!
I have lots of questions to ask Larissa!
Love this! We just got a 93 Coleman destiny Royale currently trying to remodel. So far our new floor is in and I have new comforters and fabric chosen. Time to put in the hard work. Haven’t decided if I want to paint cabinetry or counters.
Watch out, Samantha! It’s an addiction! You’ll find yourself remodeling the whole thing before long! 😉
I absolutely love the colors!! I have a 2009 Jayco, Jay series 806? There’s not very many cabinets under the sink and the ones that is there are tiny. :/ Do you have any ideas on how to store food (seasoning, canned foods, etc.) Without it looking cluttered or have to dig it out of the dinette??? I’ll be living in for close to a year soon. So I definitely need some ideas if you have any.
Oh, wow, Bridgette! Are you going to be traveling or will you be stationary for a year? We don’t typically store food inside our camper because we camp in bear country, so I’m afraid I won’t be much help. You could build some tension rod shelving to help with storage, though. We’ve got a great tutorial here. 😀
Yes! I just saw it! 😊 That’ll be alot of help. I’m working construction and will be located in Oklahoma, and staying in an RV Park is WAY cheaper than staying in a motel! Lol. THANK YOU!
I’m in the process of making all new curtains for my newly purchased older model Coleman. I got a great deal on cotton duck fabric on ebay. Where did you get tge white “mesh-like” fabric for the bed curtains? Or did you reuse what you already had? I do want to incorporate these for those warner summer nights. Your remodek is inspirational to me. I’m going through camping withdrawal so I’m making a “wish binder” for my remodel come spring.
I reused the mesh from the original curtains when I made ours, Sue. You can find that tutorial here. 🙂
I love your remodel! We are picking up our first pop up this Saturday. It’s definitely in need of some TLC and I will be slowly renovating the entire thing. (My husband doesn’t know that yet!) I want to start with the curtains and cushions. Can you tell me how much material I need to buy? I’m so excited, and a little nervous. Thanks!
That will really depend on your layout, Maya. I used the old cushion covers and curtains as a guide when I made mine. You can read about the cushions here and the curtains here. Best of luck!
Any tips on installing the toilet? We just purchased a 1998 Flagstaff 206 and it does not have a toilet. I would love to add one if possible!
Ashley, I believe the toilet is a standard porta-potti. It’s not actually installed. Jennifer just used a bungee cord to secure it into place. You can find them at most RV stores or on Amazon. Here is one is one many PUP campers love, although I haven’t tried it personally.
Potty cupboard… INGENIOUS! but gonna need a tutorial that breaks it down. Does one exist? Friend and I each purchased pop ups to renovate… because we each have different “specialties” (aka tools) we are swapping for expertise. I’m doing sewing for both trailers, he’s doing painting and flooring for both. YAY!
Sounds fun, Beth! How nice that you guys can trade your work. Unfortunately, I don’t know of a tutorial that exists for the potty cupboard. A tutorial would not be of much value anyway. Each trailer will have different measurements, so the process would be highly individual. Best of luck on your remodel. Can’t wait to see it! 🙂
Where did you find the grey white and teal valances?
I found the fabric for the valances at Hancock Fabrics and sewed them.
This is so cute! We just purchased a travel trailer with ‘popup-style’ beds. Do you use regular sheets and covers for your pop-up beds? I don’t want to use a sleeping bag and want my camper to be cute! 🙂
We use sheets on ours, Cheri. You can read all about how we make the beds on this post. I’m not one for sleeping bags either. I love a cute camper! 😉
I love the idea of refinishing the counter tops! My question is, did you take out the counters before you spray painted them? Or did you leave them in and mask everything off? I’ve been thinking lately I would love to paint mine and spray paint is so easy!
I did remove the counter tops before I spray painted them. It was easy to do because they were only held in with a few screws. I didn’t want to risk spraying them in the camper.
Camper looks amazing!! Colors are perfect and bright. The only thing I do not like is the addition to the potty. That was one thing we did not want in our popup camper. But other than that they did an amazing job!! So glad I found the site, looking for tips to organize our camper.
LOVE this!
We are looking at redoing our trailer for this summer this has given me so many ideas as I love everything that was done here! Amazing job!
Looks great! We are about to paint our cabinets. The wood grain is peeling off! So we are going to have to peel it all off I assume and what kind of paint should we buy?
Here’s how we did our cabinets, Andrea. You may have a bit of a tough time peeling off that wood grain paper. Any chance you could re-adhere it where it is peeling up?
Painting Camper Cabinets
How many yards did u need to buy to redo the benches? I will have to order it online so it would be helpful to know exactly how much before i order
I absolutely love it!! I’m in the process of redoing our pop up too. Who knew campers could look so cool! I hope I will be able to figure out how to post my pictures when done. Lol
What color did you use for the walls? Was there any special steps to paint them?
Not sure how Jennifer approached her remodel, but to paint our pop up camper walls, we cleaned them well with TSP, primed them with Glidden Gripper, and used a washable latex Behr paint. They still look amazing. 🙂
Thank you! I’m so excited to start my camper remodel!
I have a “standard” Coleman pop up. Even tho hubby doesn’t want for me to upgrade, I’m doing it. He always agrees after the fact. How much fabric should I buy to reupholster the cushions. I’ll probably have someone make new cushion covers & place the old cushions right into them rather than stapling. If anyone is looking for a way to save on fabric, go to Fabric Guru website. I’ve bought from them several times & very happy with them. Thank you for all your ideas!
That will depend on the method you use to make the cushion covers, and how many cushions you have. It took me about 7 yards total for my four dinette cushions, Melissa. You can read more about how I did ours here.
Plastic drawers are your friend! I have a set of three large ones that I use for groceries in my 1997 Sun Valley pup. Then I have two smaller sets that I use for toiletries and first aid stuff. Mine were clear and I didn’t like looking at all the junk in them, so I mod-
lodged the drawer fronts with the same fabric as my curtains. Voila! Now I have pretty drawers AND storage! The drawers come apart and store on the floor when I fold down the pup. Good luck!
Great job Jennifer. We just bought a tent trailer too and I can’t wait to get in there and clean and freshen it up! Happy camping!
How do you attach the quarter round on the floor/cabinets Glue or nail? I put in vinyl squares over mine and would like the “finished” look..
We used both, Sue. We ran a thin bead of wood glue on the back of the quarter round and used our brad gun to secure it.
Just wondering what is t-trim and where can I find it? I am new to remodeling pup and loved that idea on the countertops.
This is very nice!
Do you know how many yards of the fabric you used for the 4 cushions?
I have a pup that’s only been used a handful of times but some how the floor is rotted out. Even in the front cubby. Any tricks on replacing floors? Ty
That isn’t a very easy fix, Robyn. If the whole floor is rotted, you will need to take the camper down to the frame to replace it. Check out Robert’s camper here for an idea of what is involved. If you only have a section that is rotted, you can often cut it out and replace just that section. Either way, it involves quite a bit of work. Best of luck! Make sure to take lots of pictures if you tackle that project! I’d love to see it. 🙂
Any tips on painting the fridge?
Use appliance epoxy in a spray can. It is the bomb! 🙂 You can read about how we painted ours here.