


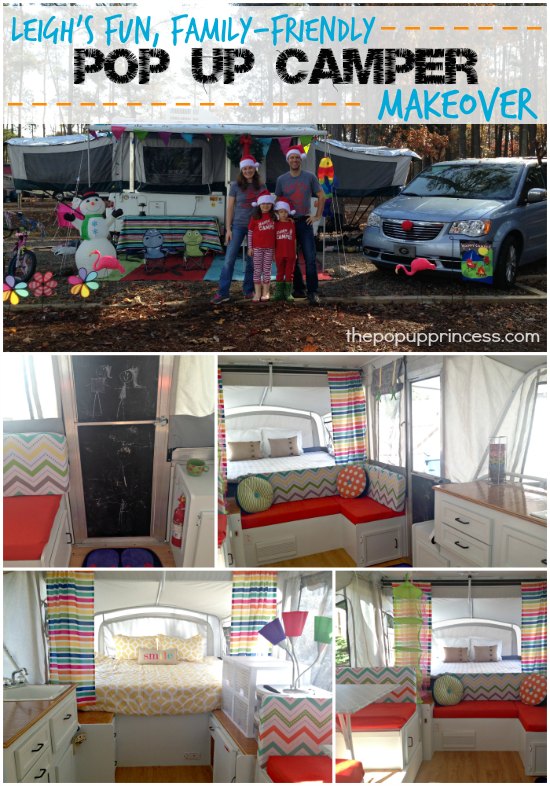
It’s no secret that my favorite part of blogging on The Pop Up Princess is seeing all of your jaw-dropping camper remodels. I love hearing your makeover stories and seeing the amazing progress you guys have made. The remodel process is so much for to me, but… I’m pretty sure Mr. TypeTwoFun won’t let me have another camper, so I’m living vicariously through you all! 😛
I know a lot of you are like I am… which is why I know you’ll love this latest makeover story. Leigh and her family were itching to purchase a pop up and get camping. They were patient, set themselves a budget, and stuck to it. By purchasing an older, neglected camper, and doing much of the remodel work themselves, they were able to get everything they were looking for and more. Wanna know how they did it? Here’s Leigh to tell you all about it…
I have been reading The Pop Up Princess blog for almost a year. My husband and I have been tent campers for a long time, but about a year ago, one of our friends insisted that we try his pop up camper on a local camping trip. He drove it out to our site, set it up, and broke it down so that we could enjoy the pop up experience. Needless to say, we were hooked. We started to dream about the trips that we could take in our camper with our 5 and 6 year old children. Buying a new camper was out of the budget, so for almost six months, my husband combed RV Trader and Craigslist. In the meantime, I discovered this blog on Pinterest and became obsessed with a pop up renovation. This made the search easier because it didn’t matter what the interior looked like, as long as the bones of the camper were good.
We wanted to get a deal–our budget was under $4,000–with a slide out and potty. After months of searching, we started to get discouraged because everyone seemed to ask five to seven thousand dollars for their small, old PUPs, and there were very few with dinette slide outs. We sat on our $4,000 pile of cash and began to wonder if we needed to up our price to $6,000 and/or compromise on the dinette slide out. Then my husband came across a listing for a pop up that didn’t sell at a garage sale a month earlier.
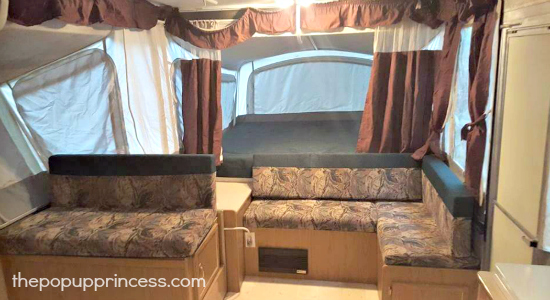
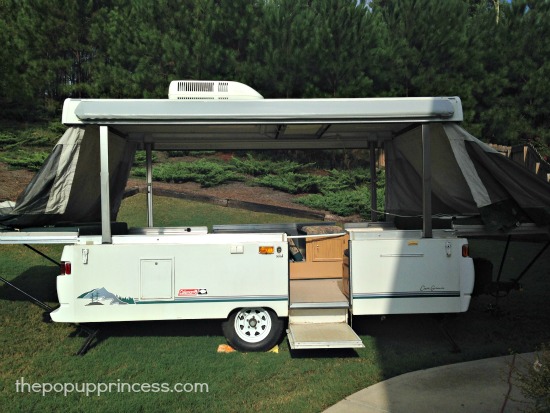
Fortunately, it was located about 20 miles from us, so we grabbed our cash and our pop up friend (who happened to have a great tow vehicle) to have a look. The owners popped it up when we got there, and the smell of mold almost knocked me to the ground. At first I thought, “No way. Another dud!” but then the longer I poked around in the camper, I could see the potential. Sure, it needed cleaning, but the bones of it looked good. It had the required dinette slide out, AND also a kitchen pop out. The one major drawback was that it didn’t have a potty or a front storage unit. The seller was asking $2,900. The canvas had so much mildew that we were convinced we needed to replace it. The cost of a new canvas was just over $1,000 through Bear Creek Canvas. After a little negotiation, we settled for $1,900. Since the camper was so old and smelled so bad, at first I didn’t realize what a great deal we got until we got the camper home and discovered what great shape it was in. All it needed was some love and attention! After almost a year of reading posts on this blog and seeing remodels on Pinterest, I was inspired and excited to see what I could do with our “diamond in the rough.” 😉
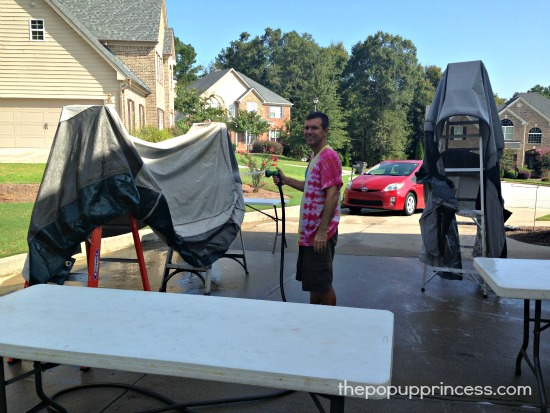
My husband was enthusiastic to begin this new adventure, and the first thing we did was remove all the canvas. We used the tutorial on The Pop Up Princess to clean the canvas. My husband thoroughly scrubbed each piece. We were amazed at how clean the canvas looked afterwards. It was like new again.
The original cabinets were a pine looking color. We wanted to brighten things up, but were afraid to paint pure white inside the camper. We choose a neutral light blue/gray paint color that could be used with a variety of future color schemes. We even painted the fridge. We took off the gold colored knobs and replaced them with a sleek black ones I found on clearance at Home Depot for $.57 each. The original floor was cream vinyl with pink flowers. After reading other pop up remodel posts, we purchased Allure Vinyl Plank flooring from Home Depot. My husband was able to lay down the new flooring in just a few hours. The new paint and floors changed totally changed the look of the camper.
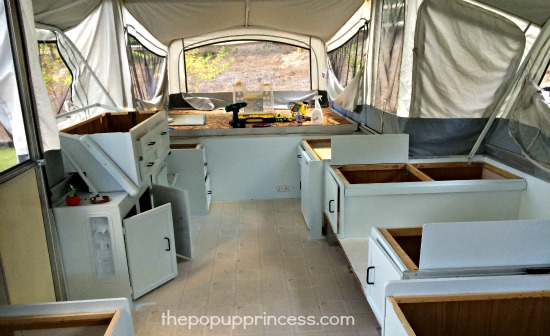
The countertops were showing signs of age, so my husband cut new ones out of high quality oak plywood and covered it with four coats of spar urethane. He also had to cut out a new table top because the previous owner destroyed the original one by leaving it out in the rain. I covered the table with a felt backed vinyl table cloth fabric from Hobby Lobby for less than $4. It looks great, and when it starts showing wear and tear, I can replace it for cheap.
The mildew smell was still strong in the PUP, so I removed the foam from the beds and all seating areas. We disposed of the foam, but kept the covers everything thing came in. After two good washings, the covers looked good as new, but the green/brown colors were still not going to work for us. We ordered custom foam from Foam Factory for our two king beds. It arrived within a few days and fit perfectly inside the old covers.
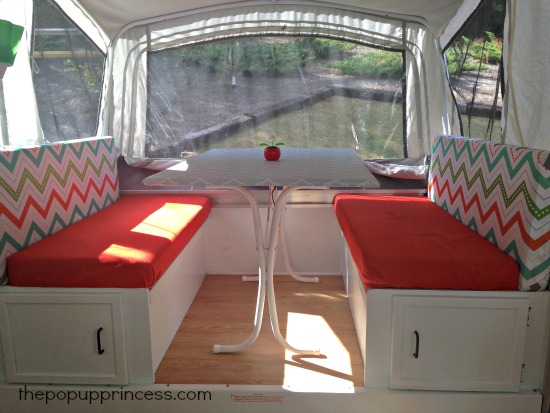
I had a 60% off coupon to JoAnn’s Fabrics and bought all the 3 inch foam they had. I cut each piece and put it inside the original cover with the original plywood to hold it together. I searched for a sturdy duck fabric to cover the original cushions, but discovered I would have to buy so much fabric that it was going to cost a small fortune and require some sewing. After visiting four fabric stores, I decided to use shower curtains for my cushion fabric.

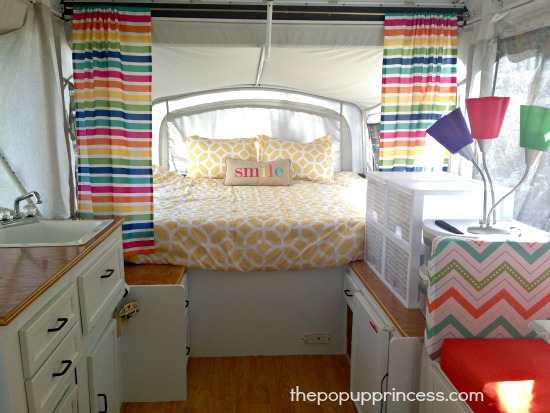
Shower curtain fabric is sturdy and cheap. I was able to cover two cushions with each shower curtain. All in all, it took four shower curtains to cover my eight cushions. I’ve seen some awesome camper cushion covers that are removable; however, I am not a sewer. I wish I was, but I just can’t seem to get the knack of it. Instead, I used a staple gun to attach the fabric to the cushions. I can’t remove the fabric to wash the cushion covers, but I can change out the fabric since it was so inexpensive. I also threw out the old camper curtains, purchased two more shower curtains, and had a friend sew them in order to make the bunk end curtains. Rather than using the track, we used a café rod to hold up the curtains. I also had two windows that needed covering, so for these, I cut up an old curtain that I was not using. We hung those on café rods and use them as “roll up” window shades–they are held up by Boca Clips.
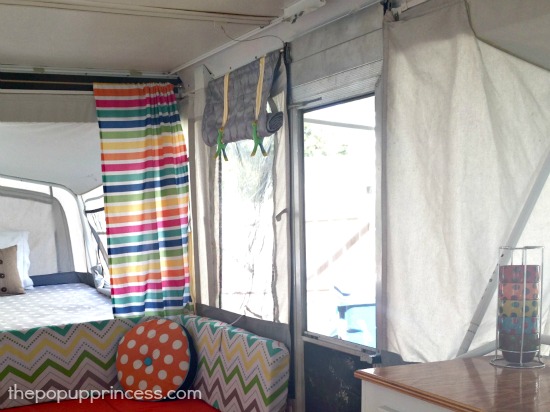
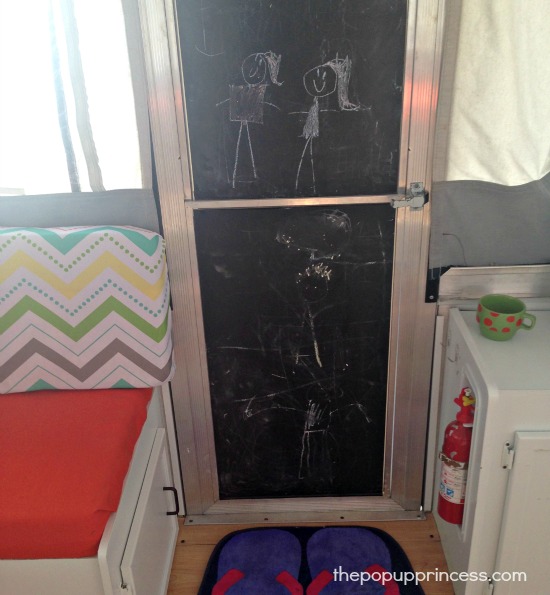
I have discovered that Boca clips are extremely helpful when camping. They can hold towels, curtains, coats, etc. I love them! With all the updated painting and fabrics the camper door was looking sad and worn. I found blackboard contact paper on Amazon for $6. It helped complete the fun, modern look, and the kids love it! 😀
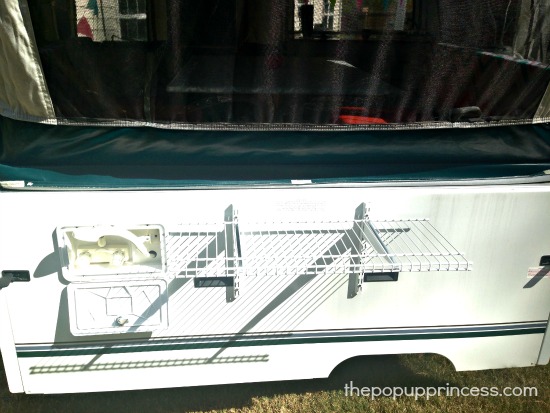
My husband added a wire shelving unit near the hot water shower on the back of the pup. It comes in real handy when you need to set something down while using the water. He really enjoyed tinkering with the mechanics of the PUP, and converted the gas heater into an electric water heater with a Camco Hybrid Heat Water Heater Conversion System.
One of the big concessions that I made was not having a built-in potty. After some research, we discovered that a portable potty would work for us. We identified a cabinet that we could use to store it, so it’s not always out. My husband widened the old cabinet space so that we could slide it and out as needed. I stapled some decorative fabric to cover the opening. During the day, I walk to the campground bathrooms, but at night I’m so thankful for the potty.
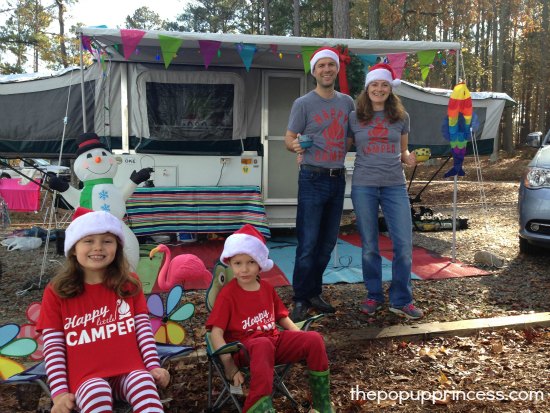
So far we’ve been on two trips with a third planned this month at Fort Wilderness at Disney World in Orlando. I’m so excited about this trip. It will combine two loves: camping and Disney, and we are making fabulous memories with the kids!
Costs
Camper purchase = $1,900
Cleaners = $150
Bed foam = $385
Seat foam = $270
Curtains (shower curtains for bunk ends) = $40
Seat Fabric (shower curtains) = $80
Curtain holder café rods (4) = $35
Floors (2.5 boxes) = $130
Paint & primer = $85
Chalkboard door = $6
Knobs = $6
New counter tops = $50
Outdoor shower shelf = $22
Electric water heater element = $80
Total cost of camper and renovations: $3,239
(Yay! We came in under $4,000–just like planned! 🙂 )
Thanks so much for sharing your awesome remodel with us, Leigh. I love how bright and cheery it all looks. Take a look at those before & after pictures. What a difference a little hard work makes!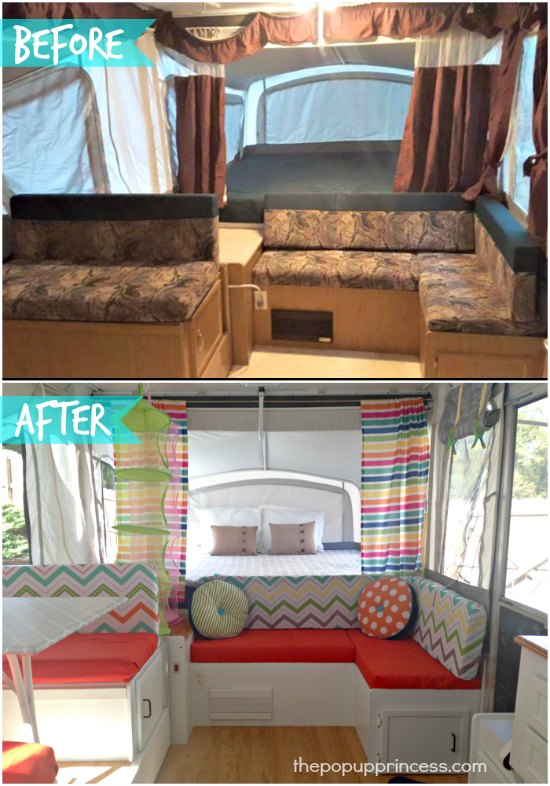
Have you taken on the task of giving your tired pop up camper a facelift? We want to hear all about it. You may even have the chance to get featured on the blog. Be sure to check out this post on how to be featured on The Pop Up Princess. We can’t wait to hear from you! 🙂
Disclaimer: This post contains Amazon affiliate links. The Pop Up Princess is a participant in the Amazon Services LLC Associates Program, an affiliate advertising program designed to provide a means for sites to earn advertising fees by advertising and linking to Amazon.com. This means that if you choose to purchase an item from a link in this post, The Pop Up Princess earns a small advertising fee to help pay for future projects and posts… so thank you! 🙂
Happy Camping!

What a great makeover! I love all the bright colors. Right now it’s below freezing here in CNY so I’m getting my camping fix here and on the pup portal. We can’t wait to get the pup opened back up and ready to go camping!
I’m glad you like it. Our second trip out in the pup was low in the 20s and high in the mid50s. We were so happy to camp in our newly renovated pup that we enjoyed ourselves. I think that is as cold as we are going to get.
Great job; it looks so cheerful and fresh!
Wow! looks beautiful…can’t wait to start my reno!
Amazing! Creative, colorful and frugal all in one! I’m so envious! 🙂
Thanks. It’s so much fun to both renovate and enjoy on trips. It’s consumed our lives a bit. Is this Owen from Tucker?
Nice work, great colors! Your pictures are so nice! Enjoyed your outdoor pics, so cute.
It looks awesome, doesn’t it, Glenda? 😀
What color paint did you use on the cabinets? I love that blue tint!
We got Behr paint at Home Depot. The color is “Calm” and we got it in outdoor semigloss finish. We also used Kilz underneath. Sorry it took so long to respond. We just returned from our first trip to Fort Wilderness in the pup. I’ve been to Disney many times but Fort Wilderness is my kind of Disney. Loved it. I can’t wait to go back.
I’m officially inspired to keep searching for a pup that has all we’d like, but not spend a fortune 🙂 The pup we have now is really too small for our large family and we would really like to find a pup with a slide out dinette for added space, as well as outside storage up front. We, too, would like to have a potty, but already have a portable unit that would work great in a converted cabinet like you mentioned. I’d love to see some images of the cabinet you remodeled and the curtain that covers it. For now, we’re thinking of removing the fridge (because we never use it) and putting the potty in that space on a slide out cabinet bottom. Easy out when needed and concealed when not in use.
Great makeover and admiring your persistent search, from afar!!
Thanks AJ. The dinette slide out is just amazing. It makes it feel much more spacious. Two feet of extra floor makes a big difference. It’s funny, I thought having the portable potty was a big compromise, but now I’m good with it because I have a ton of storage in the pup where the built-in would be. We still need to pop it up this week following our Disney trip, so I will take a pic and post it. We had a drawer and cabinet next to the fridge. We were able to keep the drawer, but my husband removed the cabinet door and cut the cabinet entry to be wide enough to slide the potty in. I had some leftover fabric and just stapled it on the top inside so it hides the potty during the day. We only pull it out at night, just in case. We also discovered “campa-chem” on this trip. Just a little of it in the tank took all the urine smell away. Amazing!
Thanks, Leigh! Can’t wait to see the pics when you get a chance. I’m glad you mentioned all the extra floor space from the slide out dinette…that was something I was on the fence about 🙂 And I agree, the cassette toilet/showers f=do take up quite a bit of room. Thanks again for sharing!!
Hi, I love your remodel! I was wondering if you removed the doors from the cabinets when you painted? I’m not sure how hard that is, and we are going to attempt to pain ours tomorrow! I’m so nervous!!!!
We removed all the cabinets. I laid them out in the garage and just sprayed them with kilz aerosol cans for primer and then finish coated them. We didn’t remove the hinges from the doors and just painted them in place.
How did you attach the cafe rod/curtains to the wall of the camper?
There are a couple of ways you can do that, Kim. You can use Command hooks to hold the rods in place, like this. You can also screw them into the roof of the camper. If you have a Coleman camper with an ABS roof, though, I would strongly discourage that method. 🙂
This remodel is seriously making me reconsider what I want to do in ours. 😀 We just got a 1978 Starcraft in very good condition for $300 (someone lovingly cared for this PUP). The counters are a bright lime green and in good shape. I want to keep them as-is to play off of that retro-vibe, and they would go perfect with all this color!! I usually like to keep neutral matted colors because I’m usually surrounded by boys – and that’s the only way I can get away with decorating anything! Ha! But I’m so inspired by this look too! Thanks so much for sharing!
Love the shower curtain idea!! We just purchased a PUP pretty much exactly like yours. I am a decent DIYer except for sewing so the shower curtain/staple gun method totally appeals to me! It looks great and you’ve given this non sew gal some hope in cushion remodel haha. Thanks so much for sharing!
Wow! What an amazing transformation. Thanks for such a through explanation of your search and transformation. I also have been to Disney a lot but never to camp! I have never been camping and I am excited to purchase a PUP! Enjoy your journey!
What is the make an model of this camper?
I love love your pop up camper! Would it be for sale by chance? Lol