


 I always tell people that pop up campers are addictive. Once you’ve been bitten by the bug, you get a little obsessed with finding one. I remember searching Craigslist for well over a year before I found our Santa Fe. It takes some time to find the right camper, and I highly recommend doing your homework before you buy a used PUP. We’ve got a great article here on finding just the right one for your family.
But what happens when you think you’ve done all your research, only to get your baby home, and find the seller wasn’t exactly truthful on the condition of your camper? I’ve heard quite a few stories about readers who thought they were getting a great little pop up, only to find severe damage when they started their remodels. Do you throw in the towel? Cut your losses and find a new camper? In certain circumstances, it is definitely more economical to walk away, but sometimes–with a little hard work–you can make that new-to-you PUP as good as, well… new. That’s exactly what Lisa and her husband did. Here she is to tell us all about it.
Lisa’s Pop Up Camper Makeover
We are a scouting family and have tent camped since our oldest son was a tiger scout in first grade. Our boys are now 16 and 13, and we love the outdoors. It is our happy place, for sure. We were never in a place – we thought – to afford a camper of any kind. That was, until I stumbled upon The Pop Up Princess. After being inspired by so many reader stories, I began watching Craiglist for something that we could afford. We knew that a pop up was definitely the right first step to take.
After looking at a few pop ups, we developed some specific “wants” for our new camper. We wanted a dining slide out and we preferred not to have to climb over seating to get into bed. We also wanted something that was in decent condition, so we could instantly use it and make cosmetic updates over time. Well, we ended up with two out of the three of those wants. 😉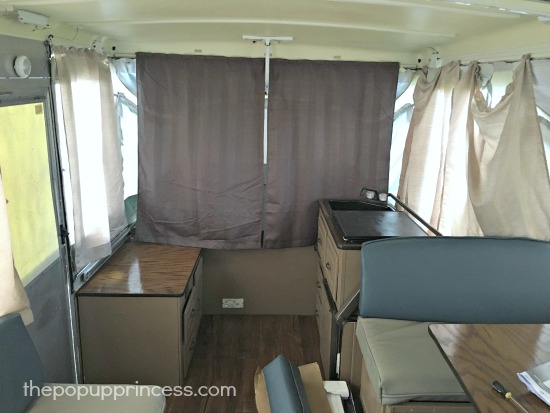
We found the camper and emailed to see it as soon as possible. It was a 2001 Coleman Niagara with dining slide out and two king size beds. We knew we had to have it. In fact, we were so excited we made reservations for the closest state park before we even purchased it. Boy, were we novices! It never occurred to us that it would be too heavy for my Honda Pilot to tow. It literally pushed us all the way home, but it was the perfect excuse for my husband to get a truck. Our affordable venture was becoming less affordable. Lesson learned… know your tow capacity before you buy your camper.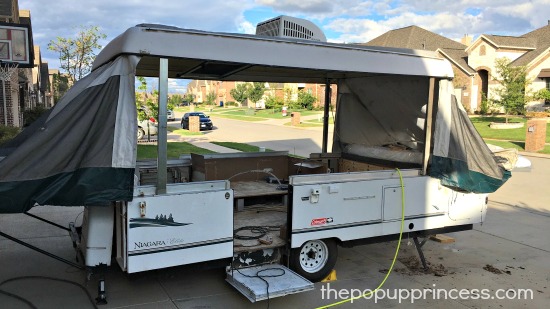
After we got ourselves a new tow vehicle, we scheduled the next few weekends to make cosmetic updates to the camper. We planned to do new floors, new paint on the walls and cabinets, new curtains and accessories. The countertops had already been replaced with nice wood ones, and the seats had been recovered with a vinyl material that I knew would hold up great with the boys. I am not a seamstress so knowing I didn’t have to worry about the seat cushions was a huge plus. In fact, I picked the entire color scheme to work with those seat coverings.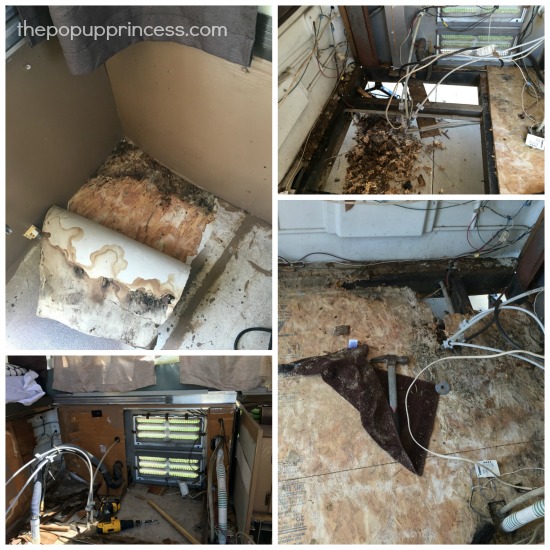
That was where the good news ended. When we pulled up the old linoleum, we discovered wood rot along with some mold in several places. You could push on the wood and your entire finger would go through the subfloor. Upon further examination, we discovered we had rotted wood on the back sides of the cabinets and some rotted walls behind where the cabinets had stood. It was a mess. There had been some major water leakage over time that had been ignored. We were so heartbroken. We knew this was about to become one of our largest challenges yet. Second lesson learned… thoroughly inspect your PUP before purchase, and make sure you slide up under the camper and check the underside for water damage.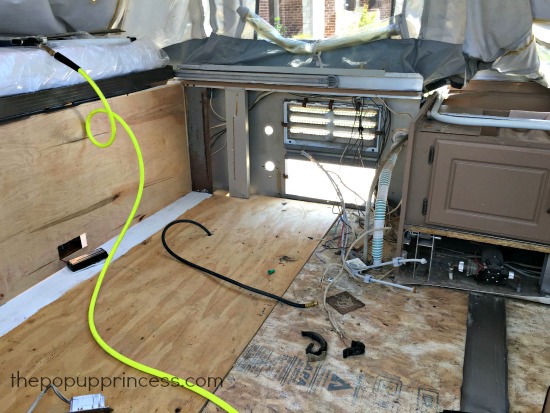
We donned our masks and gutted the entire camper down to the frame and began the rebuilding process. We had quite a bit of work to do, but we learned as we went along. We used plywood where we could, as it is a bit more water resistant than particle board, and we wanted to avoid having this issue again. After we replaced the rotted sections of the subfloor, we worked on the interior walls.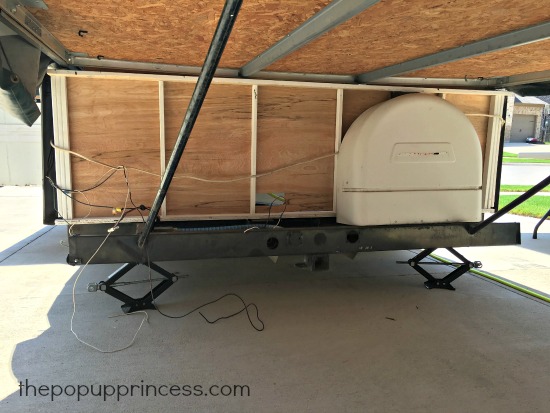
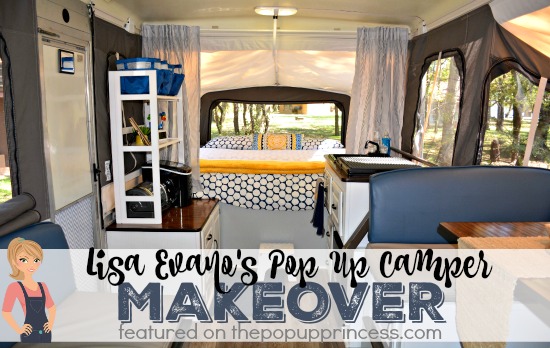
Then we rebuilt the cabinets. My husband used the existing cabinets as templates to build new ones out of ¾ inch plywood. We kept the original drawers, so we had to remove all the paint and sand those down. That was the most time consuming part. Once they were finished, we painted everything white. I splurged on spray paint, because I didn’t want to deal with brush strokes, although I did buy the cheapest economy white spray paint that Lowe’s offered. We reused all the hardware, but gave it a fresh coat of black spray paint.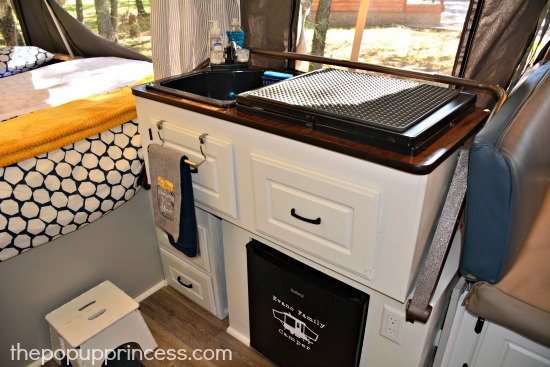 To provide some contrast from the white cabinets, we painted the walls a light grey. I wanted everything to feel light and airy. The flooring is Stainmaster Washed Oak from Lowes. The original refrigerator didn’t work, so we replaced it with a black dorm fridge and added a cute, personalized decal to the front.
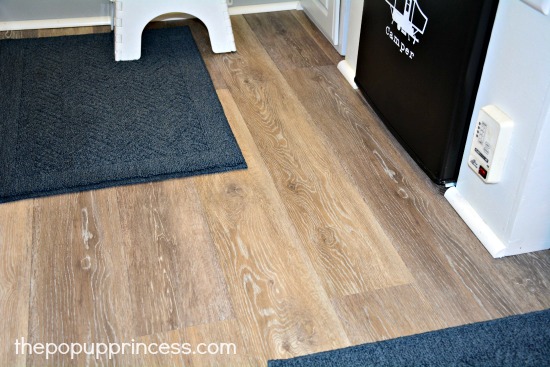 The largest expense was the canvas, but it was also the best thing we did. We purchased it from Bear Creek Canvas, and I cannot speak highly enough about them. That canvas is worth every. single. penny. 😀
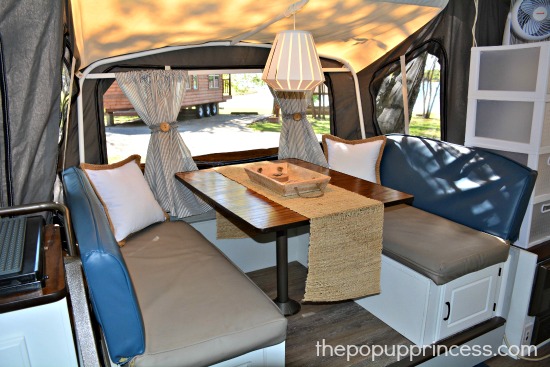 Miraculously, even though we had to replace nearly everything else in the camper, we were able to keep the cushion covers and the countertops. They look amazing in the remodeled camper. I purchased coordinating curtains from Ikea and cut them down to size. I used iron-on hem tape to hem them and hung them on tension rods throughout the camper. We opted to leave the valances off, and I love the look. We also hung a chandelier–purchased at Ikea as well–above the table.
 I followed a lot of Larissa’s suggestions when it came to the sleeping areas. The camper came with the interlocking anti-fatigue mats on the bunkends, but no mattresses. We purchased 4-inch memory foam mattresses from Walmart and put an egg crate on top of them for added comfort. We trimmed the memory foam and the egg crate to size with an electric carving knife. It was so easy. The bedding also came from Ikea. I like to mix and match my sheets with a different color on the bottom sheet than the top sheet, and that’s easy to do at Ikea, and they have great comforters and duvet covers. Our beds are really comfortable, too! I added a pop of color by layering yellow blankets (Kirkland’s) and pillows (Target) on the bed… and they were all on clearance. Score!
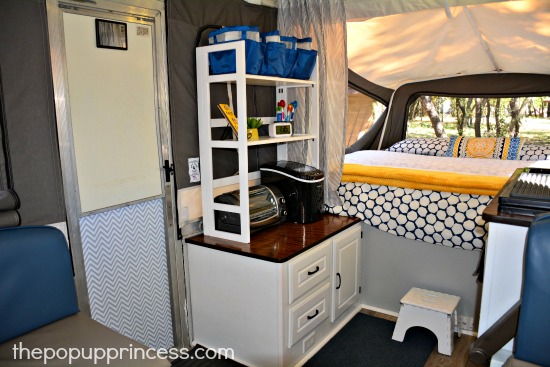
The door to the camper was pretty beat up, so I covered it in cute printed Contact paper. The shelving comes from The Container Store and folds completely flat. It was a splurge but has paid for itself in convenience ten times over. All in all, it took us from July until October to complete the entire project. It was a bit more than we signed on for, but I am in love with how it turned out and so grateful for all the reader remodels on the blog that inspired us along the way. We can’t wait to take it out more this year! 🙂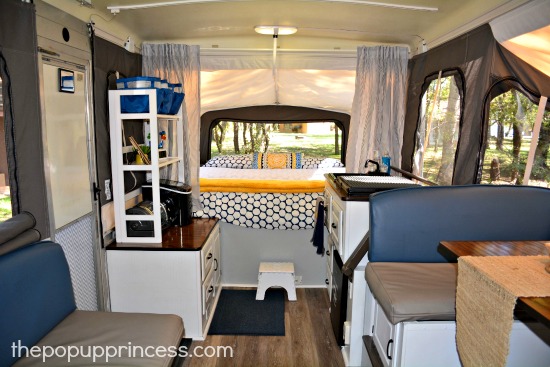
I am so impressed with Lisa’s makeover. Isn’t that amazing? It just goes to show that if you are handy and don’t mind a little hard work, you can repair just about any problem your little PUP might have. It looks amazing, Lisa! Thank you so much for inspiring us! Now go enjoy all that hard work.
Happy Camping!
![]()
Happy Camping!

Wonderful redo! Curious about where you got the custom vinyl cutout for the fridge…
I purchased the decal from Carol George. I found her on the Coleman Camper Club and Popup Camper Owners Facebook pages. Her email is: carol.george1969@yahoo.com.
This is so gorgeous! Amazing transformation!
Thank you so much!
May I ask approximately how much did the canvas redo cost? We have been looking into redoing our canvas as well. Ours is starting to peel and crack as well as holes from mice. The previous owners left it in a barn for several years before parting with it.
Replacement canvas usually runs around $900, Courtney. Depending on your model, it may be slightly more or less. That is usually a good approximation, though. 🙂
Hi there, did you have bear creek install or did you DIY on the install of canvas? We too have to replace and are wondering how hard it is to do.
Lisa, it turned out amazing. That is such an awful feeling thinking you’ve made a bad purchase. But you definitely made the best of a negative situation. Your family is going to have so much fun. Such beautiful work!
Thank you Laurie!
Lisa – your and Charlie’s long hours and hard work has paid off! It turned out beautiful! Love your decorating style and the bedding looks luxurious. This definitely turned out to be one pop up “glam”per!
Thanks Anji!
How do the white cabinets hold up in the dirt?! I’m wondering if it gets really dirty
We used a semi gloss spray paint and everything wipes right off. We have had no issues at all.
It looks great! What a wonderful accomplishment! So excited about the blog!
Thank you! We were so excited that Larissa featured us!
Lisa, you did an amazing job! I was so excited to see your canvas from Bear Creek. Last year, a friendly little critter destroyed our beloved PUP. Everything had to be tossed from mattresses to cushions to the canvas. As we are about to embark on our remodel this spring, we have been researching canvas makers and had chosen Bear Creek too! I am glad to know that you are very happy with your purchase. And, I love the gray color!
You will be very happy. In fact, when we received our canvas, one of the bunkends was missing a zipper. I contacted them, they had it picked up at my house at their cost, covered the shipping, fixed it perfectly and had it back to us in a few days. Amazing customer service.
Lisa … That’s amazing work!! You need to come to your old home town and teach the rest of us at 457 a trick or two! Your hard work really shows. So beautuful!! Y’all enjoy and if you decide to pull it up this way make sure to stop and say hey! I’d love a tour!! We’d love to see the boys. Miss y’all!!
We definitely will Michele. Hope our scouting friends are doing well!
I just love this and every other camper on this site. So much so that I am very confused about what colour scheme I will use in my refurbishment of my camper. Well done to all!
You mentioned your Honda Pilot and lack of tow capacity, so I thought I would throw this question out to Larissa and her blog readers. Just curious about tow capacity… My husband has a truck, so we can tow our pop up with his truck, but we would like to use our van. I have a 2002 Coleman Santa Fe that weighs 1700 lbs. (I believe it is identical to Larissa’s- no slide-out, nor double kings), and my 2013 V6 van has a tow capacity of 3350 with 3-5 people and luggage (a GCWR of 8750 lbs). I’ve researched this quite a bit, and some say I can use the van and others say no. Just curious if others have had luck pulling their PUPs with similar tow capacity as my mini van? Thanks!
I have a 2014 Honda Odyssey and according to the manual with 6 people weighing 150 plus 15 pounds of luggage each I can tow 2900. I have a a 2000 Skamper Vision and the GVWR is 2500 on that,
Kari,
You are well within your 2013 van’s tow capacity of 3350lbs when pulling your 1700lb Santa Fe. Read the towing section of your vans owners manual, it may recommend that any trailer over a certain weight have its own brakes.
I pull a 1700lb Jayco popup with my 2008 Honda Pilot V6. My Pilot has a tow capacity of 3500lbs (4500lbs for aerodynamic trailers, i.e. boats with their curved front design). My owners manual further states the tow capacity is based on 3 people and their luggage. For each additional person, subtract 150lbs from tow capacity. We have a family of five, so I subtract 300lbs, giving me a total tow capacity of 3200lbs. (My three kids combined don’t weigh 150lbs but if we’re going by the book here….) My Pilot pulls our 1700lb Jayco without any trouble. Even up hills.
GVWR is an important number. This is truly the number to focus on when towing. This represents the total allowable weight of the trailer and all cargo within it. Fully loaded for camping, you should never exceed the GVWR of your trailer. If a trailer has a GVWR of 3150lbs, and your vehicle’s tow capacity is higher than this number after all adjustments for people etc., then you can pull the trailer.
I hope this has helped some people. I’m considering doing a blog post about towing in the near future.
Absolutely gorgeous! Good job! I on the other hand think I will upgrade before I do that kind of work as I am alone and don’t have a handyman to help me do this kind of thing but my Thelma (camper) could really use a facelift like this and boy would I be happy with it too. Can you come and do mine?!?
If you lived in my town I would totally help you! Thanks for the compliment!
Please share more about replacing the flooring under the slide-out; was that a challenge and are there any tips?
We actually didn’t replace the floor under the slide out. Thankfully there was no mold there so we just cut out as much of the old vinyl that we could with a box cutter (only because it was gross.) And the wood that comes down in front of the slide out covers up everything behind it. We did replace the flooring on top of the slide out. We just removed the hardware for the table stand and I made sure to mark my screw holes on my flooring so I would be able to line it up exactly right when we installed the table again.
Love It! I have a silde out dinette and was wondering how you wired the overhead lighting. Thanks
It is actually a lug-in pendant light from Ikea. I just wrap it around the slide out pole and then run it along the roof on some clips and then down to the plug. You can hardly notice it.
Love the remodel!! Curious where you got that shelving unit, the white one. Or other suggestions on top of counter storage for our pup
I got it at the Container Store. It completely folds down flat when we store it. We put it on top of our long bench when traveling and top it with some throw rugs so it doesn’t get scratched up. That shelf is a life-saver!!
What did you use to paint the walls? I’d love to paint the canvas walls on mine.
Lisa painted the walls of the camper body, not the canvas, Amanda. Painting the canvas is NOT recommended. First, the canvas needs to remain pliable in order for it to fold away properly. Second, anything applied to the canvas will make it less breathable. You need the air to be able to pass through the canvas to reduce condensation. 🙂
I’d also love to know more about the shelving from The Container Store – the name of it and how it gets stored when not in use. We are embarking on our own PUP remodel adventure and organization is so important! LOVE the remodel Lisa!
Shelf: https://www.containerstore.com/s/white-solid-wood-stackable-folding-bookshelf/d productId=11002128&q=folding%20shelves
(This was a splurge but I got it on sale. We didn’t install the bottom shelf so we can put our ice maker and toaster oven there. It was totally worth the spend.)
Sorry – use this link instead: https://www.containerstore.com/s/shelving/freestanding-shelving-storage/white-solid-wood-stackable-folding-bookshelf/12d?productId=11002128
Really curious about your counters. Stained wood with an epoxy? Is it plywood or other? They look nice from what I can see from the pictures.
You did a great job! Someone mentioned the decals I couldn’t find them can you send me the link ? Thank you, Peggi