


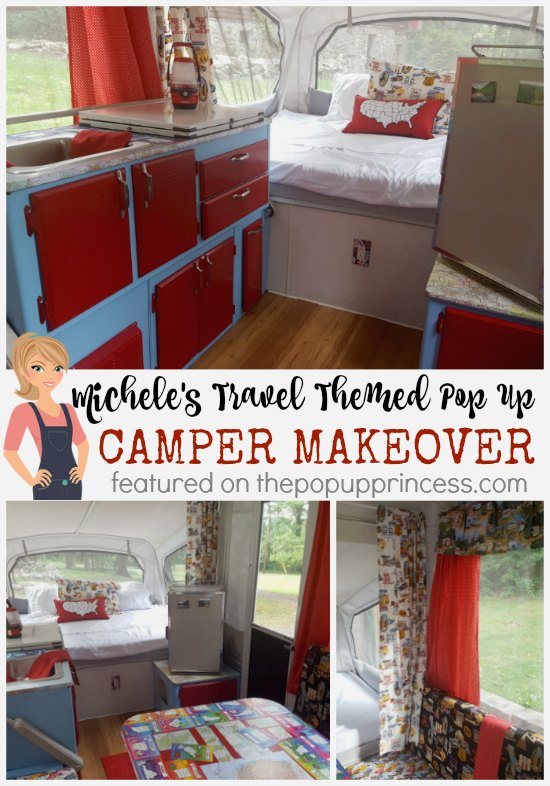
 I have made it no secret that one of the things I love most about writing this blog is sharing reader makeovers with you all. In fact, lately, the reader makeovers have taken over. But no matter how many transformations I share here, no two are completely the same. Some borrow from other makeovers, but still manage to retain their originality. Others are so unique that I have never seen anything like them. Michele’s makeover is one of those unique ones. I like to think the makeovers reflect the readers personality, and Michelle is pretty unique herself. So here she is to tell you her story…
My husband and I threw around the idea that one day we would get a camper, but we never even entertained the idea of getting a pop up camper. I love DIY projects and am on Pinterest religiously. One day, I had watched an episode of Junk Gypsies on CMT where they renovated an Airstream. I immediately looked up renovated campers, and while going through Pinterest, I started coming across pop up camper renovations from Larissa’s blog. I started to follow The Pop Up Princess and became so inspired that I knew I had to get a pop up camper as soon as possible! 😉
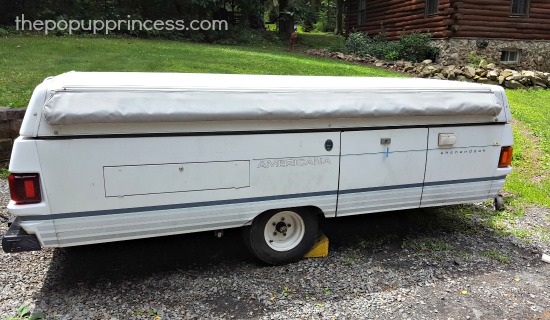
We found our 1992 Fleetwood Americana Shenandoh Series camper on a buy and trade group on Facebook. The first pop up camper I saw for sale on that group had sold within minutes. A day or two later another pop up camper came up on same group, and I expressed interest. I met the owner that weekend and bought it as soon as I saw it. It was the very first pop up camper I had ever seen in person. My husband thought that maybe we should wait, since it was the first one we checked out, but that pop up was calling to me. It was very clean and in great condition. The owner was a camping gal who was just so passionate about the camper–almost like it was her child. I could tell she took pride in her PUP, and I felt confident in purchasing it.
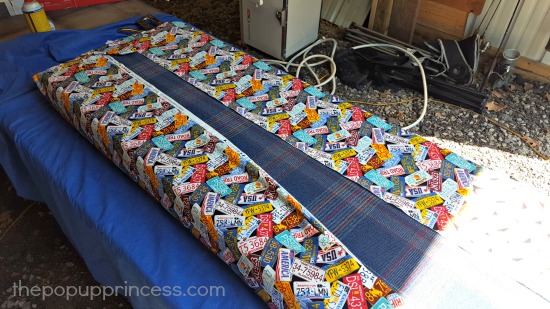
 Once we got the camper home, I had to think of the theme I wanted to go with. I was leaning towards a beach theme, but ended up choosing a retro travel theme. My husband and I love old hot rods (we have two), so going with a travel theme seemed natural. My first purchase was the fabric, which I got from JoAnn Fabrics. I bought all the fabric they had left in a Route 66 print. The fabric was 30% off, but it still cost $80.00. My most expensive purchase by far on this remodel was fabric. I bought a few yards of vintage campers and license plates on Etsy (9 yards for $100.00) and came across more Route 66 material at Hobby Lobby. I bought five yards of that, so in total I bought about 25 yards fabric from various stores.
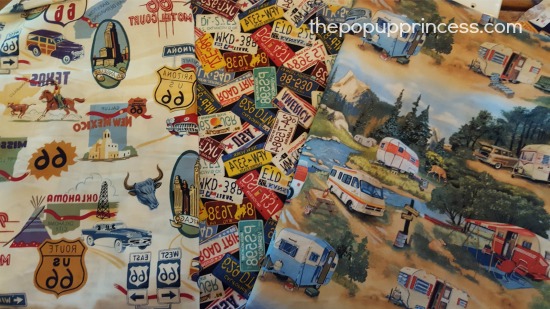
I had to buy additional material at Walmart for the curtains, because the valances used so much fabric. I selected a red material with white polka dots. I was scared to death of trying to figure out how I was going to do the curtains, and I saw this was a challenge for many of other readers. I don’t sew, but my mom does, and I was not sure if she could sew the sliding tabs on the new curtains. We were able to reuse the old tabs, as they tore off the old curtains easily due to their age, and believe it or not the old curtain tabs sewed beautifully into the new fabric. My mom had no problem and the curtains slid in nicely into the tracks. What a relief! My mom also sewed valances and privacy curtains, since the camper didn’t have them. I used 72 inch tension rods from Target to hold the privacy curtains up, and they come apart easy enough when the camper is closed.
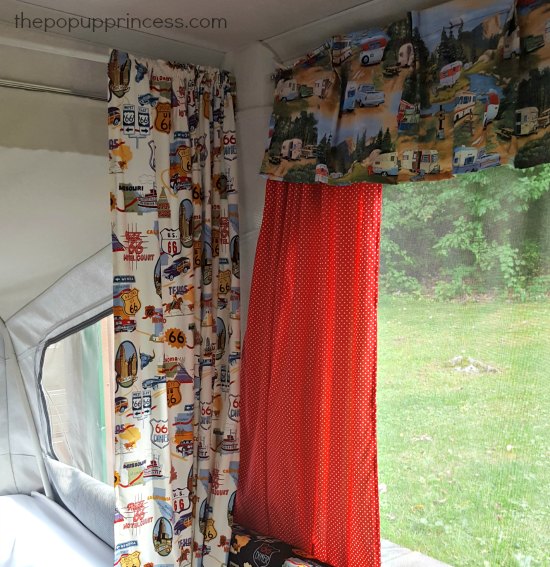
I used the fold and staple technique on the seat cushions. I used the license plate fabric for the bottoms and the black Route 66 fabric for the backs. I didn’t pay enough attention to the black Route 66 material when I bought it, and piecing it together caused a weird seam. In order to hide that seam and make the fabric print align correctly, I inserted a panel of leftover red and white polka dot material. I wasn’t sure it would work, but it turned out perfectly and adds some great visual interest.
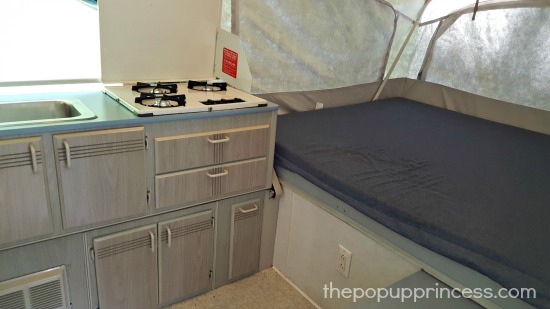
 Then moved on to the cabinets. After first priming them to make sure the paint would adhere well, I painted the cabinets a pretty blue. I spray painted the cabinet doors and drawers red. Next I laid the plank vinyl floor. I found it on clearance at Lowes, so the whole floor only cost $7.00 to do. What a bargain!
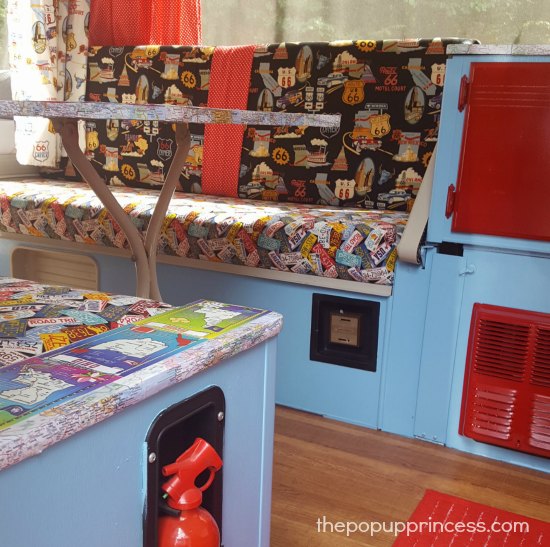 My biggest problem was the table. I had started out spraying it with red gloss spray paint. I guess during the night, while drying in my husband’s garage, a moth decided to land on it and made marks all over table. We had to go back out and buy more spray paint and try again. The results were not what I expected, so I gave up and bought a set of 50 United States Post Cards on Amazon for $17.00.
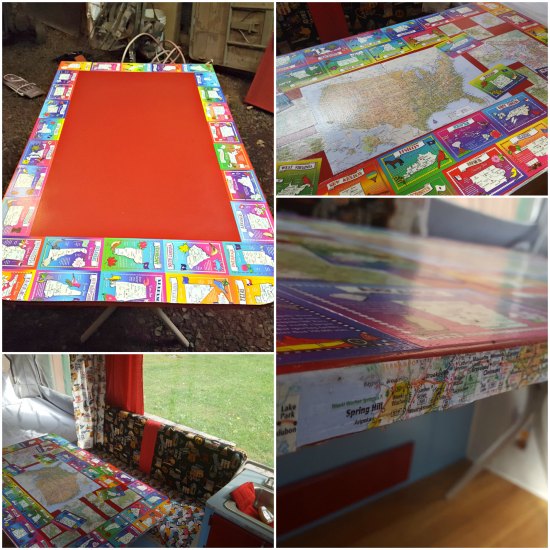 There is a card with facts for each state. I decoupaged the table with the postcards and then went to Target and bought a road atlas. I cut out all the National Park maps, along with a map of the United States to be the center focal point of the table. I love it, as it gives everyone something to read. I also incorporated some postcards on the arm rest and around the sink. Since I didn’t know where to buy molding for around the table and sink/stove area, I decoupaged strips of maps I cut out to decorate the edges.
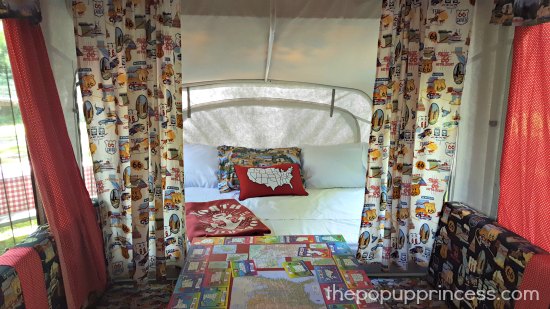 I found the awesome United States pillows from Home Goods for $15.00 a piece. I also painted the interior camper door with chalkboard paint for messages. My husband was a bit skeptical at first when I told him I wanted to renovate the camper–he even had doubts during the process–but I did the whole thing by myself and just love it! If I could live in my pop up, I would! 😀
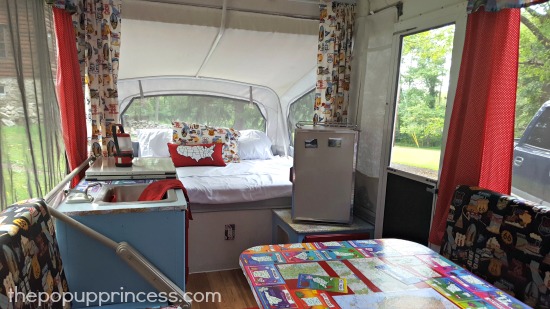 We took our pop up out for a test run a month after we bought it, and I had just barely finished the renovation. I was scared to death to pack the camper up and dreaded the ride to the campsite. I was praying that when we got to the campsite, no paint would have chipped or smeared. It all held up, but as soon as we got set up it started pouring rain. I suddenly remembered that I packed a quart of the blue paint with me for touch-ups. I ran to the cabinet to check on it, because my husband and son had rushed to get set up before the rain hit. The can was tied in a plastic bag, but I guess I didn’t secure the lid properly and all the paint spilled out. What a mess I had in the outside compartment under the sink! I was covered up to my elbow in paint and used all of our towels to clean it up, but I was determined not to ruin my new camper. We still had a great time, but now I leave my paint home when we camp. 😛
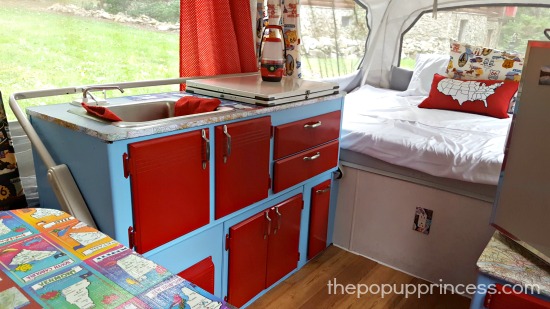
What a great makeover! I love that retro travel theme. Isn’t it unique? Thank you so much for sharing your makeover with us, Michele. You did an amazing job. I know you and your family will make amazing memories in it together.
Happy Camping!
Happy Camping!

Is she saying she used Mod Podge or something similar for the table? I would also like to put a map on our table top–do you know what kind of decoupage I should use?
I believe she did use ModPodge on the table, Isha. 🙂
To make the top more durable with heavy use, a layer of epoxy can be poured on top. It dries clear, will not yellow, crack or peel and can be tinted.
I love that idea of a map on the tabletop! Definitely going on the “when I update our PUP” list . . . 🙂