I’m excited to be able to share another camper makeover with you this week. You might remember my friend, Cassie, from her first camper makeover last year. Cassie had so much fun making over her first pop up camper, that she sold it and bought another to remodel. She did a fantastic job, and I’m so pleased to be able to show off her work. Her enthusiasm is infectious, so I’m going to let her share her renovation in her own words. Here’s Cassie to tell you all about her latest project…
Hello!
I am so excited to have our second pop up be featured on this amazing blog, and I am thankful I found The Pop Up Princess blog when we were looking to re-do our trailer! If you are new to this site, I promise you will want to save it to your favorites–whether you are planning to re-do a pop up or just maintaining one.
On a whim we decided to sell our previous pop up, the one that we refinished last summer. Within 3 hours of posting it for sale, it was snatched up and gone from our driveway! If you’ve been wondering about how remodeling your pop up will effect its resale value, I can attest that it will have a positive impact, if done right. We found and purchased our new camper that same week.
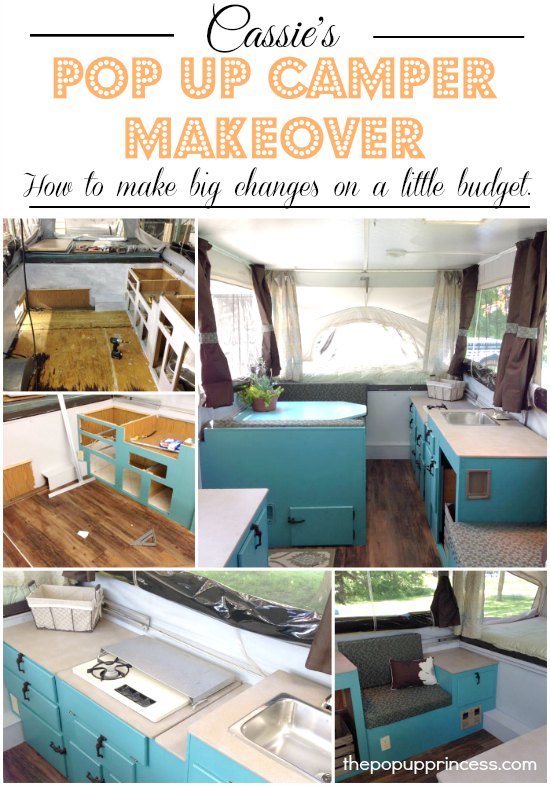
Since I did the first one on a budget, I wanted to try really hard to do the same for the second one. We may have been crazy, but we remodeled the entire pop up camper all in one week. We spent a lot of hours that week on it, and my house was very neglected… 😉
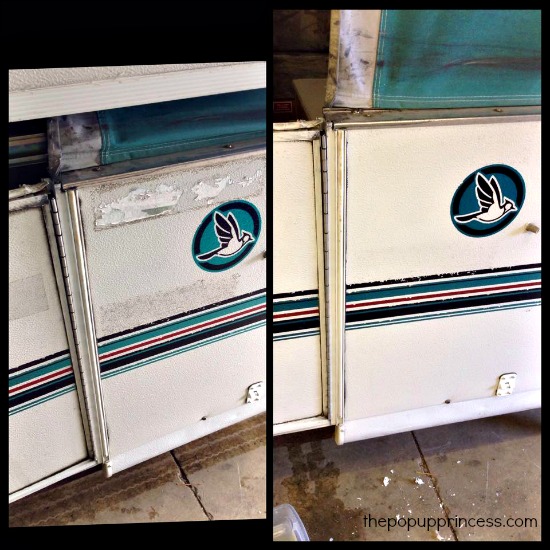
The first thing we did was give it a good wash down. It was dirty from being stored and just needed to be cleaned up. The outside was especially dirty and showing its age. A magic eraser, bug and tar remover and Goo Be Gone worked wonders!
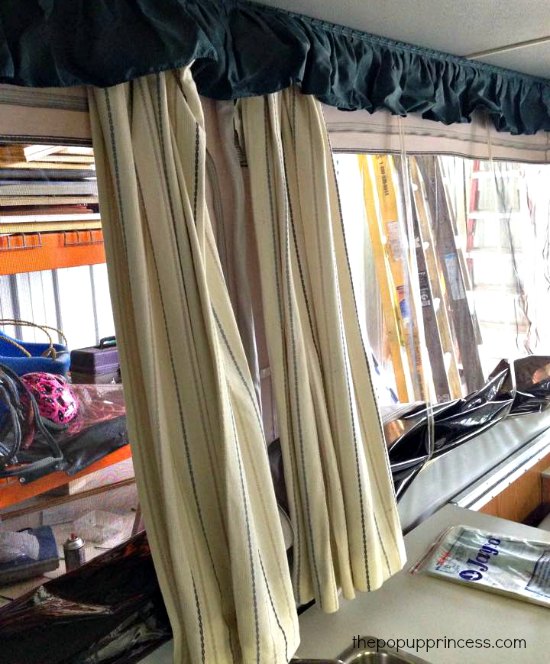
The next thing we worked on was taking down all the curtains and valances. I labeled all the curtains as I took them down so I could measure them to make replacement curtains. That way, if the panels were different sizes, I would know where to put each new panel. Thankfully, they were all the same size, so it made my job much easier. The valance was stapled to the top of the roof, so I used a screwdriver to pop them all out. All the old valances went to the garbage.
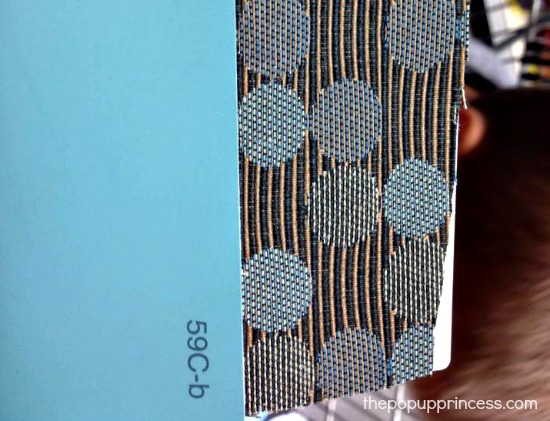
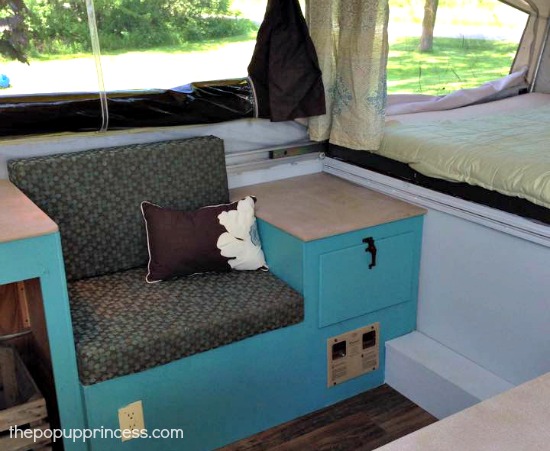
 Whenever I design a pop up, I pick out the fabric for the cushions first and then design around that. I get overwhelmed if I don’t pick out something to start from. We are lucky enough to have a local furniture store that has rolls of designer upholstery fabric for $2.50/yard. I purchased 10 yards of this, and my total was $25.00 for my cushion fabric. This gave me a great jumping off point to chose paint, flooring, and accessories.
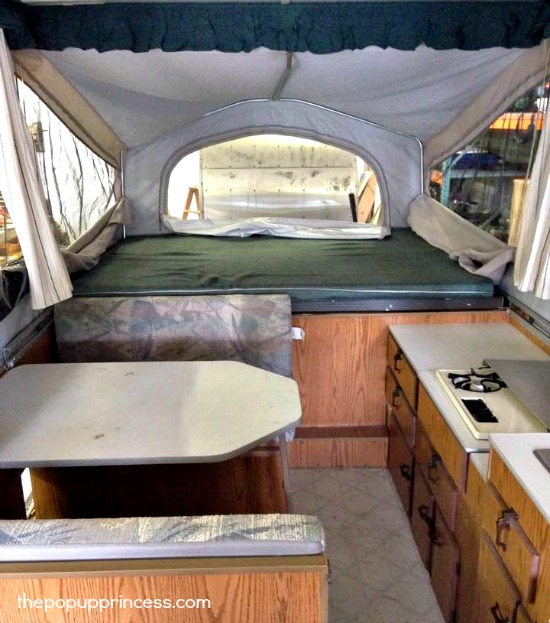
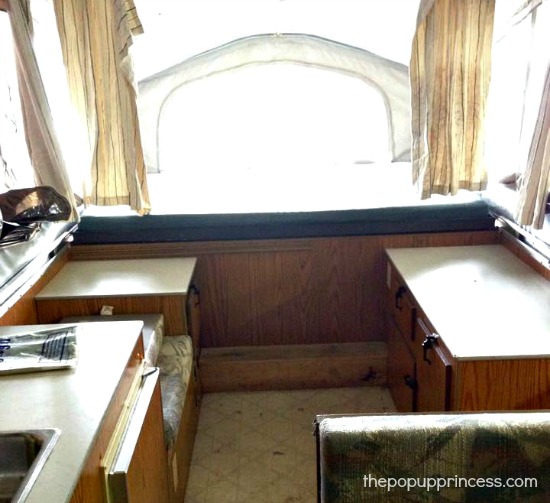
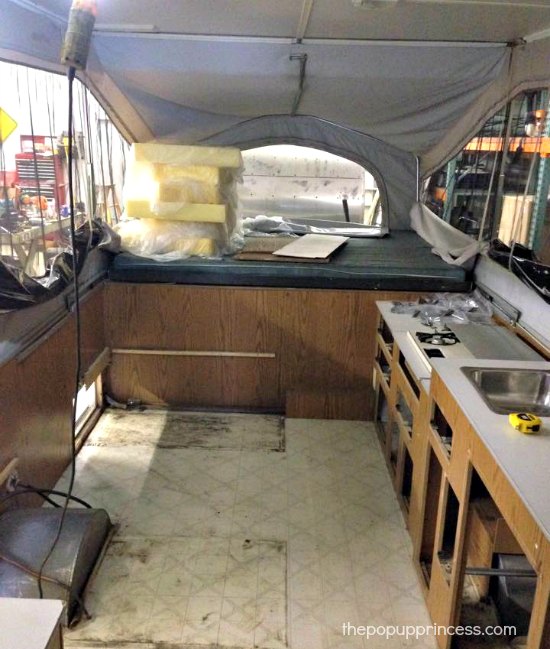
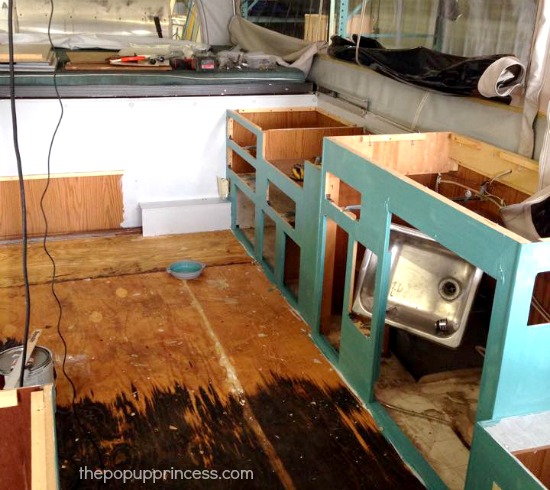
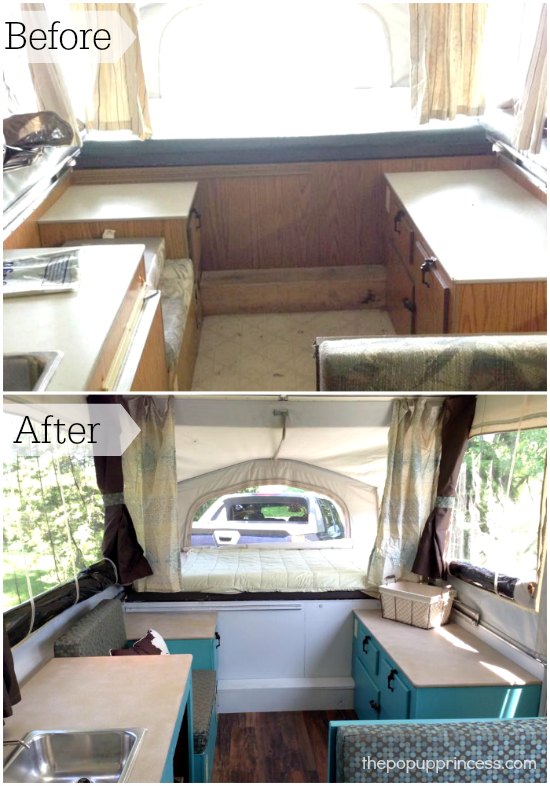
 We decided to take out the dinette bench and table. Originally, I was going to pull all the cabinets out but realized very quickly that the one wall of cabinets would be very challenging to take out. I honestly didn’t have the patience for that. I did take all the cabinet doors, hardware and drawers out to be painted. I put all the hardware in baggies and labeled what drawer they went to.
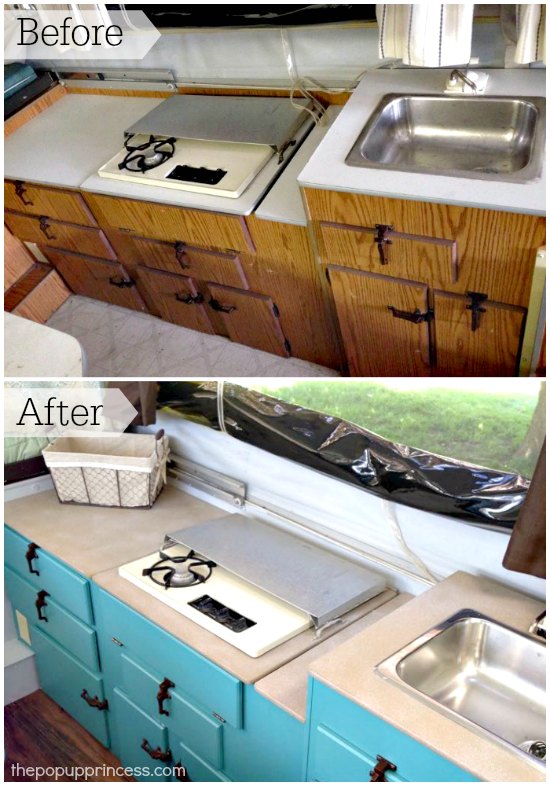
Once that was all out, I started painting the cabinets. I primed them all first with a strong adhesive primer and let that dry overnight.
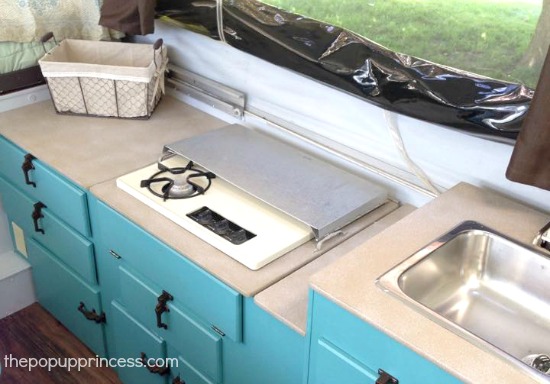
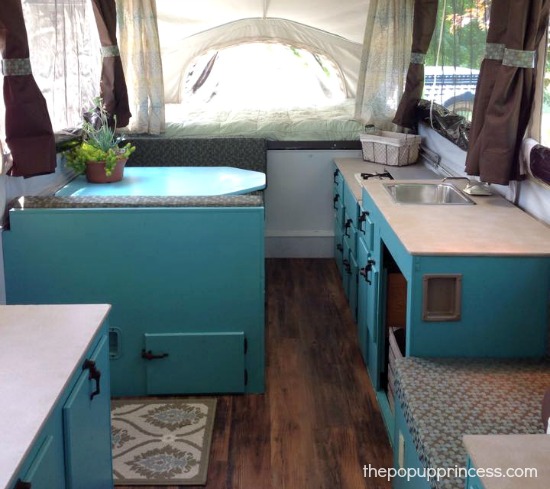
I picked out the paint by matching sample chips to the cushion fabric. I originally thought I was going to do white cabinets, however we have two little ones (2 and 5) who have dirty little hands and feet. In our last trailer, the cabinets were white, and we frequently had little hand prints on those surfaces. I had just seen Todd’s Pop Up Camper Makeover on Pinterest and here on this blog, and I loved his blue cabinets! To paint the walls, I found a can of white/grey paint on the mistint shelf that matched the canvas perfectly. It was only $5 at Menard’s. I bought some paint in the blue color I liked, and that was $20 with a $5 mail-in rebate. I didn’t even go through a ¼ of it. I have lots of it left over for future projects.
I can sew, but I am an instant gratification type of person and like fast and easy. I went to Wal-Mart, after finding black out curtains online for a good price. I took the measurements of the curtains and realized I could cut a long panel in half and use it for two panels in the trailer. I bought four sets of long panels, folded them in half, cut them and then hemmed the cut edge. I took the plastic clips off the old curtains and then sewed them on to my new curtains. They were a pliable plastic, and I wasn’t sure how to reattach them. My grandma, my resident sewing expert, told me you could just sew right through them, and she was correct! It worked great!
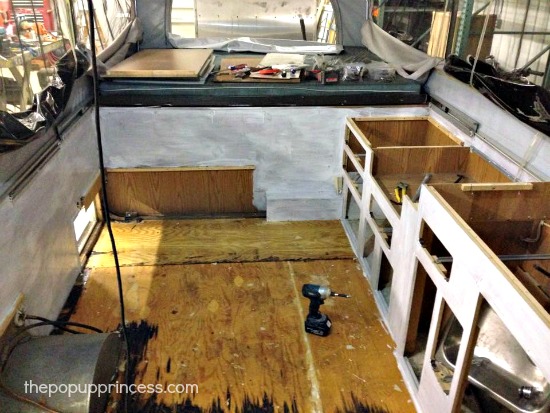
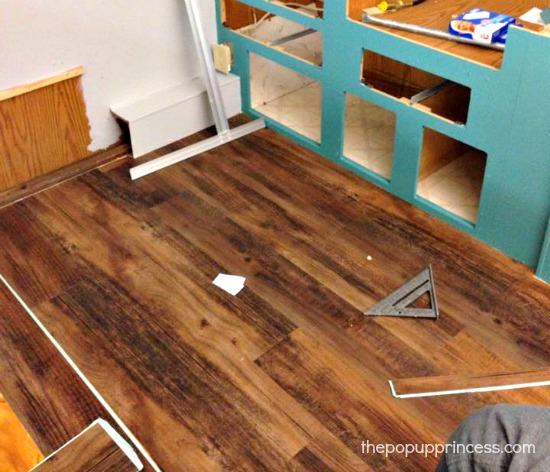
Our next step was to pull out all the flooring. Yikes! 😛 What a task! That’s when I realized that we were fully committed to this remodel. The top layer of sheet vinyl came up easily, but we had to scrape the bottom layer off. I found that using a blow dryer to heat the area worked wonders and made it come off really easily. I really liked the look of the faux wood vinyl plank flooring. We could have gone with cheaper square sticky tiles, but I had the money in my budget, so we splurged a bit. The cost of the vinyl plank flooring was $70, but I love how it turned out. Once the cabinets were painted and the flooring was in, we put the cabinets back in. This was a lot easier than I thought it would be.
I searched Pinterest for an easy way to do the countertops. I did not want to take a lot of time cutting out and applying new Formica. I found a pin where someone had used stone spray paint and a high gloss floor sealer to transform their countertops. I decided it couldn’t make them any worse than they already were, so I took the plunge and just did it. I am happy how they turned out. The only issue I had was that I moved the countertops before they were dry and scratched an area. I didn’t dare re-spray paint that spot, so there is one scratch on the counter already. 🙁 So far it doesn’t seem to scrape off easy once it’s fully dried. The countertops do have a rough texture to them, even with the high gloss sealer. These are not food grade safe, but we do all our food prep outside anyway. I will put something down inside if I need to use the countertops for that purpose.
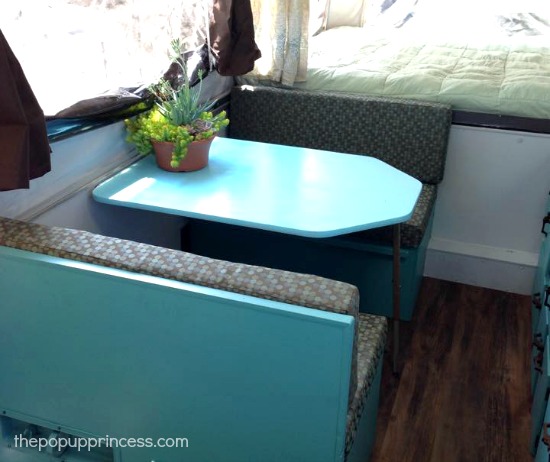
I didn’t want the the table to have the rough texture I had with the counters, so I decided to just spray paint it with regular paint. It worked great! We did the same with our last camper and had no issues with the paint chipping.
With my grandparents’ help, I cut all the fabric out for the cushions one afternoon. We measured the sides of the cushions and then added an inch to each measurement, so we would have a 1/2” seam on each side. My grandpa was awesome and took all the old zippers out of the cushions while my grandma and I worked on cutting out fabric. I had plans to sew them all myself, but I think when I told Grandma I was going to just staple them together if my sewing skills failed me, she felt a little nervous. She decided to get them ALL done for me one day while I was at work. I was so surprised when I went out to the camper after work, and they were all in there completed and beautifully done. I am so thankful to live next door to my grandparents. 🙂
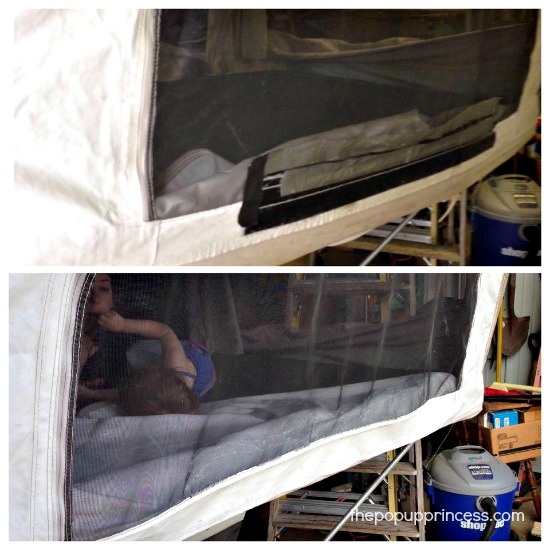
The bunkend screen was ripped and had been duct taped. I didn’t care for how it looked and the duck tape had melted into the screen and canvas. It was a sticky mess. I took the duck tape off and got nervous, because there was a lot of sticky, nasty goo on there. Thankfully, after scrubbing for an hour with Goo Be Gone and a wet wash cloth, it came off. I used a heavy duty thread and hand sewed the bottom of the screen to the canvas. I couldn’t believe what a difference it made!
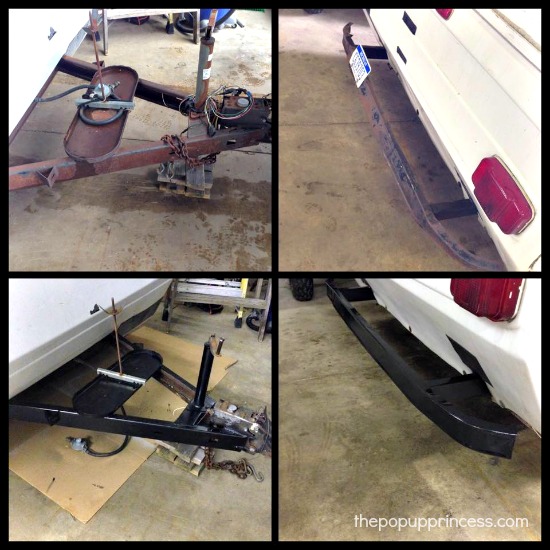
The hitch and the bumper were very rusty. The bumper was very crooked and bent, so we straightened that out and then painted it. My husband used a metal sander to sand it down. Then he used black paint meant for metal bumpers and spray painted them both. The front wire harness was also a mess and had wires all over the place. He used a wire cover and made that area look so much better!
We completed all of this in just eight days! We plan to add a refrigerator to the open cabinet at some point, but we are pretty happy with it. Here is what our budget looked like. My original goal was to do it under $200. I went over by $5. 😀
Paint for cabinets – $35 (I could have bought a pint size can instead and saved money.)
Counter spray paint – $15
Flooring – $70
Curtains – $70
Fabric for Cushions – $15
Decorations – Free (I used what we had around the house.)
Grand Total- $205
I am blown away by what paint, fabric and flooring can do for a pop up. You don’t need a big budget to make big changes. I am so happy with how our camper turned out! I can’t wait to use it camping this summer!
Thank you so much, Cassie! You’re awesome! 🙂
I hope you all were as inspired by Cassie as I was… and keep those makeover pictures coming! I love sharing them with our wonderful community of pop up campers. You guys are amazing!
Happy Camping!



Thanks so much Larissa for featuring our makeover! Love it 🙂 we are so happy with how this pop up turned out!
Of course, Cassie! How could I not? It’s amazing! 😉
Beautiful Job, Cassie…You are now a remodeling expert 😉 Are you planinng on doing it again?
Yes! I am already searching craigslist for another one!
impressive! Really! Carol wanted to replace flooring in our Pop Up and i resisted until seeing what all you have done. You have inspired Change! thanks
Didn’t she do a great job? Replacing the flooring is a quick way to give your PUP a new look. I highly recommend it! 🙂
I agree with Larissa! It’s so easy to do and soo worth it! It completly changes the look!
Hey Cassie, I’m from West Michigan too! Where do you get your upholstery fabric so cheap?
Thanks!!!
Melissa
Herman miller outlet store in Zeeland! They have a whole huge section of rolls and rolls of designer fabric for 2.50 a yard!
Awesone thanks! I’m there tomorrow. I got the camper today 🙂
Woo hoo, Melissa! We’ll expect pictures soon! 😉
Cassie, the Haworth outlet store in Holland had 10 times the amount of upholstery fabric and it was only 1.50 a yard- check it out!!
YOU ARE MY HERO!!! We live in Southeastern MI, so this store is completely accessible to us as well! I would’ve never known about it otherwise! Thank you!
What a great job! I love both of the campers you have done (and all the others I am seeing on this site). We just purchased a 1983 Palomino Colt and it needs a lot of love. I love all the ideas I am getting here. This camper didn’t come with curtains that are hung by the usual plastic tabs. Do you have any recommendations for where to get them or what else I could use? I am making curtains for both bed areas for some extra privacy.
Didn’t Cassie do a great job? She’s a rockstar!
Do you have some sort of curtain track in your Palomino, Wendy? I’m not familiar with the system they used to hang their curtains.
Love ❤️ the 2 color cabinets! I’ve had the camper for nearly 2 weeks and am ready to get started. After I get back from mom’s 80th surprise party!
Super cool! Thanks for sharing! I just bought my first popup last night. It’s great to see what paint, new flooring, covering the cushions and curtains can do. Great job!
Awesome, Kim. Can’t wait to see what you do with your camper. Take lots of pics! 😀
We are in the process of updating our pop up thanks to your inspiration. We bought the same flooring you used. Can we stick this over the existing linoleum?
You can, Melissa. Are you laying it around the cabinets or are you pulling them up?
Awesome makeover. I’m so glad I found this site, loads of inspiration from all the makeovers I have seen here.
I bought my first PUP a couple of days ago. A 1988 Jayco Swan. It’s in pretty good condition for it’s age.
Up until now I have had Off Road Camper Trailers (not the caravan type). These have all been bought new and as they really are
basically a bed on a trailer with the unfolding tent and annex, there was not much I could change. The kitchens were fully stainless steel and pulled out from inside the trailer, so nothing to be changed there either.
Due to some health issues, I’ve had to change to something a bit more manageable as there was a lot of work in the setup and take down of my other trailers.
Even though I got a good deal on my PUP, I wasn’t very excited about the change…….until now!!!
I’m so busy making plans for my own PUP makeover, I can’t wait to get started. I’m in Australia so it’s the middle of winter here and we’re just not getting enough of a break from the cold and rain for me to do anything yet……very frustrating lol.
I have gotten so many ideas from looking at what everyone else has done and I can now say that my new camper has finally got me excited.
Thank you to everyone for sharing all their pictures, tips and tricks.
That makes me so happy to hear, Suzi! Pop up campers are definitely overlooked. Their bigger, flashier cousins get all the attention, but they really are versatile little campers.
I can’t wait to see what you do with your PUP. Make sure to send me pictures of your progress. 😀
Hi! You said that you wrapped your cushions with the cheapest fabric you could find so the plywood wouldn’t snag it. What type of fabric was it? Thanks!
I used cheap polyester lining fabric, but it doesn’t really matter what type of fabric you use. Find something cheap! 😉
I am new to this. We purchased a used Pop Up. I see on your picture where you used the magic eraser that your canvas looks like mine. What did you use to clean the canvas?
Pam, here’s our post on canvas care. It should cover everything, but if you still have questions, let me know! 🙂
Cassie,your work is beautiful! I loved looking at both transformations! I recently got a 92 Jayco and have been scouring Pop up Princess for wonderful ideas.
Currently I am painting the cabinets, and will use your idea of the stone spray for the countertops. Did you put a polyeurathane on top of the cabinets? I bought some clear coat spray but wondering if it is necessary.
I also have a question about the valance: you mention that yours was stapled to the ceiling (as was mine). Did you put a new valance up? And if so, how? Can’t seem to see in pics.
Thanks & I am secretly hoping you sell the 2nd one so we can see you do a third 😊
Thank you! I just love doing these :). We actually did sell this one already and bought a hybrid! We have plans to make that over this fall/winter!
I did not add a new valance up I like the feel of the clean open. I just had one area of wires that showed a little and so I pushed my curtains against it. I did not put any top coat on my cabinets just paint 🙂 I would touch up paint after trips if it got nicked but that’s my own preference to keep it looking nice!
My hitch was rusty and dull – sanded and painted and it looks great. Just curious about the crank – should it be painted. It now sticks out – and looks horrible!!
Looks great! I am about to paint my Jayco cabinets which look the same. Did you have an issue with the edges or did they paint just the same as the rest of the cabinets / drawers? The seem kind of raw. I am nervous about re-attaching the hardware (also looks the same as yours). Did everything line back up and still latch shut? Thanks!
I’m getting ready to start my first popup remodel and I’m super excited! I am having the hardest time finding inexpensive fabric. I have 2 boys (8 & 11) and 2 dogs so I want something durable. I live in St Louis if any one has any suggestions.
How fun, Amy! I can’t wait to see your progress. Several other readers have used shower curtains or curtain panels for fabric. Sometimes you can find them on clearance or at stores like Ross, Marshalls, and TJ Maxx for cheap. You might want to check that out and see if it is any cheaper for you. 🙂
Hi ladies! This is a question for Cassie. Did you pull your countertops out to spray paint them? Are the countertops in these pop ups fairly simple to take out and out back in? Thanks in advance.
Jenni
We removed the countertops on our PUP when we remodeled, Jenni. They are attached from underneath by a few screws. They are easier to remove if you have removed the whole cabinet, though I’m sure you could do it without removing them as well.
Hi:
I just bought a pop up and the first thing I need to address is the peeling plastic coating on the drawer fronts on the cabinets. Did you have to deal with this coating on your cupboards before you painted them? I’m concerned it won’t come off and I’ll have to start from scratch. Any advice?
This remodel looks amazing!
Thanks
Terri
We encountered that problem to some degree, Terri. You can read all about how we painted our camper cabinets here. I just used a bit of wood glue to re-adhere the peeling plastic. How bad is it? Would this work for you?
I love your remodel and this may sound very strange, but we have the same exact Jayco model and we are doing our remodel this spring. Unfortunately our’s requires a new canvas as well and I cannot find my VIN. Do you happen to know where on this thing it is?
I really like the hardware on these cabinets but can’t seem to find it anywhere. Any thoughts? Or at least a close up picture so I can more easily see what the exact design is? Thanks! Getting ready to remodel my first pop up, a 1987 Coleman Laramie.