


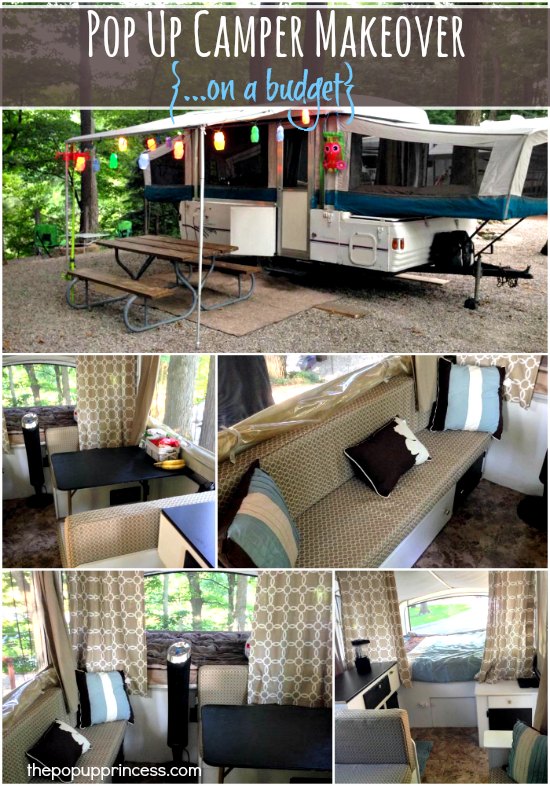
Today I am really excited to feature a pop up remodel by one of my readers, Cassie P. I’ve seen some really great reader photos since I’ve been blogging, but I was so impressed by Cassie’s remodel, that I just had to share it here. I asked Cassie to give me a little bit of background on her camper and a few specifics on her remodel. She went even further, and wrote a little summary for me. So I’m excited to introduce you to Cassie P., and I’ll let her tell you all about her camper in her own words…
Hey there!
We have been tent campers ever since my husband and I started dating so the past seven years. We would only go, at most, once a summer due to our busy schedules, but this summer we finally started doing more camping trips! In June, we went on our first family camping trip in a tent with two kids. It went surprisingly well, but I told my husband I would love to find a cheap pop up and fix it up to camp in, so… we started looking. At first, we had no serious interest in buying one. Then I found pop up makeovers on Pinterest, and it was all down hill from there. I would watch Craigslist every few days, and eventually the perfect one “popped up” for us!

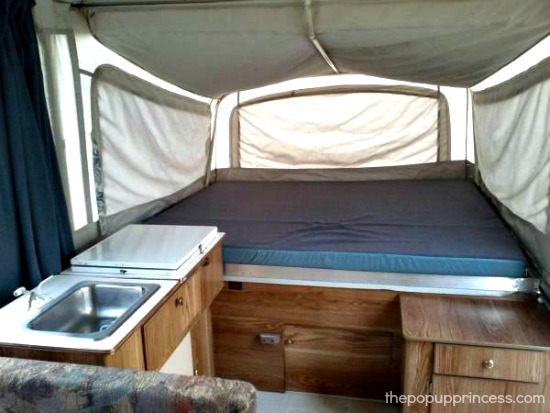
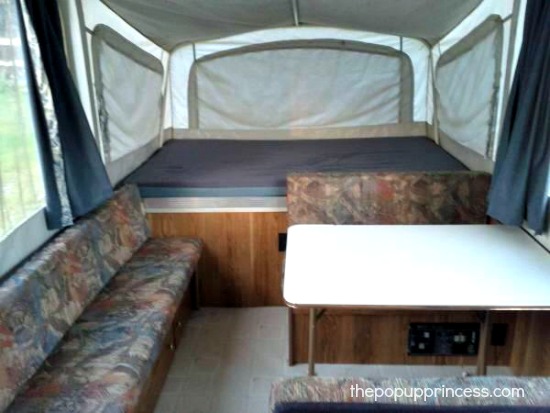
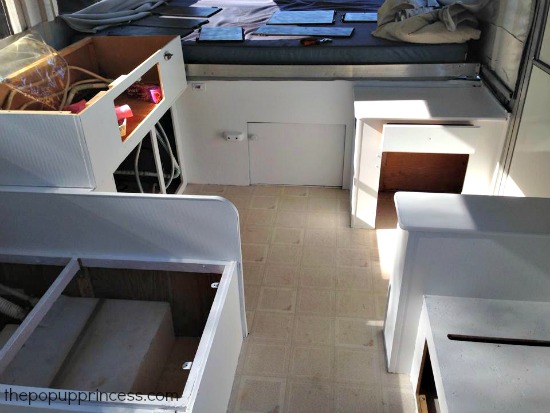
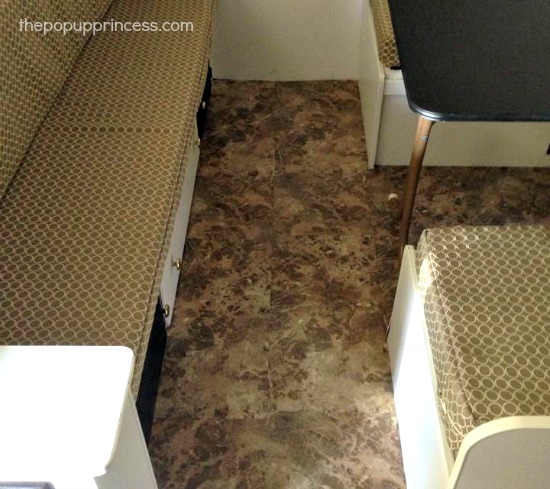
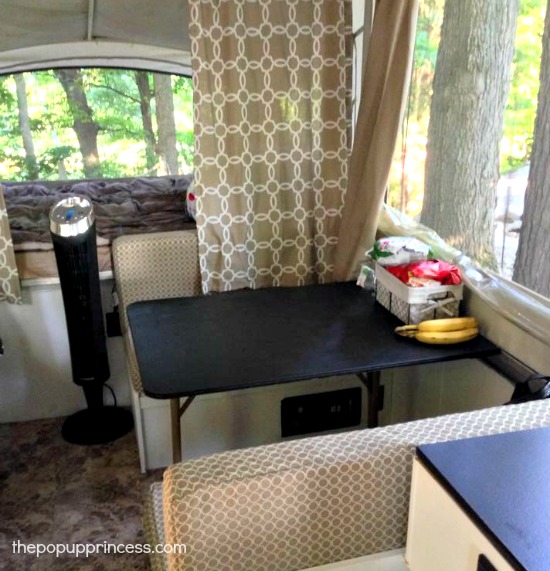
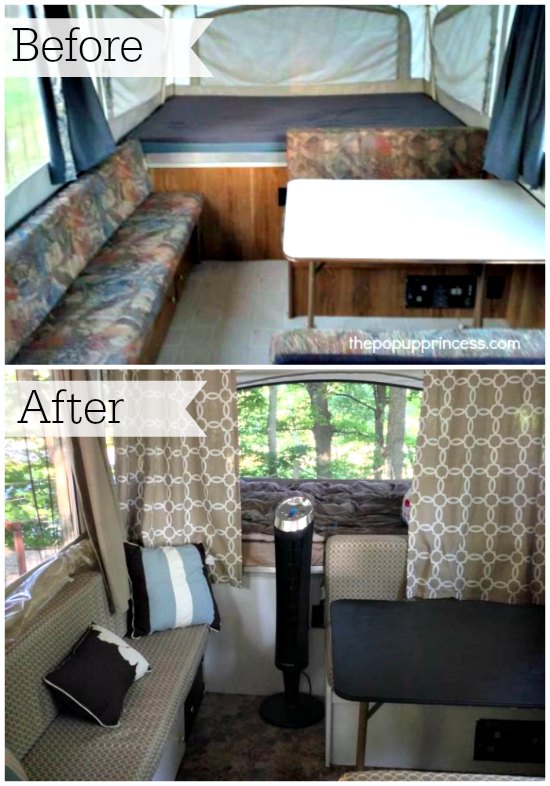
We got a great deal on our pop up. When I saw it on Craigslist, I immediately called the guy and asked if we could come look at it. I told my husband that I had found one that was in our budget and it looked good. We wanted to make sure it functioned and had no leaks. He agreed to go look at it. It had a few issues. The previous owner was a smoker, so the cushions had a funny smell. The sink and oven countertop looked bad and was starting to fall apart. The floor had yellow spots on the linoleum. The tent fabric had some mildew that needed to be cleaned. All of these, in my mind, were “easy fixes.” My husband agreed that it was a great buy for our price range, and we ended up taking it home with us that day! 🙂

Budget Total – $175
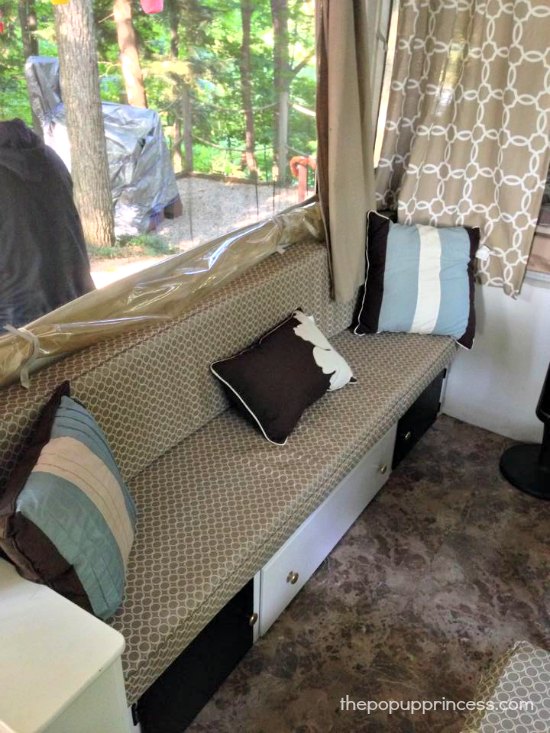
Cushion Fabric- $40
Seamstress- $60
Curtains- $30
Flooring- $20
Counter- $15
Rugs-$10
Paint- Free (Leftovers from other projects)
Decorations- Free (From around the house)
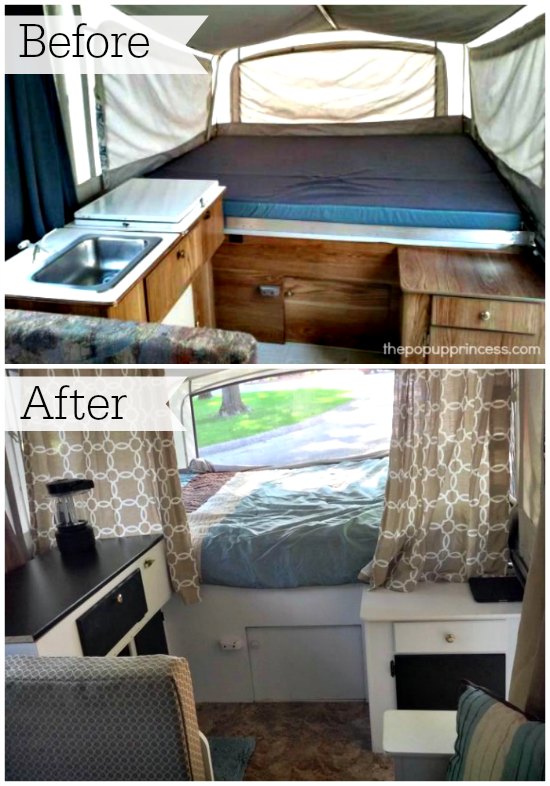
We didn’t buy this pop up until the middle of August and were able to squeeze a few last minute camping trips in before it got too cold outside. Living in West Michigan, our camping season is not very long – usually May- September. We didn’t get to use it long before it went to storage, but it was totally worth it. We are so excited with how the overall makeover went.
I actually really want to do another makeover, so who know how long we will keep this one! But whether we keep this one or do another pop up remodel, I am super excited to start going on more camping trips with our kids! 🙂
Thanks so much for sharing, Cassie! Your makeover is amazing!
Keep those makeover pictures coming! I love seeing what you are doing with those old pop up campers! 🙂
Update: Cassie’s at it again! She recently sold this pop up camper and purchased a new one to remodel. If you want to see Cassie’s latest camper project, you can find it here. 🙂
Happy Camping!

I really love how this turned out. I have one that I have been rebuilding this summer. I had to take it down to the bare floor, but now I’m putting it all back together. Your blog has given me a lot of good advice and I appreciate it so much.
Awesome, Cindy! I can’t wait to see it. Glad you’re finding inspiration here.
Great Job Cassie and my favorite is your budget.. I thought we were really watching every penny, especially using things we already had. You did great. I wish you many miles of enjoyment 🙂 I can’t wait to post my before and after, although I don’t know if any of us are ever done….There’s always something you want to tweek.
She did do a great job, didn’t she? 🙂
I love this. I can’t wait to do mine. Hadn’t thought about about stapling the curtains to the plastic clips. I have extra paint lying around to paint the cabinets. Did you guys just paint your table like you did your cabinets?
I used spray paint chalk board paint on this table 🙂 that way the kids could color on it
Soooo beautiful.. Can’t wait to do mine.thanks for the tips.
i have to laugh because this WAS me last year. We bought a pop up a smokin deal. Started tearing it all apart like you and bought it like Labor Day weekend. I bought flooring, painted, ripped the sink and stove plus ice box out…It was like you telling my story. However I did not finish mine in a timely manner and she is parked out behind the garage for the winter. AND I live in West Michigan too!! You have inspired me for the spring. Wish I could crank it up and get my cushions out of there to redo them at least. Thanks for the story!!
I am just not seeing this comment but that is awesome! I have an instant gratification problem so when I start I go like crazy because I just want to see the end product quickly! Hope your makeover is going well! They are so much fun we are working on our next one right now
I have some questions on painting pop up camper cabinets? Can you tell me syterp by step if you took them completely out or just how you painted them. We are restoring ours and want to have it done by April to start casmping again!!! Please help also curtains and all.
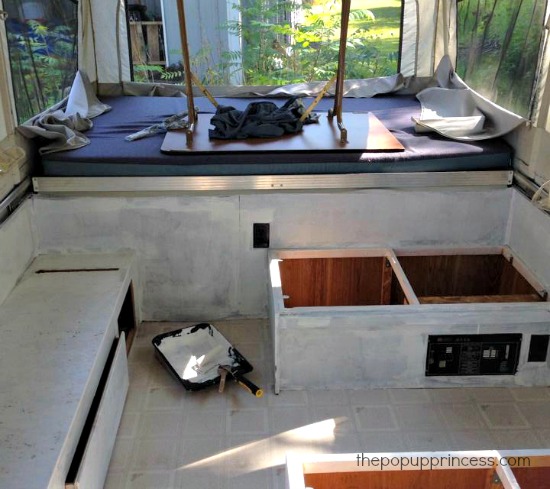
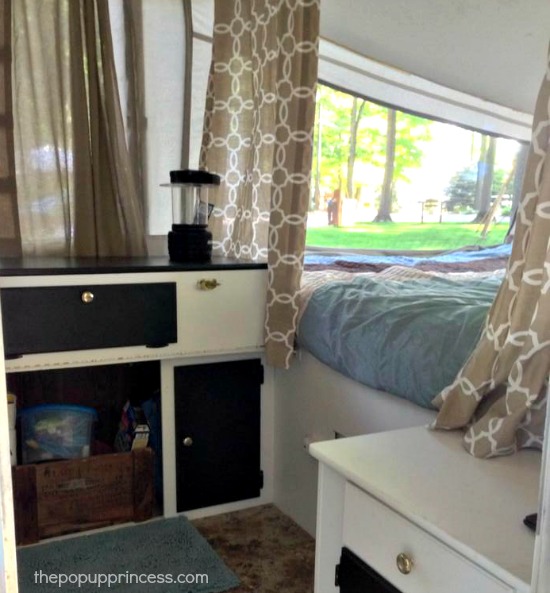
Rebecca, Cassie left her cabinets in her PUP when she painted them. If you are replacing the flooring as well, you don’t even have to mask off the floor. Just paint! We took our cabinets completely out of the camper. You can see that whole demolition process here. We did that for two reasons. First, we wanted to use an oil based spray paint without worrying about overspray in the camper. We also needed to rebuild one cabinet that had seen better days. Second, we wanted to replace the flooring, and didn’t want to lay up to the cabinets. We wanted to cover the entire floor. You can see how we painted our cabinets here.
We had planned on keeping the existing curtains, but they didn’t make it through the wash. I ended up making new curtains and valances. You can find that post here. I hope that helps with all your questions. If you still need more help, feel free to drop me an e-mail! 😀
Love the great job you did. Budget is awesome. We just purchased pop up as well and can’t wait to use it this summer. Thanks for the great ideas!
I am so inspired to now gut and update our pop up! Thanks for all this awesome information. Woo hoo!
Cool, Amanda! I want to see pictures! 😉
I just bought a pop up camper, it was a great price and actually in really good shape! I had originally planned on buying something that needed to be fixed up, because my budget wasn’t going to allow me to buy something turn key. I was pretty excited when I saw that this one needed next to nothing! Well, how naive of me! Lol! After seeing this blog, I did a 180 in about ten minutes and now I just want to run out into the sunlight with ottles of primer and paint and get started!
It’s addicting, Kaela. I’m constantly thinking of getting another one to makeover. Mr. TypeTwoFun isn’t so convinced. 😛
Haha yea I can see my guy disagreeing with my need to renovate the trailer… but it seems like fun and I can totally see how it would be addicting! I will be reading your blog like a textbook through the process, I am sure!
I love what you have done with your trailer. It is beautiful. Your hard work has paid off.
Thank you! It was fun!
I am getting ready to do some minor refreshing of our pip up we just got. I was wondering if any knows the yardage of material for the curtains? I want to make my own.
Yardage will really vary depending on your curtain panel length and width and number of panels, Tonya. You can see how we made ours here. 🙂
I am a newbie to owning a pop-up but bought one late in season last year. Didn’t get to do much to it but it really is in good condition. I made new curtains and recovered the cushions this summer. My curtains were a rubber backed curtain and were really ok but I wanted some bright colors in my PUP. I took the clip strip off the curtains and then just ended up sewing the new fabric right to the old curtain and then sewing the clip strip back on. I do some sewing but not a great seamstress so I watched some videos and browsed the internet to find a simple way to make the cushion covers. I wanted to make them so they could come off and I could wash them. There are some flaws in my sewing but I like them. It’s been fun decorating and now I want to make a new awning. Has anyone ever done that on their camper before. I would LOVE some quick tips and ideas!
Nice, Peg! I haven’t tried making my own awning. I’m not sure my sewing machine could handle such heavy duty fabric. I’d love to see yours if you attempt it, though! 🙂
I love what you did with your camper!
We have an older Coleman Yukon and I recognized the same pattern on the cushions.
We are in the midst of our own remodel. I am a sewer and can do that myself. I started with the curtains first. I bought fabric at Walmart for 3.97 per yard. It looks better already.
Our BIG problem is we live in Rural CT. and a family of mice wintered over destroying the screens on it. My husband, being a true “Yankee” has patched them but they look awful! Help Please!
Karen
I don’t know of a way to repair the screens other than patching them. Did the mice chew big holes in them? Small rips can be repaired with heavy duty monofilament type thread and clear nail polish. If the patches are an eyesore, you might call a tent and awning repair shop to ask if they do screen repairs. We have a local shop that does amazing work and they have all the pop up camper canvas supplies in house. They have repaired a couple things for us, and I love them! They aren’t very expensive either. 🙂
I can’t figure out how to take off the curtains on my Coleman 1999 Niagra. We took the piece that held them from sliding but there seems to be another bracket with a wierd screw in it.
Hmmm… Not sure, Chris. Do you have a picture?
I love the lights you have pictured in your awning. where did you get them?
Hi! We bought a pup 5 years ago, it was 6 years old BUT only used 3 times so it was basically brand new when we got it. Although I’m not a fan of the colors, I haven’t decided what color I want to change it to. BUT my question is… can you change the layout of the cabinets? Right now the table is centered to the back bed and we have to move it all the time. I’d like to put it to one side but don’t know if it’s possible and don’t want to suggest it to my husband without showing him the possibilities. Thanks for yours or anyone’s help!!!