


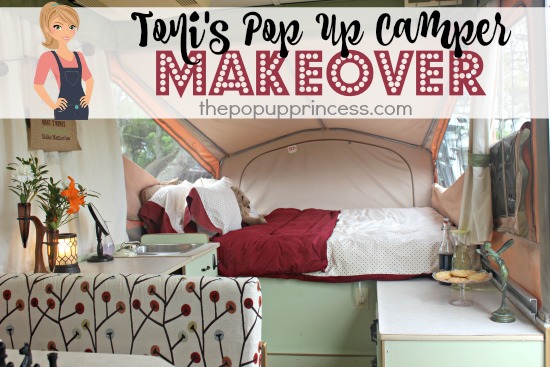
Lately I’ve featured a couple of pop up camper makeovers that were completed in record time. It’s hard to stop once you start the makeover process. You become consumed, and it is all you can think about. But it can also be a little intimidating and overwhelming to think about tackling a camper remodel all at once. This next makeover proves that you don’t have to pull your whole remodel together in a week. You can take your time and do it a project at a time. That’s what Toni and her family did, and they couldn’t be happier with the end result. Here’s Toni to tell us all about it…
My husband and I have tent camped our whole lives–as kids before we knew each other and as adults in our 18 years together. We traveled around the country camping together quite a bit, always discussing what kind of camper we wanted “one day.” Once we added two adorable kiddos to the mix (ages 2 and 4), tent camping became a lot more work. My husband was pushing for a pop up, but I wasn’t sold… until I came across this blog!
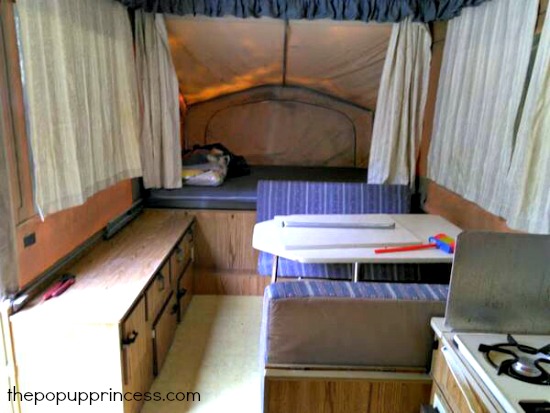
In August 2015, we purchased a 1990 Jayco 1006 Deluxe that seemed anything but “deluxe.” It was pretty old and dirty, but I had a vision! I picked my color scheme based on the exterior stripe, and we slowly made it over. It seemed that on each trip, we had accomplished a little more. We still have some more work to do, but I’m really happy with what we have so far.We started by cleaning the camper really well. We had some mildew on the bunkends, so we first tried both Iosso Mold & Mildew Cleaner and Oxyclean, but I wasn’t happy with the results. We ended up using the Bass Pro Shops Mildew Cleaner, and it worked so much better. We really spent a lot of time cleaning the camper. I especially liked using the 303 Aerospace Protectant on the vinyl parts of the canvas and windows. It really did a good job cleaning up that vinyl. We also used the 303 High Tech Fabric Guard to waterproof once we were finished cleaning. (You can read all about cleaning your pop up camper canvas here.)Then, I painted the cabinets by myself one LONG day while my husband took the kids on an adventure. I just removed the doors to paint, but didn’t pull out the cabinets. I followed the instructions here on the blog. My husband did help with the prep work. We sanded everything, then cleaned with TSP. I used the Zinsser BIN primer, and then rolled on an oil-based paint, using a brush for the corners. I didn’t paint the trim or hardware, as I liked them both the way they were. Everything is holding up nicely so far.
 We started by cleaning the camper really well. We had some mildew on the bunkends, so we first tried both Iosso Mold & Mildew Cleaner and Oxyclean, but I wasn’t happy with the results. We ended up using the Bass Pro Shops Mildew Cleaner, and it worked so much better. We really spent a lot of time cleaning the camper. I especially liked using the 303 Aerospace Protectant on the vinyl parts of the canvas and windows. It really did a good job cleaning up that vinyl. We also used the 303 High Tech Fabric Guard to waterproof once we were finished cleaning. (You can read all about cleaning your pop up camper canvas here.)
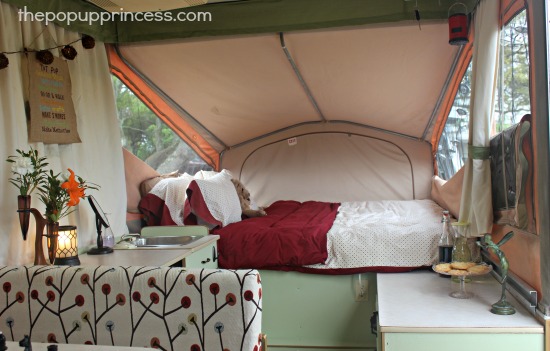 Then, I painted the cabinets by myself one LONG day while my husband took the kids on an adventure. I just removed the doors to paint, but didn’t pull out the cabinets. I followed the instructions here on the blog. My husband did help with the prep work. We sanded everything, then cleaned with TSP. I used the Zinsser BIN primer, and then rolled on an oil-based paint, using a brush for the corners. I didn’t paint the trim or hardware, as I liked them both the way they were. Everything is holding up nicely so far.
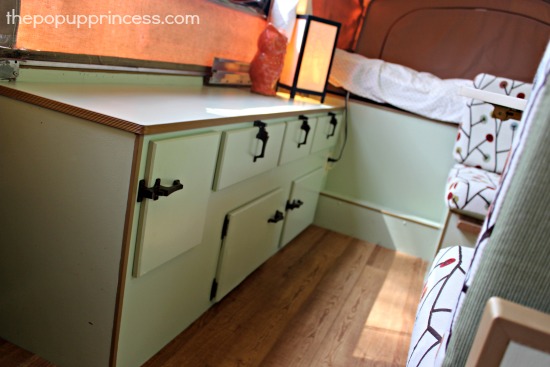
I found my cushion fabric at JoAnn, and it became my inspiration for the rest of the camper. It’s called Richloom Studio Upholstery Fabric in Twizzler. It was fairly pricey, but I was able to use a coupon and an “end-of-roll” discount. There wasn’t much left on the roll, but it was just enough to cover the fronts of my cushions. For the backs of the cushions, I used a coordinating green fabric. We used the original covers as a pattern for the new cushion covers and were able to use the original zippers as well, so that saved us a little money. I don’t sew, but my mom is an amazing seamstress. She did all the sewing for our makeover. 🙂
 My mom sewed a tailored valance for the top of the curtains with the leftover green fabric from the backs of the cushions. We also used that same green fabric to make tiebacks for the curtains. Speaking of the curtains… we used a neutral cotton-poly duck cloth, purchased from fabric.com. I love it because it has a nice weight to it, and the wrinkles just fall out of the curtains once we pop the camper up. My mom actually made the curtains 1 1/2 times wider than the original width and just a few inches longer. They have a nice gather when closed and look so much nicer than the originals. She also made the duvet covers from sheets that matched our color scheme.
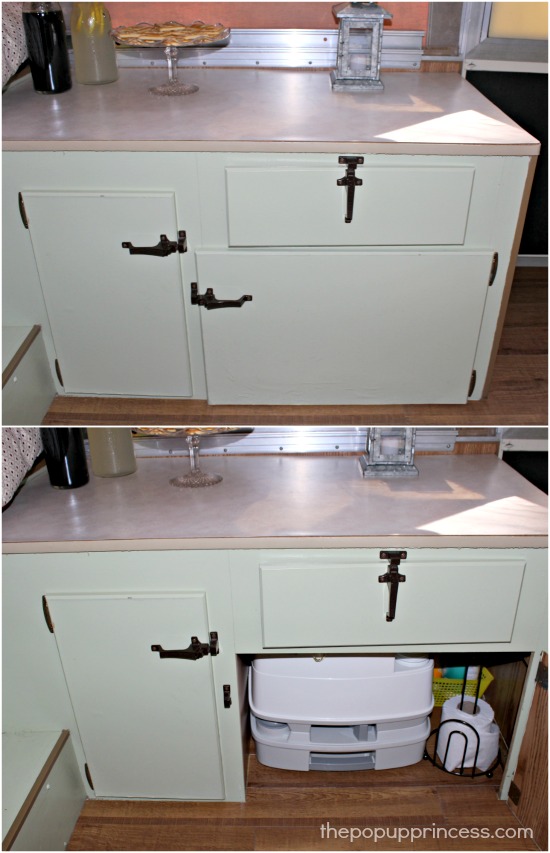 We purchased a clearance box of peel-and-stick plank vinyl flooring from Home Depot, and my husband installed it one weekend. We didn’t have a built-in potty in our camper, so we made a spot for our portable one in one of the cabinets. I love that it slides out when we need it but stays hidden during the day.
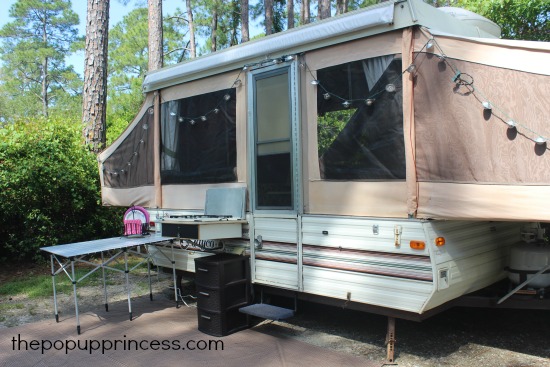
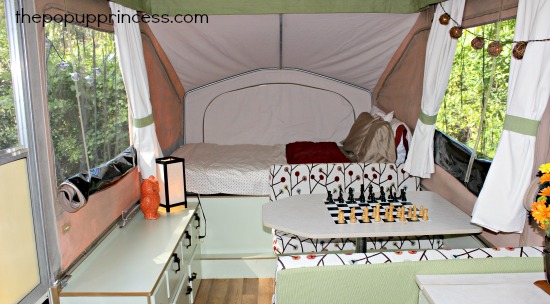
I really loved the chess table in Todd’s Pop Up Camper Makeover, so we found this vinyl decal on Amazon. I have been reading The Pop Up Princess blog for a while, and have gotten so many great ideas from the remodels that were featured here. 😀
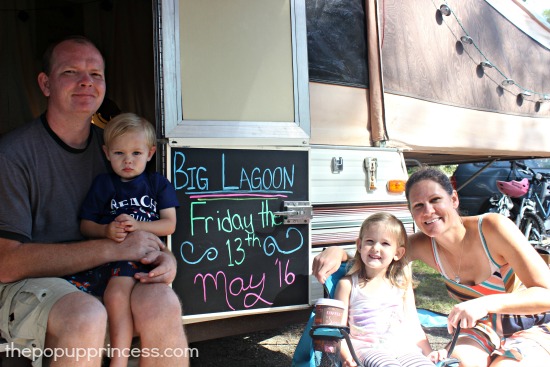 My husband and I both have names that begin with the letter “T” so we call our little camper the TnT PUP. We’ve already made so many great camping memories in it, and we can’t wait to make many more.
So if you’ve been thinking of remodeling your pop up camper, but you’ve been a little intimidated, take a page from Toni’s book. You don’t have to tackle it all at once. Take it a little at a time. The end result is still just as fabulous. Thanks for sharing, Toni!
Happy Camping!

Toni Toni Toni has done it again😘
I LOVE the green cabinets! Toni choose great colors! Thanks for mentioning the wrinkle factor in the curtains, that’s something I’ve been wondering about. I’ve been thinking about chalkboard paint on the door also, it looks like it all turned out fabulous!
Toni’s makeover is great! I’ve been fascinated by all of the makeovers, and my husband and I are seriously considering taking this on as a project. I have one question for those of you with older (1995 or older) pop-ups…how has the lift mechanism held up? This is one of my husbands major concerns.
If we can find a trailer with a sound floor and good roof, the rest I think we can rehabilitate 🙂 Thanks for such an inspiring blog, and thanks to all who contribute to it.
warmly,
Beth
Just reading your comment now. We have a 1990 Jayco just like the one in this feature. We bought it new and it has a lifetime warranty on the lift-system. We actively camped several times a year over about 15 years with it. Now only occasionally. In all that time, we only had to have one post re-paired (I don’t even remember what the problem was but it was minor.). We have taken very good care of our trailer (always been garaged)
and never loaded anything onto the roof, as that would void the warranty. Jayco used to make a superior product. I think they are probably still good quality but they don’t offer that kind of warranty anymore, so buying an older one, especially if you know some of it’s history, is probably a safe bet, especially if it looks pretty clean. The new models cost 2-3 times what we paid new ($4000) and they have changed very little in design. This 1006 model has a king size bed on one end, a queen on the other and the dinette makes a twin bed. This arrangement allowed us to be comfortable with 4 kids from infant to teen years. Now our oldest son is planning to use it for his young family! You won’t regret having a pop-up with kids. Keeps them out of dirt, you can get a good nights sleep and getting ready for a trip is so much easier when you can keep the trailer stocked with kitchen items, tools, linens, etc. Good luck with your hunt for the perfect trailer. We have dearly loved ours!
It looks so good Toni!! I can’t wait to finish ours!! Love the chess board and chalk board paint!!
Looks amazing!!
We have this same camper, just a year older. It’s great to see it fixed up. Ours needs some wood replaced and some exterior work before I can do the pretty stuff. I can’t wait t get started on that part.
Your makeover is beautiful! We bought a 2001 Coleman Mesa last week. We have started shopping for the supplies we need to remodel. I love your fabric choice for the cushions! I am going with the same fabric. What color did you paint your cabinets?
Thank you!
Angela