


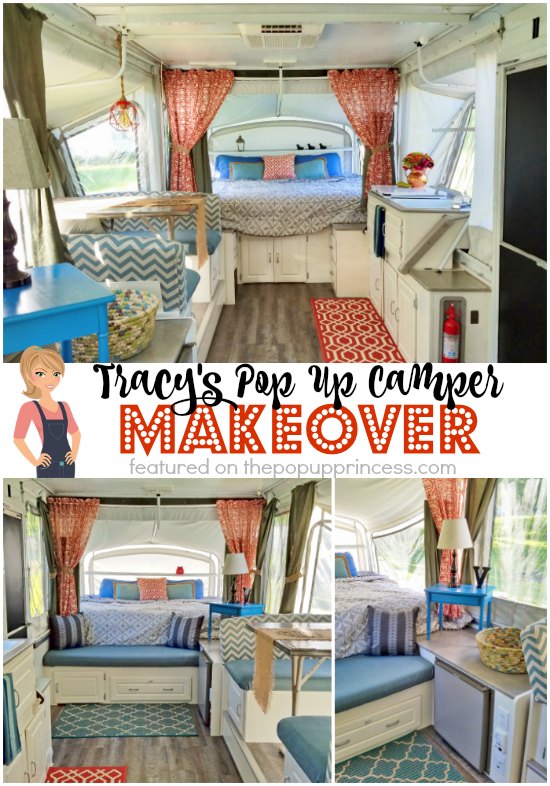
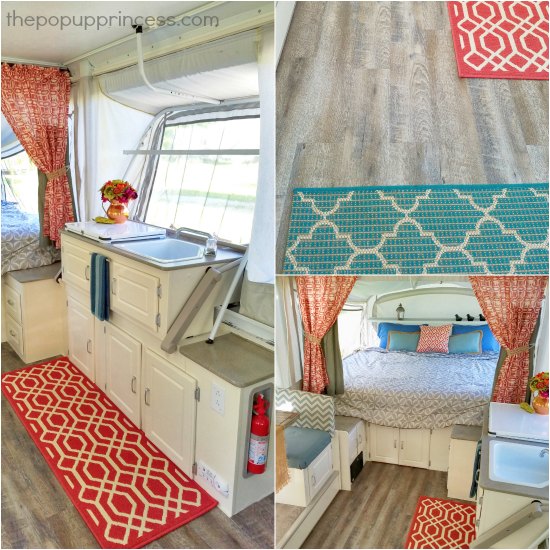
 I’m so very excited to share Tracy’s pop up camper makeover with you this week. Tracy’s pop up was in good condition and only had a few issues. The fake oak paper on the cabinets was peeling off, and the linoleum floor had yellowed. The cushions were fine, but the fabric was outdated and scratchy. Tracy had big ideas and was great at shopping sales. With a little creativity and a small budget, Tracy completely transformed her camper.
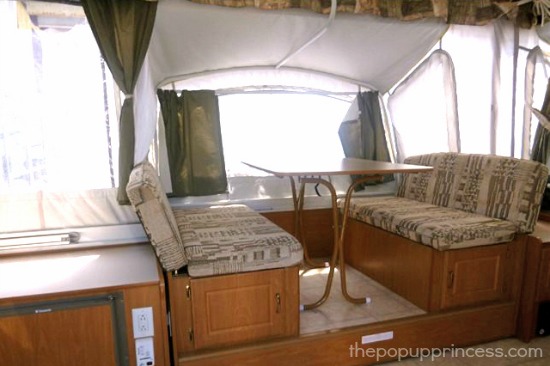 Tracy started her remodel by removing all the cushions and covering over the existing fabric with upholstery fabric she purchased at Hancock Fabrics before they went out of business. She bought four yards of fabric–originally $25/yard–at 80% off, in coordinating coastal blue colors. Tracy simply wrapped her cushions in the new fabric and used a staple gun to attach the fabric to the back side.
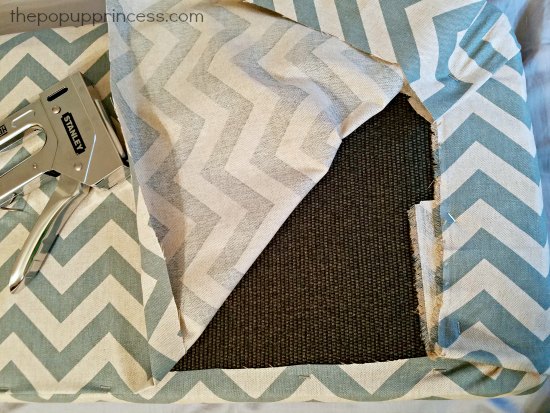
Next Tracy painted the cabinets and hardware. She chose Glidden Gripper for the primer and topped it with a BEHR paint plus primer in Antique White gloss. She primed all the cabinets, walls, and countertops including the T-molding. At this point, Tracy tells me she thought she was way in over her head but there was no turning back! 😉
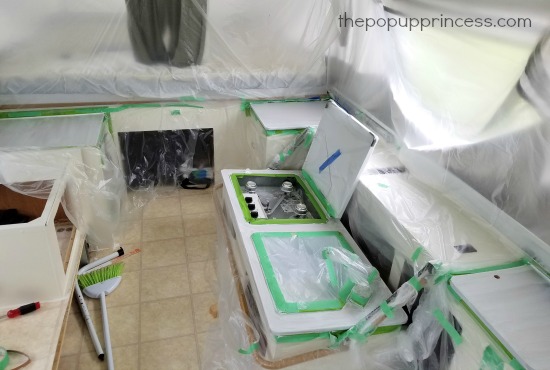 Once the last coat of paint was on the cabinets, Tracy could finally see that she hadn’t ruined the camper. It was full speed ahead at that point. She spray painted all the old brass hardware with Rustoleum metallic silver spray paint. She also removed the mini fridge door, fire extinguisher holder, and the metal trim piece from the dinette slide out and spray painted them in Rustoleum’s Castle Rock color in matte finish. When they were dry, Tracy added three coats of Minwax’s Polycrylic in clear gloss to help protect everything. She used the same color spray paint on the galley kitchen swing arm to coordinate.
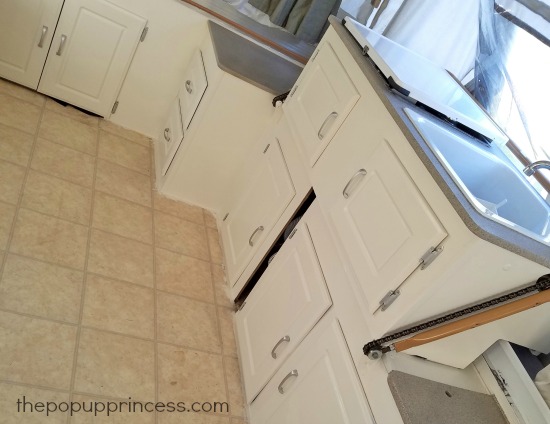
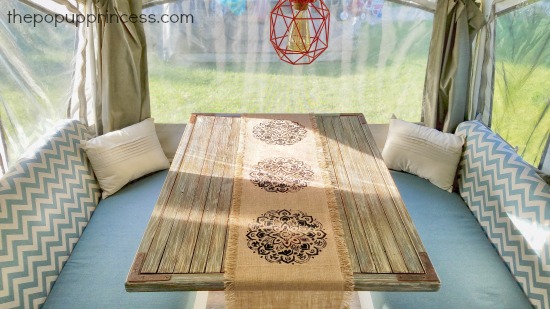
Tracy’s next project was fixing that cheap looking dinette table. She was inspired by the wood table top she saw on Becca’s Pop Up Camper Makeover, so Tracy built her own version. She used wood strips, which she attached to the table top. Then she used the dry brush method to drag different shades of paint along the top. She topped it off with a clear coat.
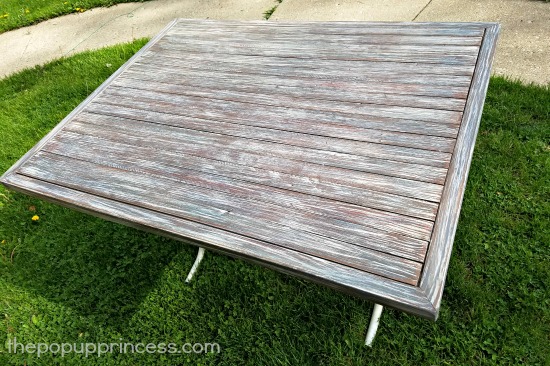
Then she added rustic brackets to the corners. To finish the look, she purchased a burlap table runner from Hobby Lobby for $6.99 (using a 30% off coupon, of course) and used a mandala stencil and black paint to give it a custom look.
In the past, she had always used a lamp on the dinette table, but this time, Tracy wanted something more industrial looking. She had seen a pricey pendant lamp online that was perfect but not in her budget. While walking through Target one day, she saw a coral colored wire lantern in the patio section. Tracy used this (with the handle removed) and a pendant light cord she already had on-hand to create her own version of that pricey light. She wrapped the pendant cord in some leftover jute twine and purchased a cool vintage Edison light bulb from Home Depot. This is now her favorite accessory, and it is easy to see why! I like Tracy’s version even better than the original.

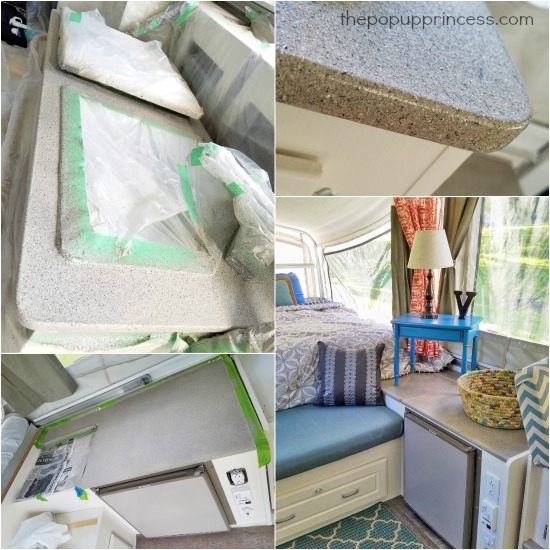
After the table was done, Tracy moved on to the counter tops. She planned on spray painting the counters, so she carefully taped everything off and draped plastic everywhere to prevent the over spray from getting on her new white cabinets. Tracy used two cans of Rustoleum’s American Accents stone spray paint in the color Stone Pebble. She applied three coats to get good coverage, making sure to include the plastic t-molding. After it was dry, she added two coats of Minwax Polycrylic in clear gloss, sanded lightly, then added four more coats. Tracy tells me that her countertops are perfectly smooth and shiny.For the floor, Tracy purchased one box of Style Selections peel-n-stick vinyl planks from Lowe’s in the Driftwood color. The cost should have been $63, but Tracy was offered a $13 discount. Lowe’s had showed an inventory of 123 boxes, but when Tracy arrived, they were out of stock and had to order it. For her inconvenience, they offered her a discount. Nice! 🙂
 For the floor, Tracy purchased one box of Style Selections peel-n-stick vinyl planks from Lowe’s in the Driftwood color. The cost should have been $63, but Tracy was offered a $13 discount. Lowe’s had showed an inventory of 123 boxes, but when Tracy arrived, they were out of stock and had to order it. For her inconvenience, they offered her a discount. Nice! 🙂
Tracy used almost all 40 planks and had a few extra for screw ups on awkward cuts. She purchased two inexpensive rugs from Kmart, one in coral and one in blue, to add some more color to the floor and break up the areas.
Then Tracy shopped for new bedding. She found two bed-in-a-bag sets on 70% off clearance at Kmart for $30 each, and that included two throw pillows! They were a neutral antique white and black color color in a cute pattern. She also found 84″ curtain panels at Menards in a pretty coral color for $15 to add the the finishing touch.
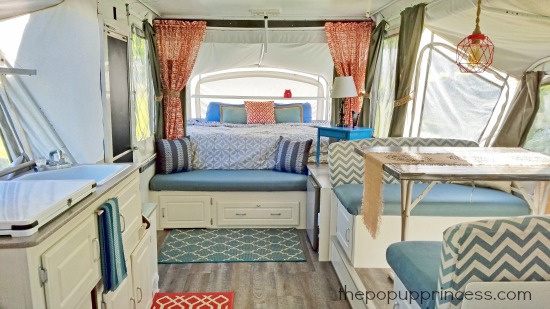
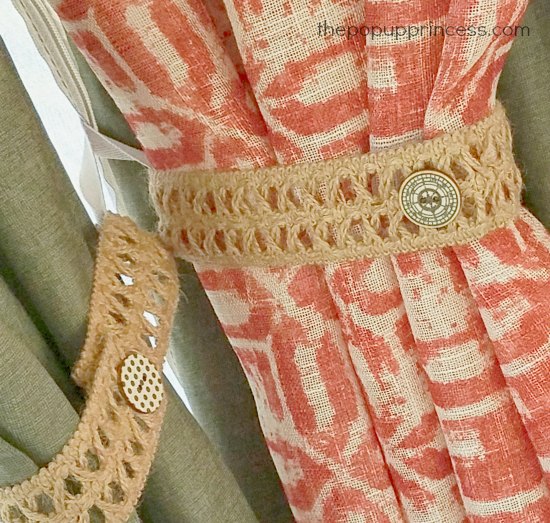
The original curtains were a neutral solid color and could be kept, however the valances were sagging and dated. Tracy removed her valances and hung her new coral curtains above the the bunk ends with a tension rod. Then she made some tie-backs with jute rope ribbon. She added cute black and white buttons bought from Hobby Lobby. All Tracy did was cut the ribbon to size, hot glue the buttons on, and add a Velcro strip (hot glue again) for a closure.
 What an amazing transformation, right? It hardly looks like the same camper. Tracy really has an eye for color and did a great job working within her budget and shopping sales to create a fabulous space for her family to enjoy. Nice work, Tracy!
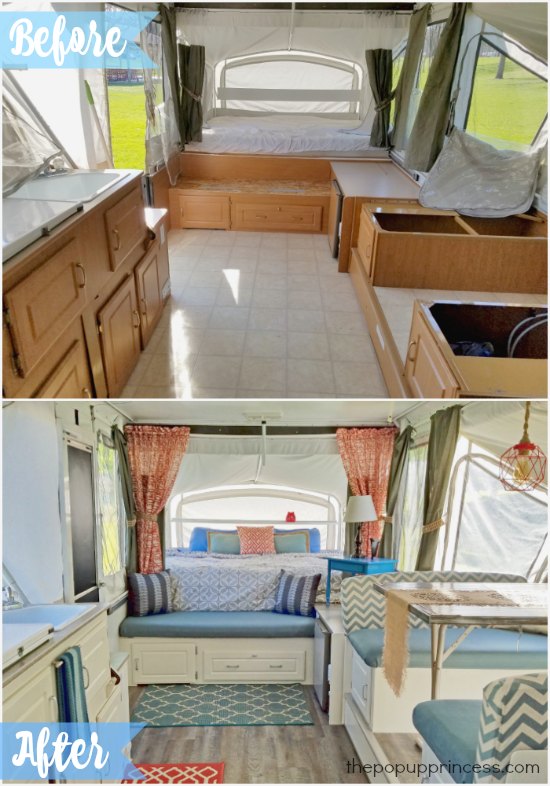 Keep those fabulous pop up camper makeovers coming. You guys are all so creative, and I love seeing your projects. And if you haven’t started that camper makeover yet and are looking for a little inspiration, stay tuned! I’ve got some really fabulous reader features coming up next month. You won’t want to miss them! 😉
Happy Camping!

Greetings! We just bought at ’97 Dutchman and are getting it out for our trip over the 4th of July weekend. My wife and I are super excited and she has been pinning all these wonderful things. We are starting with storage (3 drawer plastic bins). I’d love to replace some of the fabric soon because it’s just not nice. Can you tell me more about using a staple gun to attach fabric? Have you written a post on this?
Thanks for having this blog and sharing all that you do!!!
Congrats on the new camper. Sounds like you are having fun with it. 🙂
Lots of people use the “wrap and staple” method to cover their cushions. It’s quick, easy, and economical. You can find more info about it at The Little Vintage Trailer. Here’s a link to that post! 🙂
WRAP AND STAPLE CUSHION COVERS
Do you know how she painted between the cabinets and the slide. We are struggling with that.
Do you know how she painted between the cabinets and the slide? We are struggling with that. Also how do you Lau the flooring under the slide.
It is impossible to paint between the cabinets and slide I found. I just did as far as I could reach. Once everything was done I hardly noticed it. Maybe one of those small smooth foam rollers stuck on a pole would reach? I just have up.
We were able to on ours — but only after removing the slide out from the camper 🙂
How did you remove the slide out?
Also, regarding flooring under the slide, same thing — we removed our slide. But i think if you had it in the out position and removed the large metal edge piece and the vertical board connected to it (that goes between the slide floor and the main floor), you could get under the slide enough without taking it out.
I love it!! We are doing ours now and have a slide for the dinette as well. How did you get between the slide and the cabinets to paint it white?
I agree, I would love to know how this was done as well. The space is to small for any kind of spraying and even a brush would be difficult.
Also, how did she get the flooring under the slide-out and in the small areas between.
It looks great! I have been hesitant to do paint and flooring due to the slide-out, so any insights on how to work in that area would be greatly appreciated.
I found it impossible to get between the slide out and cabinets. I just painted what I could reach and its not really noticeable. Try a small foam roller on a pole…
The slide out has a removable front panel held on by like 3 screws. Once you pop that off you have access under the slide out. For tricky cuts I made paper templates. The flooring was thin enough to use scissors.
Beautiful makeover! I had been wondering about getting the vinyl planks under the slide area, as we have a slide out dinnette as well. Did you remove the cabinets and rip out the old vinyl flooring or just lay the new stuff over the top? I worry about there being enough space for the slide out to work well with an extra layer of flooring. Does your slide clear the extra height of the flooring without getting hung up?
Tracy! I am in the process of remodeling my pup. I just have to tell you- I bought the same exact light fixture on clearance at TJ Maxx last weekend for $20! The one you originally wanted! I had been looking and looking and did not want to pay that price for a light fixture. And- I put down the same driftwood flooring! I was like, wow! This is crazy! And I spray painted my countertops with the same exact spray paint. Love the remodel- it looks fantastic!!! Mine still has a ways to go, as working full time and being a mommy full time tend to halt my time in the pup. Great job!
Thanks. That is pretty crazy! I’m jealous you got that light so cheap, I just may have to go to TJ Maxx now and check it out! Don’t you love that flooring though? So did you coat the countertops with polyurethane also? Oh I can wait to see your reno when it’s done.
I love it! I have the same camper but I just can’t bring myself to paint the cabinets which is totally ironic because I’m a stager and real estate agent and paint EVERYTHING. My question is how are you plugging in your light over your table? Are you using an extension cord or did you figure out how to plug it into the 1/4″ phone jack plug that is above the slide?
Would Love to know the answer to the light question also!
Me three! We’ve been searching for a lighting solution for over the dinette and it would be helpful to know more details!
This is my question, as well!!
I would also like to know how you did the light too? Great idea.
Looks great! How long did this makeover take? I would love to spruce up our POP but worry about the length of time we would need it up and in the driveway. Also, how and where do you store all of the accessories like the light, table and lamp?
It took me 5 weekends to do everything. The countertop under the blue table flips up to hold the table and a 13″ TV not pictured. I can also fit throw pillows in there. I have so many other cabinets and drawers storage is not an issue. I keep all the bedding on the bunks. We no longer travel with it since we got a beautiful seasonal site. It pretty much stays popped up these days.
Love this website and all the ideas. This is a beautiful remodel. Question on the countertops….does covering the old t molding with spray paint as used in this remodel a durable solution? Or should I look at new t molding?
For bunk end curtains, I found premade made panels 50″ in width that I need to hem. Is this width enough or have people had to double them up to get a wider panel?
Thank you for all these great examples!
I’m really not sure how durable spray painting the t-molding is in the long run. I do know that when we spray painted ours, it didn’t hold up well at all. We ended up replacing it a year later. This was the cabinet t-molding–around the dinette–but it is the same stuff used around the countertops. You can read all about that here.
larissa i have the camper . you are taking about here / i like its nice
So far so good. I sanded it with fine paper, then used primer, and then spray painted. Polyurethaned, sanded again, then more polyurethane. If I could have found t-molding in a coordinating color I would have used that instead. But even then on mine there were areas between two counters side by side almost touching, how do you get t-molding in there?
My bunk end curtains were one panel per bunk cut half way at 42″ from 84″ length and are 48″ width. I think 50″ wide is fine unless you want them more ruffled.
Fabulous job! I love the beach cottage vibe!
Thank you! That’s pretty much how went about decorating. Like I found things along the beach and repurpised them to create a table or light fixture! Yet is not the typical beach or nautical theme.
Nice makeover! Also love the shelving on each bunkend. Just makes it that much more homey feel to it! Your hard work paid off-great job!
Thanks! Those shelves come in handy for books and your cell phone at night. Love them. We also have one above the sink/stove.
Hi Tracy; I love your redo!!! I’m in the midst of redoing our pup and I’m interested in how you did those shelves above the beds and sink. How do they attach?
I’m curious as to how you made the bed and sink shelving? It’s genius!!!
Those were standard features in Tracy’s camper, Tami. Wouldn’t be nice if manufacturer’s included them in all campers? I love them, too. 😉
Curious about removing that “oak paper” before painting. We have the identical popup and were thinking about repainting. Do you typically sand and paint over that? Does it have to be stripped off?
Andy, you can paint right over it if you prep it correctly. You can read all about how we painted our pop up camper cabinets here:
PAINTING YOUR POP UP CAMPER CABINETS
I only removed the flaky pieces. Then just primed and painted. It actually covers well and seems to stick.
https://www.pinterest.com/tavazquez/pop-up-renovation/
This shows a picture of how my cabinets were peeling
Lovely redo!!! Can you tell me what model this pop up is? We are looking for one to redo and I love all the room in this! Thanks for all the inspiration!
2003 Colman Bayside Elite. Two king size beds. Slide dinette, and a bump out gally kitchen. It’s huge! Lots of cabinet storage.
We’ve been struggling with the bed curtain issue, We have an’01 Coleman and we can’t find a tension rod long enough to reach the width of the trailer. We were thinking of using a standard curtain rod hanger but I’m afraid that the screws would punch through the roof. Any suggestions?
That’s really a slippery slope, Phil. Although I have featured makeovers that use tension rods or regular curtain rods, I would never actually drill into the roof myself–especially for something like curtains, which will get pulled on a lot. Is there any reason you can’t use the existing curtain rail? 🙂
I found my tension rods at Walmart for 8$
I love your new look! it’s bright and refreshing. my question is: how did you put up all of your curtains… I’m thinking about using grommets and a string to put up my privacy curtains.
I’m in love with your table!! Do you have a tutorial on how you did it?
Not yet, Dawn. Tracy did sent me some pictures, and I hope to have a tutorial up soon. In the meantime, if you have any questions, feel free to shoot me an email at thepopupprincess@gmail.com and I’ll do my best to answer them. 🙂
Does anyone know how she created the shelves on the bunkends? I have a Coleman Niagara but did not come with shelves. Would love a tutorial on those! Nice camper remodel!
Love it! I see a little shelf above the beds. What did you use to make that and how did you install it?
Those are shelves from the manufacturer that came with the camper. They aren’t available aftermarket, Jessee, but sometimes you can build something similar. Check out this post on Pop Up Portal for some ideas. 😀
Hi! We also have a 1996 Coleman Fleetwood Bayside, with the 2 slideouts. We are thinking of adding the peel-n-stick, but wondering if you’ve had any issues with the slide outs, sliding in/out by adding that slight height with the vinyl flooring. Been looking for a remodel with our model. Thanks for sharing!
Adding wood to the table top, so you have any issues with the thickness if using it as a bed? That’s how I want to redo my table but we will use it as a bed as well.
We just bought the exact same trailer this week and making some improvements before leaving this weekend. The one thing we are struggling with is finding a workable solution lack of support for the backrest at the table. We don’t like how the cushions are supported by the canvas. Does anybody have any suggestions?
How much Minwax’s Polycrylic in clear gloss did you use?
What did she paint the refrigerator door with? I’m about to start my pop up camper make over but have yet to read what everyone is using on the refrigerator
We used spray appliance enamel to cover our fridge, and it worked fabulously. 🙂 You can see it in action here.