


Disclaimer: We are not professionals. We are just outlining the steps we took to rebuild our Rockwood pop up camper roof. There may be different (and better) ways to rebuild a damaged roof, and our experiences should not be construed as professional advice. We love sharing the process of our remodel with you all, but please don’t think we’re perfect. This is the first time we’ve taken on a roof rebuild like this. 😉
 You might remember that we brought home a new little project last month. You can read all about our “new” little Rockwood camper here. There was some massive water damage, thanks to a roof leak, so we knew that our first project on this old gal was going to be a complete roof rebuild. Now, up until this point, all of our hands-on pop up camper experience has been with our Coleman camper. We are pretty familiar with Coleman pop up campers, but this Rockwood was a whole new ball game for us. We basically approached this roof rebuild like a puzzle. Because we knew we’d forget how to put the camper back together again, we took a lot of pictures and labeled everything as we went along. I highly recommend doing this. We’ve referred back to our pictures so many times already.
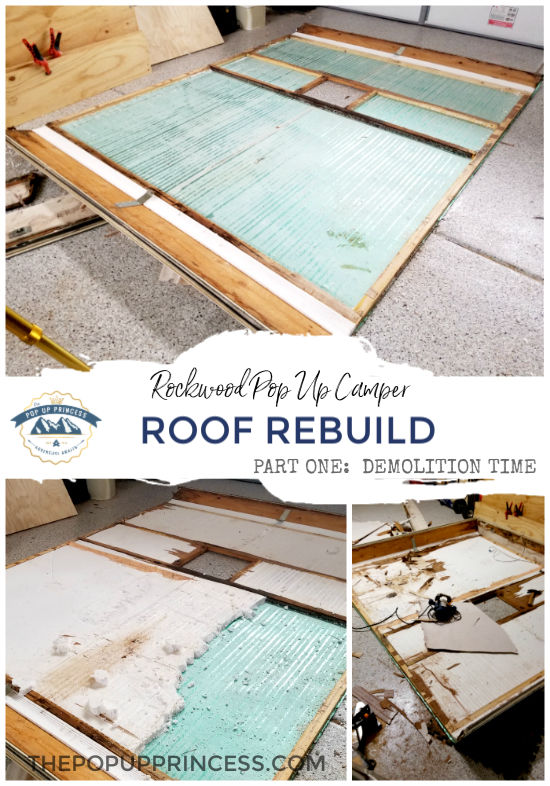
We really want to go into detail on just how we tackled our pop up camper roof rebuild, so we are breaking this post up into several smaller posts. We’ll do a little roof rebuild series, but… fair warning: this is going to be a long series. While rebuilding the roof of the pop up camper wasn’t necessarily difficult, it was tedious. There was a lot of manual labor involved. First up? How we removed and deconstructed the roof.
REMOVING THE ROOF
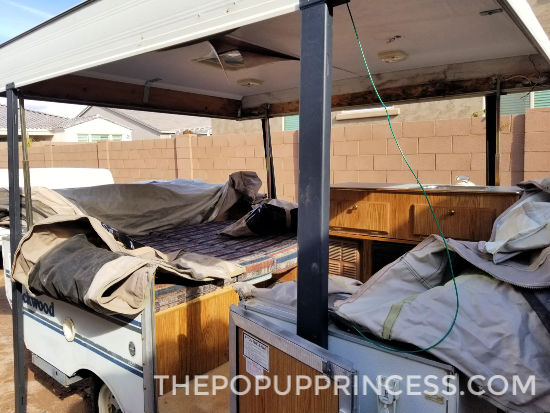
The very first thing we did was remove the canvas. The canvas of our pop up camper slides into a groove at the bottom of the plastic curtain tracks. There are several screws that hold it in place, so once we removed them, we could just unzip the canvas at each corner and slide the individual pieces out of the track. Because they had been in place for years, we did have to gently pry the track up a bit where the screws had been. Once we did that, it was no big deal to slide the canvas away from the roof.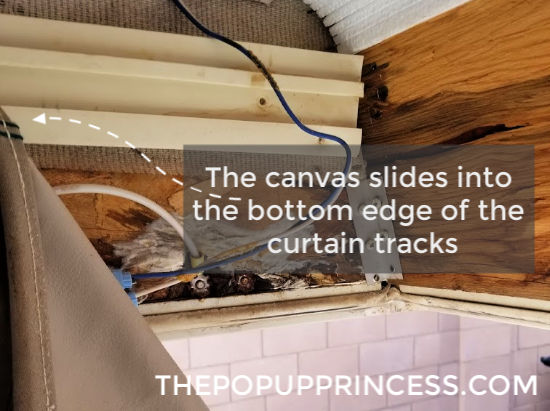 Once we had removed the canvas, we also removed the curtain tracks, labeled them, and set everything aside. We unplugged the electrical wiring that runs up to the roof and propped the edge of the roof up on 2×4 lumber that was all cut to the same length. This ensured that the roof didn’t fall on us while we were taking it apart.
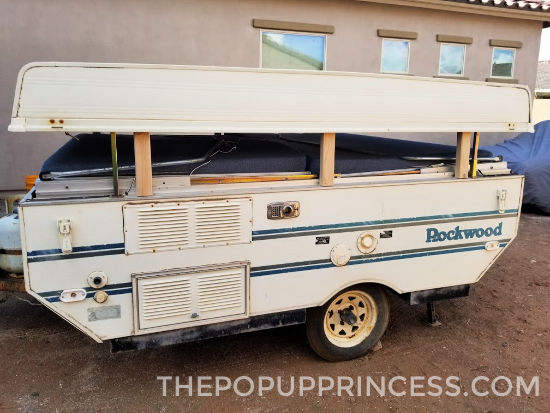
We lowered the roof onto the 2×4’s. Once the tension from the cables was released a bit, we unscrewed the bolts that attach the lift arms to the roof. Then we carefully slid the lift arm off the bolt and set the arm to the side of the bracket. Remember that the 2×4’s are holding the roof up at this point.
Then we grabbed our teenagers, and each person took a corner of the roof. We lifted the roof up and off the body of the camper and placed it upright on the floor of the garage.
TAKING THE ROOF APART
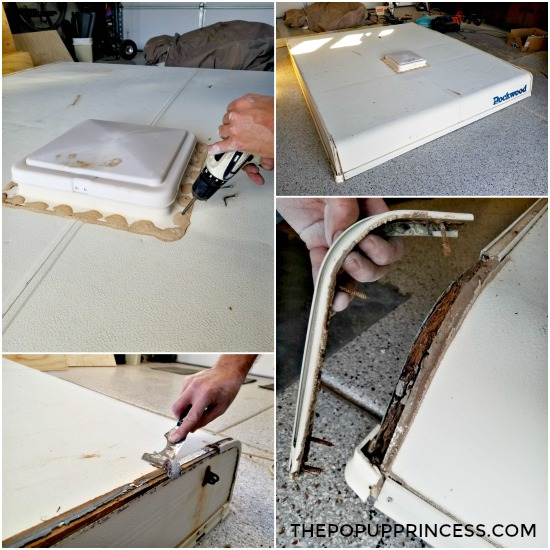
Justin (Mr. TypeTwoFun) removed the rv vent and all the metal trim from around the outside of the roof. This was no easy task, as there were several layers of caulk and butyl tape to dig through and scrape off. This part was the worst. Really. The. Worst. We used acetone to loosen the caulk as much as possible, but it was still a booger to remove. Justin wedged a paint scraper between the roof and the trim pieces and slowly pried them off. Then he used the scraper to remove the rest of the caulk. Be SUPER careful with this step. The aluminum skin of the roof is very thin, and you can easily gouge it with the paint scraper.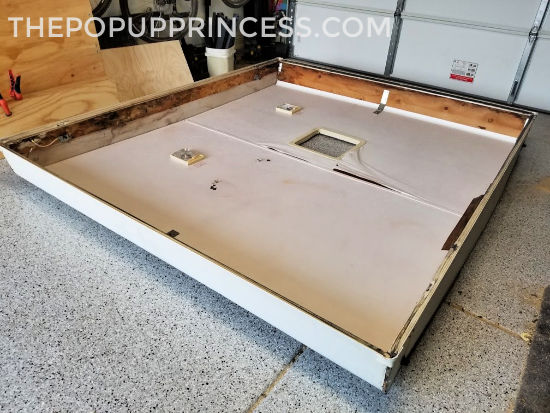
Once the top trim pieces were removed, we flipped the roof over onto the garage floor. The roof was already pretty dinged up. It’s an older camper and has seen some abuse, but we wanted to make sure we didn’t add any new dents, so we were extra careful here. We swept the floor really well before we laid the camper top down and started the demolition process. Again, remember that the aluminum skin is so fragile, and any little screw or wood chip underneath the skin can cause major damage. Be extra gentle with these next few steps.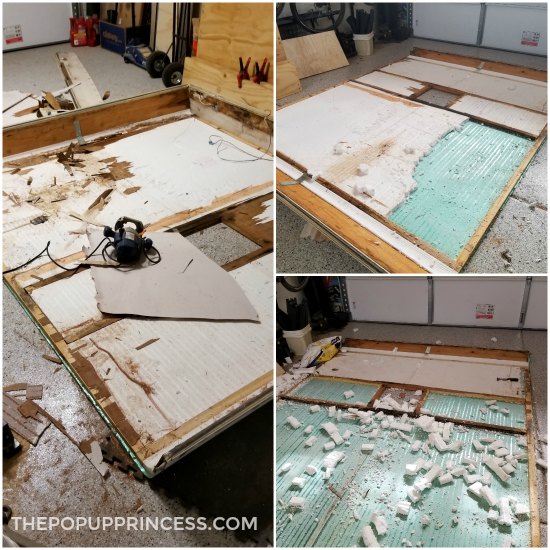
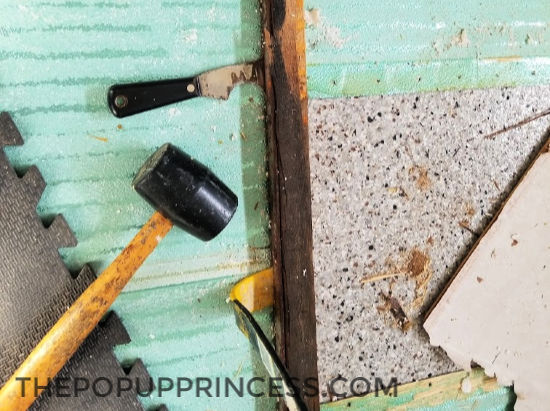
Next we removed the rest of the trim, all the brackets, interior lighting, and vent garnish. Then it was time to tear into the roof. Justin used a rubber mallet to gently tap the inside of the the long side panels of the roof so they came away from the top. Once the sides were removed, we began pulling back the ceiling. The very top layer of the ceiling is wallpaper with thin luan paneling underneath. This paneling is glued to the insulation foam and a wooden frame. The paneling is a little tricky to remove. Ours was old and brittle, but the glue was still holding strong in some spots. The luan came off in pieces and was really hard to get up. A couple of times we used the router to make a chanel in the paneling. Then we could stick the paint scraper underneath it and pull another piece of paneling up.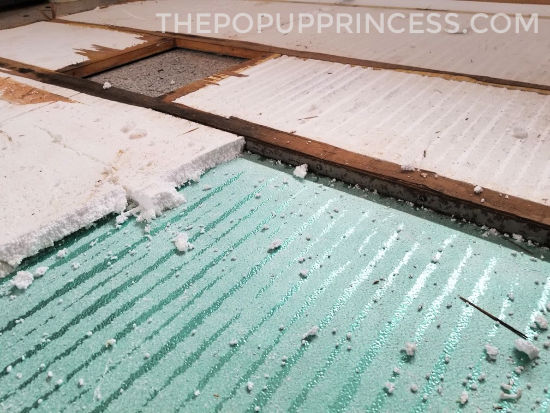
From there, we started scraping up all the insulation foam. The glue bond here was still pretty strong as well, so the insulation ended up coming off in big chunks. We used a long handled floor scraper like this one to pull up the insulation foam. It actually worked really well, and as an added bonus, no one had a sore back the next morning! 🙂
REMOVING THE FRAME AND CLEANING THE ALUMINUM
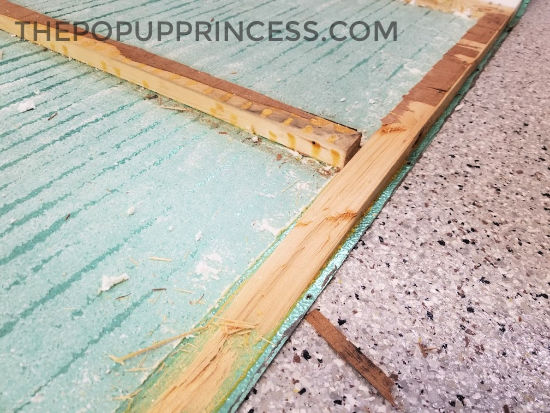
 To remove the roof framework, we used a crowbar and a rubber mallet. This stuff was stubborn, too, and it also came off in pieces. We would get a little bit of the wood pried up, soak the next layer with acetone, and try again in a few hours. This part was tedious as well. There was a lot of scraping and scrubbing going on. Don’t forget to wear a respirator and nitrile gloves when working with the acetone. Safety first! 😉
 But once most of the wood was removed, we started removing both the front and back end pieces. This was honestly just more of the same. Scraping, prying, and lots of acetone and elbow grease.
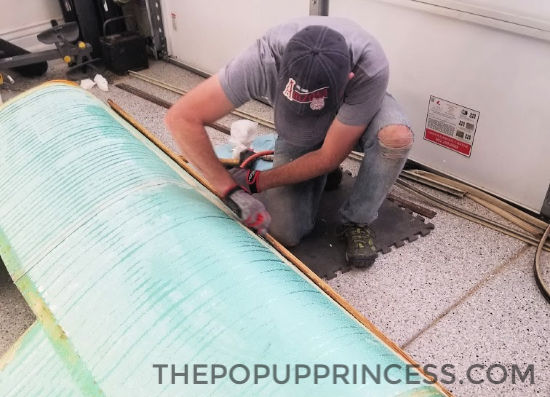
We took the roof all the way down the the aluminum. We removed the aluminum from the side boards as well. Once all we had left was the aluminum skin (and a big pile of broken boards and foam 😆 ), we gently cleaned the glue residue from the inside of the camper skin with Scotch Brite pads and acetone.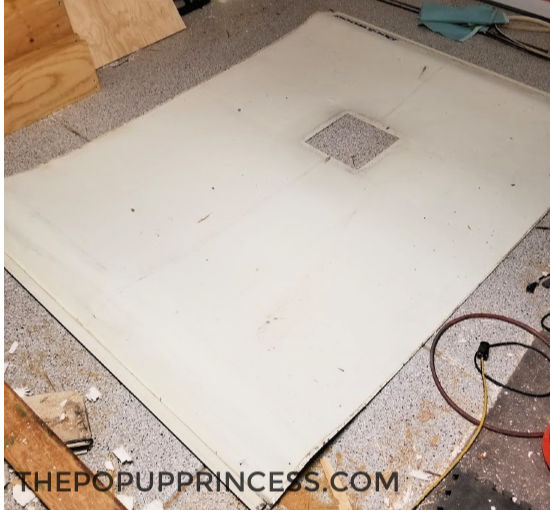
It took us the better part of two weekends (and lots of trips to Home Depot for acetone) to do it, but this is what we were left with when we deconstructed the roof. We are going to use the original pebbled aluminum skin, curtain tracks, and metal brackets, but we will be replacing all the wood and insulation. I hope this post was helpful for any of you readers that have had roof rebuilds on your to-do list–and if you have taken on this project yourselves, feel free to comment below. We’d love to hear your tips.
Want to see how we rebuilt the interior and ceiling? Make sure to check out that post here:
PART TWO: REBUILDING THE INTERIOR AND CEILING
Disclaimer: This post contains Amazon affiliate links. The Pop Up Princess is a participant in the Amazon Services LLC Associates Program, an affiliate advertising program designed to provide a means for sites to earn advertising fees by advertising and linking to Amazon.com. This means that if you choose to purchase an item from a link in this post, The Pop Up Princess earns a small advertising fee to help pay for future projects and posts… so thank you!
Happy Camping!

Wow! We have a Rockwood very similar to this one. A year younger but it has the same floor plan. Only complaint about it is the limited storage space inside. We were talking about to adding hanging wire shelves in ours, but I was dreading trying to anchor something into the ceiling. Seeing your roof opened up like that really helped me get an idea on where I could possibly place d-rings in the ceiling to hang the shelving. Can’t wait to watch the development on this one!
This couldn’t have come at a better time! I’ve recently discovered that the roof on my ’97 Starcraft Spacemaster has developed some serious rot issues. Like your project here, it sat for a long time before I acquired it. I’ve looked on your blog, Popup Portal, and watched about 600 (well, maybe 60) rebuild videos on YouTube. So far, yours is a lot more informative than most! Unfortunately, mine has a fiberglass skin on top instead of the aluminum, and it’s shot. I’m looking into alternatives now. Once I get this ol’ girl (her name is Thelma Lou) straightened out, I’ll send some pics.
Thank you for such an informative and inspiring blog! I’ve been checking out everyone’s makeovers for about a year, and have picked up some great ideas!
Happy Camping!
Jack
Do you have the steps when putting it back together
We are working on that post and hope to have it up very soon. 🙂
My husband and I just bought a camper, and the top was completely unsalvageable. Do you know of anyone who has built a roof from scratch ?
You might check on some of the Facebook pop up camper groups, Amelia. I’m sure someone there has done it. 😀
I am staring down the same challenge that you took on. Question is after all the hours of elbow grease and hardwork to recover the skin would you recommend just buying some new sheet metal and rebuilding it from scratch? I am an engineer by day and have a feeling just starting over and reusing some metal pieces off original roof will be easiest. Thoughts? Am I crazy to think this? Thanks in advance
Justin thought the same thing when it was all done. Preserving the aluminum skin was tough, and if we had it to do again, he’d really consider just purchasing a new aluminum skin. I’m not sure how pricey that would be, and unless you could find a pebbled texture, it wouldn’t match the body of the camper. Let me know if you end up doing that. 😉
This is so informative. Thank you! My husband and I just purchased a 96 Starcraft Galaxy 1224 and we will most likely do this.
I am now deconstructing the roof of our ‘95 rockwood very similar to yours. The outside corner covers were held on with some caulk that was impossible to get off. I tried everything, then read a thread in pop up portal that suggested wd40. It worked amazing to loosen that caulk. Just a suggestion in case anyone else is running into the same problem.
I’m currently trying to pry off the wood on the front and back ends. It’s giving me major problems as well. How did you apply the acetone to the wood to get it off? Just pour it on?
I know this is an older post. But I just bought this exact trailer with the exact same issues. It seems like a lot of work. But I’m also wondering of what it cost to rebuild. Is it worth it? It’s me and the wife’s first trailer and we feel like we might be in over our heads…
That kinda depends on your budget and how handy you are… We were really excited to take on a new project, so we didn’t mind the work. It has been super time consuming and pricey, though. If I sell the Rockwood, I will never get out of it what I’ve put into it. I’m super particular about materials, though. Everything has been done with quality materials and a meticulous eye for detail. That’s just how I am. I’m sure my husband will tell you it drives him crazy. 😆
If you just want an inexpensive camper enjoy without a lot of work, maybe this isn’t the best camper for you. If you like a challenge and enjoy a project, I say go for it!
I have an 81 Starcraft venture that I love. It’s been the saving grace for us during the pandemic. We bought new canvas and installed it last year. During the installation we realized there was a lot of rot along the edges of the roof. It needs to be repaired or replaced. It’s not something that we can fix ourselves for a variety of reasons (space, time, HOA). We are in Phoenix. Any chance you know of anyone that could do it?
Honestly, I’m not sure of any dealerships that do this… I think they just replace the roof altogether, if the part (roof) for your pop up camper is still available or contract it out. I have heard of a couple people finding a handyman on Craigslist or the like and having them do it. We are in the Phoenix area as well and live in an HOA controlled neighborhood. We were able to do everything in our garage, and it worked out nicely. If there was any way you could arrange to do the work yourself, I’d definitely recommend it. If not, maybe call Little Dealer Little Prices and ask what they recommend. They have a couple of vendors in the Valley they work with for canvas, so maybe they know of someone for roof repairs, too. 🙂