


When we first started remodeling our pop up camper, making space to store our gear was a top priority. We loved all the storage space we had under the dinette cushions, but hated how difficult it was to get to that space. Early into our remodel, we decided to add access doors to the dinette storage cabinet, and it was one of the best modifications we have ever made.
 We can fit a lot of gear in that space. Look at all that room! Of course, it is usually a whole lot messier than that picture, but accessing it is a breeze now. Since it has been quite a while since we posted the tutorial for this modification, some of you may not have seen it. I thought I’d give you all a refresher. If you’ve already seen this post, we will be back with a brand new feature later this week. If not, pull up a chair and settle in. For those of you thinking about adding access doors to your dinette storage cabinet, don’t be intimidated. It really is an easy project and we’ll show you everything you need to know.
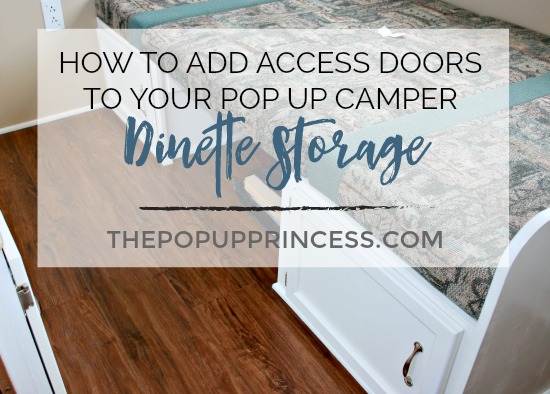
Adding Access Doors to Your Pop Up Camper Dinette Storage Cabinet
Our Coleman Santa Fe pop up camper is on the smaller end of the pop up scale. We only have a 10 ft. box, and with five people in the family, storage is at a premium. When we bought the camper, we wanted to make sure we had a place for everything. We store our camper fully packed — except for food and clothing–so we need every inch of storage space available! 😉
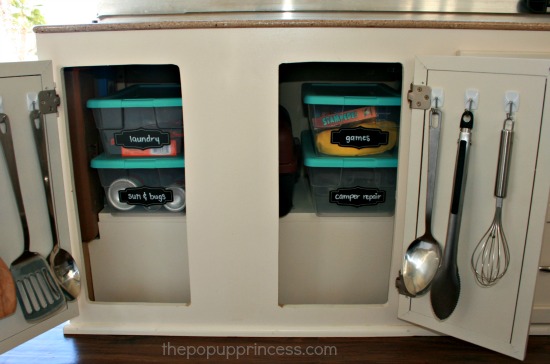
We started by fixing the rubber wheel well which is located inside the long cabinet we built. This part of the cabinet was basically unusable before. If you set anything on top of the rubber wheel well, it would cause the rubber to sag and rub against the tire. Mr. TypeTwoFun built an enclosure around the wheel, which serves as a shelf that holds quite a bit. I grabbed some plastic shoe box bins and chalkboard labels from Target, and it makes things so much easier to find. And isn’t it CUTE? I can even fit my tackle box first aid kit in there.

To hold all my cooking utensils, I used some wire 3M Command Hooks. I simply attached them to the inside of the cabinet doors, and now I have a place to hang all those tongs and spoons.
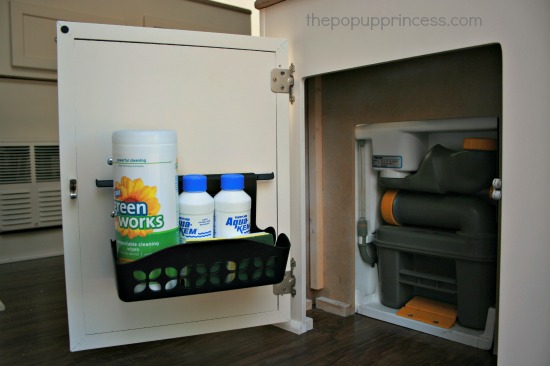
Another Command storage solution was this basket (similar to this one). It attaches to the inside of the cassette toilet cabinet and holds all the cleaning supplies we need while camping. I was surprised at how perfectly it fit. I love those Command products!
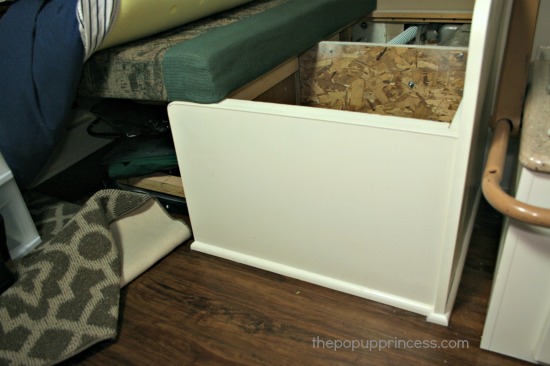
While we are on the topic of storage… We have quite a bit of storage space under the dinette benches. I was actually pleasantly surprised to discover just how much stuff we could fit in there. I packed those things full! The problem is that once we are all set up for camping, the dinette is always made into a bed for one of the kids. Accessing the storage space under those cushions is a feat in and of itself. I was cussing and throwing things on our first trip! 😀 As soon as we got home, we decided that we definitely needed a better way to access those spaces.
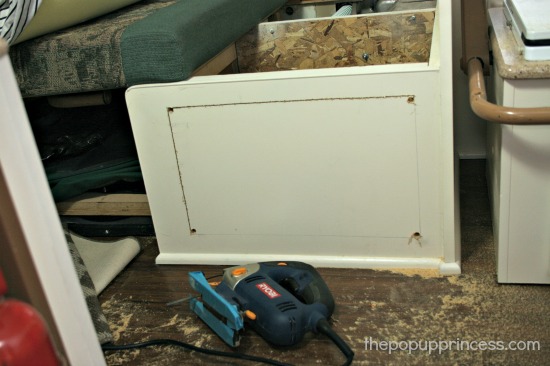
So I put Mr. TypeTwoFun to work. First, we sketched out an opening so we could cut an access hatch. Once we were satisfied with our measurements. We drilled a hole in each corner and used a jigsaw to cut out the panel. Then I sanded the cut edges and used paint to touch everything up and make it nice and pretty again.
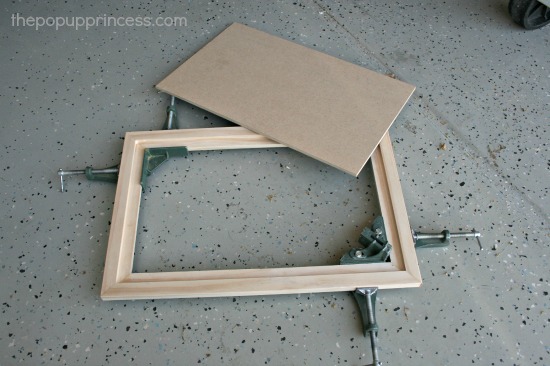
While the paint was drying, Mr. TypeTwoFun used some 1×2 pine lumber to make a door frame. You can get as fancy as you like here, but we wanted our doors to match the rest of the camper. We simply used a router to round the edges and create a channel for the cabinet door face to sit in. It looks a lot like a picture frame at this point. We used glue, corner clamps, and a couple of brads to hold it all together. Then we cut some 1/4″ MDF to fit the inside measurements and serve as a cabinet face. A little glue, paint, and matching brushed nickel hardware, and you can’t tell which cabinet doors are original and which ones we built.
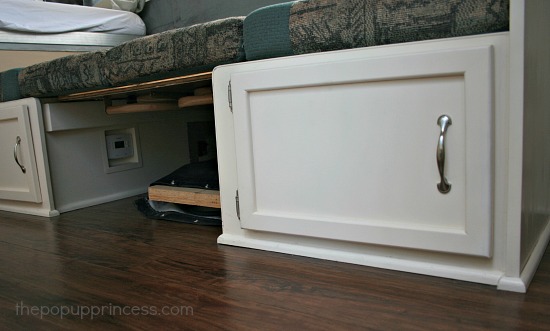
Don’t they look amazing? I’m pretty proud of this project.
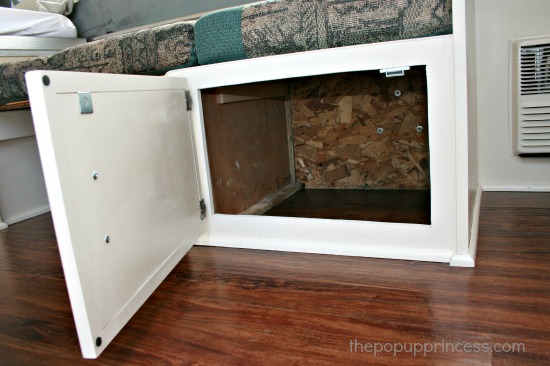
We used some magnetic catches (like these) to keep the doors closed while we are on the road. I can still stuff those little storage spaces full, and they won’t come swinging open while we are driving. The best part is that I can access them whenever I need to–no cussing involved… mostly. 😉

Got any storage tricks up your sleeve? I’d love to see them! You can show them off on our Facebook page here, or use the comment section below to brag a little. 🙂
Disclaimer: This post contains Amazon affiliate links. The Pop Up Princess is a participant in the Amazon Services LLC Associates Program, an affiliate advertising program designed to provide a means for sites to earn advertising fees by advertising and linking to Amazon.com. This means that if you choose to purchase an item from a link in this post, The Pop Up Princess earns a small advertising fee to help pay for future projects and posts… so thank you! 🙂
Happy Camping!

You and Type Two Fun are my HEROES!!! Thanks so much for all of the wonderful information. It is invaluable as we return to the joys of a pop-up. After going from tent camping, to pop-up, to travel trailer, to motor home, we finally reached the conclusion that we enjoyed the pop-up the most. Being “fixer upper” people, your blog is everything I have been looking for. Thanks so much! I’ll be “stalking” your blog!
😉
Thanks, Sheri! We had trouble finding resources when we first started. There aren’t many blogs dedicated to the little pop up, but it is the best kind of camper, in my opinion. I’d love to see pictures of your camper as you finish projects! It’s always fun to see what other PUP campers have done. 🙂
I’m looking at buying and remodeling a pop up and have been reading your blog for inspiration. I noticed on your other cabinets you have a snap in catch, while on this you used magnetic. Which do you prefer? Bc the camper I’ve looked at purchasing has these terrible handle latches (like this: http://www.rvpartscountry.com/Positive-Multi-Fit-RV-Door-Latch.html)
I’m thinking of removing and replacing the latch and just wanted your opinion.
Emily,
Both of our catches have done a good job. I like the magnetic ones a lot, but I’m not sure how they’d hold up if I put anything really substantial in the cabinet and took a sharp turn. My snap in catches do pretty well, though, and those are original to the camper. I don’t know much about the handle catches, so I’m afraid I can’t help much there. Good luck! Hope you find a camper soon. They are a lot of fun. 🙂
Larissa– I’m thrilled to find your blog! My husband and I are getting ready to buy a pop up. I want to buy a used one, so I know it will take some updating. Your blog has made it possible for me. thanks!
Cool, Renata. That makes me happy. Make sure to send me pictures when you find your pop up and start your project! 😉
Absolutely Fabulous! You only need to redo your cushion covers and this Pop-up rules:-)
kind regards,
Nathalie
Thanks, Nathalie! We actually did reupholster our cushions. You can find that post here. And you can see the mostly finished project here. There will always be something to mod, though. So stick around to see more projects. 😉
We just purchased our first pop-up yesterday, a 1992 Coleman that is in perfect condition but is in dire need of some updating. I’m thrilled that I found your blog and love all of your super cute ideas! I’ll definitely be following along for more! 🙂
Thanks, Sue! I can’t wait to see what you do with your camper! Be sure to send me pictures! 😉
Love your website!!! My husband and I just bought our first pop up last year. Looking forward to using it this summer. Question, one of our storage cabinets where we sit for our dining table the upper right frame has cracked. I think the owners before us shoved too hard when taking it down and the bed somehow cracked the frame for the cabinet. Is there anyway to fix this? Just to be clear since I can’t attach the picture it’s not the actual door its the frame. Like the part where your magnet to hold your door is. Hope that makes sense and thanks for any help you can provide.
Thanks, RaeLynn! It’s been a fun little hobby. 🙂
We had some issues with a couple of our cabinets, and we rebuilt them with a sturdier wood. Not sure if this is an option for you, though. If you want to e-mail me a picture to thepopupprincess@gmail.com, I’d be happy to offer advice. It may be as simple as reinforcing the frame from behind.
i don’t have a router or a typetwofun man in my life. Do u think I could buy a picture frame and then cut the panel to fit it for the door? I’ve been wanting to do this since I first got my pup two years ago. :/
Thx, I am enjoying ur website!
It’s possible, Jill. You would still need a jigsaw to cut the opening in the dinette bench, and you would need to make sure the frame you purchased had a wide, flat surface area to attach the hinges to. If you try it that way, I’d love to see pictures! 😉
Ok. Thx. I’ll let u know if it ever comes to be. 😉
Hi Larissa, I just love your ideas and the common sense approach! I just thought I’d share that I used simple wood picture frames to use as door frames; no routering, not assembly of a frame whatsoever. cut the opening according to the frame size and and added the hinges and pull-handle. also, i used the soft-close hinges so no more banging! thanks for the creative ideas!
Awesome, Janie! I’d love to see pictures. 😀
I cannot wait to add this mod to my Pop up. We just purchased and used ours for the first time. While the space is FANTASTIC, moving the dinette pads are a pain in the rear to get to stuff. LOVE your site, BTW. !! The person we bought our PUP from told us about you.
Cool, Stephanie! Send me pictures of your mod when it is all finished! 🙂
THANK YOU for all of this great info. We purchased our first pop up yesterday- 1991 Coleman in Great shape but needs some updating. All of these wonderful and clever ideas are terrific. Thanks for sharing
Awesome, Kim! Can’t wait to see it. 🙂
Howdy!
I know this is an old article, but I wanted to find out more about how you use the storage under your dinette benches? We already have doors there, but I tend to throw some stuff in, access it through the doors, and then leave a lot of empty space at the “back” still unfilled. I’m trying to think creatively about what can be stored in there and would love some ideas. I also will search your site further in case you have covered this before.
Thanks for all of the great and creative advice you put out there. We love our popup too!
Lee Anned
Hi, Lee Anne! The hot water heater tank and water pump are in one of our benches, and the electrical cords are in the other. We don’t have a whole lot of extra space in there to begin with, but this post will have you an idea of how we store and organize things. I usually put things like rolls of paper towels, tablecloths, flashlights, water hoses, etc. in those smaller compartments with the door. I do have one bigger pot in there as well, though. Hope you find that helpful. 😉
We too have a Coleman Sante Fe and I have ALWAYS wished there were doors on the end of those benches! We started out camping with 4 kids and at our largest, we camped with 6-yes kids-in our Coleman Sante Fe! A pac-n-play fits perfectly in front of the kitchen galley and we didn’t have a porta potty on ours. Due to water damage that caused a lot of mold, we had to gut the inside. I was sure it couldn’t be salvaged but once gutted, the moldy smell went away and we discovered it was only in the cabinets not the walls and floors. Now we are trying to fix the roof and a/c so it looks nice. If so, I am going to redesign the inside and get us camping agian.
How fun, Linda! Make sure to take lots of pictures. 😉
After reading your blog, and looking at all the pictures, we decided to keep our 1996 Dutchmen Duck, instead of giving it away! After sitting for many years, it has a leaky roof that has to be rebuilt, mildew, stains, maybe rotten floors, no A/C, and the list goes on. We are retiring in March 2018, and this will be our home away from home. It’s a major project that we are both jumping into with both feet! Thanks for all the inspiration!
Awesome, Sheryl! Take lots of pictures! 😀
Hi Larissa! I’m a newbie to pop up campers. I’m lolooking at a 1976 Coleman brandy wine with good structure. It is needing some tic 😁. I know a new canvas will be needed. But also a top kitchen galley. Was wondering if these can still be found or do you night the bullet and design one yourself. Thanks for any info and I love this site!!!
You might be able to check Coleman Pop Up Parts. They sometimes have odds and ends when it comes to Coleman parts. I hear they bought a good deal of the parts inventory when Coleman went out of the pop up camper business.
Old post, but I see it’s still getting some comments. I have a tip for people who don’t have a router but do have a table saw: You can use the table saw to cut your notches. Do each direction together (horizontal cuts on all four planks, then vertical cuts) so they’ll all be even. You can use a wood chisel to clean out the corners if necessary. I did this to frame a 4’x4′ piece of shower board in my grandson’s room, it works great as a whiteboard.