When we bought the pop up camper last year, one of the first things we noticed was that the lock on the stepper door was broken. The guy we’d bought it from on Craigslist told us that they’d forgotten their keys one trip and had to pry the door open. He said the lock stuck sometimes, but they usually had no trouble opening it. Yeah, right! 🙁 Ever since the day we brought it home, Mr. TypeTwoFun has been the only one who can open up the camper. The lock is finicky, and you have to jiggle the key just right to coax it open. Back in March, we ordered a new lock, but we were just too intimidated by the project to complete the repair.
So a couple of days ago, after desperately trying to get the camper to open while Mr. TypeTwoFun was running an errand, I decided it was definitely time to get the stepper door lock fixed. We did a little research on the Pop Up Portal and decided we could definitely handle this repair ourselves.
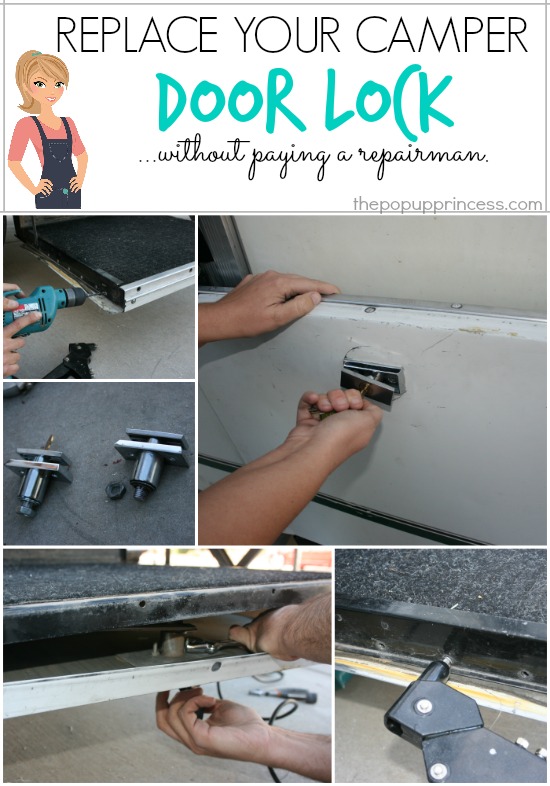
The door is put together with pop rivets, so the first thing Mr. TypeTwoFun did was take a drill and drill out all the existing pop rivets.
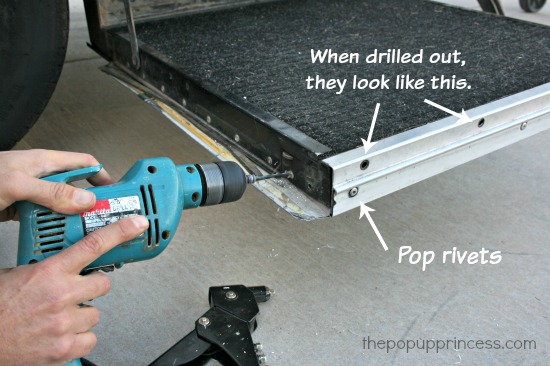 Once he removed the pop rivets from the aluminum plate on the top of the stepper, he removed that and pried the “skin” of the door back a bit. Many of the tutorials online told us that we could remove a few of the pop rivets on the top of the door and pry the skin back to reveal the guts of the door. You want to remove the large bolt at the top of the lock as well as the two screws at the metal base plate in order to replace the lock. As long as you can get to those easily, you may only need to drill out a few rivets. That was not the case for us.
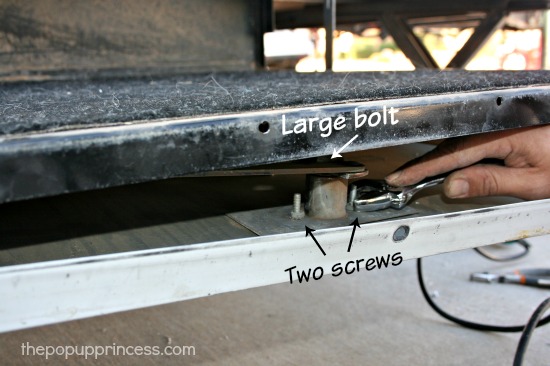 The screws didn’t seem to be a problem, but try as he might, Mr. TypeTwoFun couldn’t get that nut off. So he had to drill out all of the pop rivets and remove the entire door skin. Wow! How dirty and gross is that door?
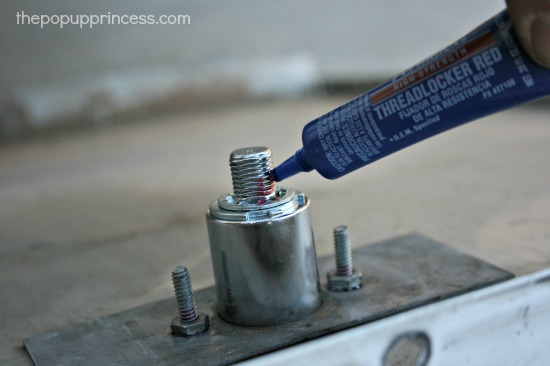
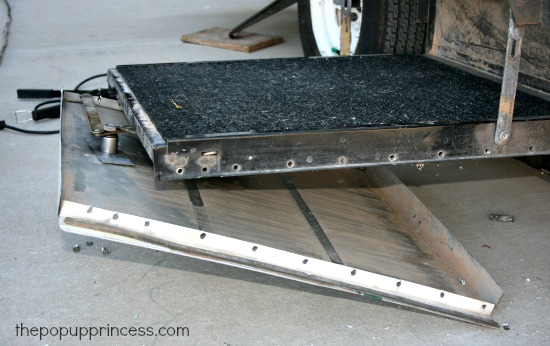 So once the entire door was taken apart, he could easily use a socket to remove the bolt and all the guts of the old lock. Turns out that bolt was put it nice and tight and sealed up with Lock Tite. Whew! As a side note, make sure your lock isn’t scratching the front of your camper when you are taking it off. Since ours was on so tightly, it took some muscle to get it off, and it scratched the front of the camper pretty badly. Halfway through, Mr. TTF covered the lock face with some duct tape to prevent further scratching. We should have done that from the beginning. 🙁
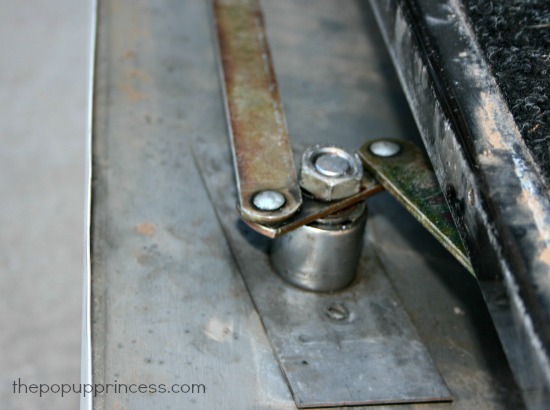 Once you have the skin taken off, you’ll have this big nut and the two small screws. You’ll need to remove them, and then, you are going to slide the lock out, but keep the locking arm mechanism in place. See the picture above? This shows the locking arm mechanism in the open position. When the arms are turned this way, you will not see the ends of the arms protruding out of the sides of the door. Turn the mechanism to locked position, so the small plate just under the big bolt is horizontal. Now, make sure the new lock is also in locked (horizontal) position, like the picture below.
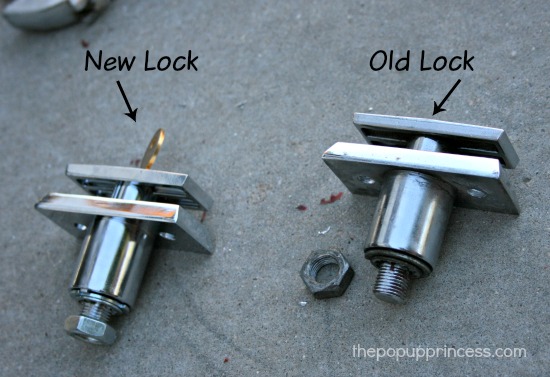 Slide the new lock through the hole in the skin and the aluminum base plate, and make sure the bolt fits through the hole in the middle locking arm mechanism.
You can then put the smalls screws and large bolt back in place. We used some Permatex Threadlocker to make sure the nut had a nice tight fit and then used a socket to replace the nut on the bolt. Test the lock a couple of times to make sure everything works smoothly, and then you are ready to put the skin back in place.
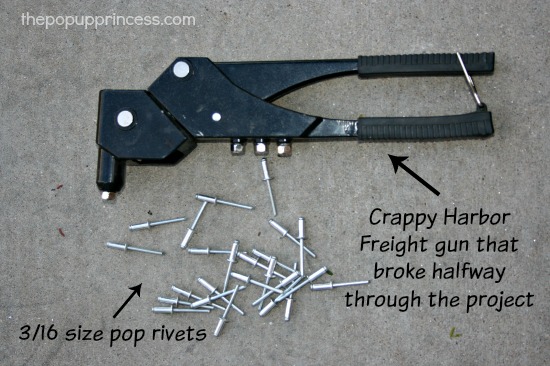
To put the skin back in place, you’ll need a pop rivet gun and some rivets. We found the 3/16 sized rivets worked well for us. Mr. TypeTwoFun had a cheap rivet gun from Harbor Freight, and he started the project with that. I do not recommend using a cheap gun. Our gun broke halfway through the project, and we had to run out to the store to buy this gun.
It was a MUCH easier project with the new gun, so if you don’t already have a pop rivet gun, consider buying a better model. It may cost a bit more, but it will make the job much easier.
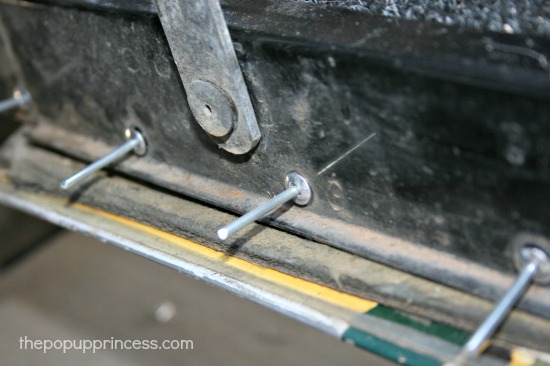
Mr. TypeTwoFun lined the door up so that all the existing holes matched up. If you don’t have an extra set of hands to hold things in place while you rivet, you can use clamps. Mr. TTF then set a pop rivet into each hole to make sure the holes stayed aligned.
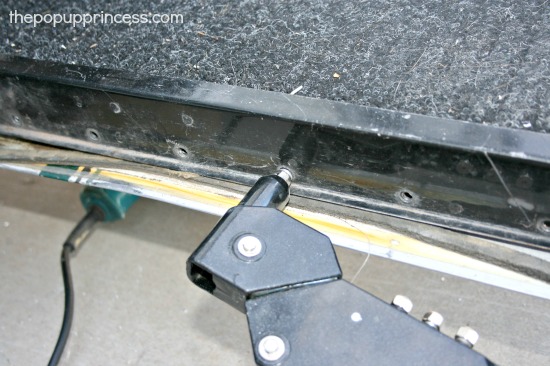
Then he used the gun to set the pop rivets. The long head of the rivet breaks off when you set it with the gun, leaving a nice, flush rivet. On a few we set with the crappy Harbor Freight gun, the head didn’t break off very cleanly. Mr. TTF just used a pneumatic grinding wheel to cut off the excess metal.
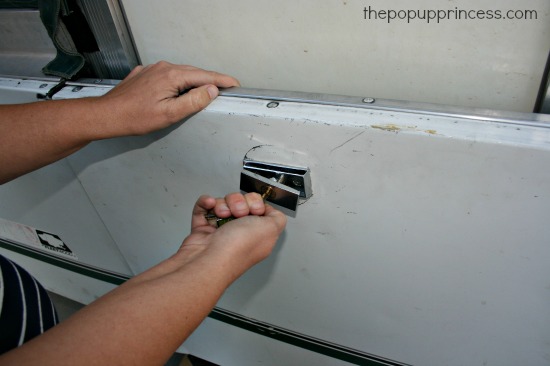 Replace the aluminum plate on top, rivet it into place, and you’re done! Yay! Now, you don’t have to have “the magic touch” to open our camper anymore. Even I can do it! 😉
Not so hard, right?
Happy Camping!



Suggest you use BLUE Loctite (thread lock compound) in the future. Blue will hold items in place and can be removed with a wrench, ratchet, etc. later. Red is for permanent fixation; parts usually break when trying to disassemble. I was told that red thread lock breaks down with heat greater than 160ºF. If true, who wants to use a propane torch on their camper. I was a school principal for 24 years, Used RED thread lock on HEAVY aluminum basketball backboards to prevent theft by salvagers. Never wanted to remove the bolts! I use blue on auto repairs due to removability when repair is needed. Hope this advice helps. (I hold BSEd & MSEd in Industrial Technology, so I can speak with some assurance & knowledge.)
Thanks for the advice, Chris. That’s good to know. We used red Threadlocker because that’s what was on the bolt previously, and it doesn’t look like it was ever changed out. We were assuming that was how it came from the factory. I’m hoping this lock lasts at least 15 more years. 😉
Thank you! We are dealing with this same problem and the hubs is definitely feeling intimidated… thanks for posting -love your site!
Glad to help, Jen! We put it off for months, but it really was no big deal. I think you’ll be surprised how easy it is! 😉
Where did you find the best place/price to order a new lock and lock bar assembly? Thank you
We like Coleman Pop Up Parts, Aimee. Derek is awesome and really knows what he is talking about. 🙂
Hi, just bought a new trailer this weekend and the key broke the lock. Now dealing with the same thing. I am so thankful for your help. I’m in the process of taking out the old rivets. What size drill bit did you use? You mentioned the rivet size.
Thank you and happy to get the tip from the principal! 🙂 Julie
We used a 3/16″ bit, Julie. Make sure it’s sharp! 🙂
How did you remove the lock cylinder (the part that spins).
We removed and replaced the entire lock, Kevin. Once you remove the nut on the back, the entire assembly slides out and you can replace it.
Larissa!
Thank you so much for taking the time to document the replacement of the camper step/gate lock. Without your pictures and explanations my neighbor and I would have had to muddle through attempting to get the locking bars reinstalled on a new lock after the original lock cylinder fell out on the highway. Drilling out the rivets–no problem; installing the new lock with the locking bars and blue Threadlock for the center nut–no problem; reinstalling the panel with the locking bars in proper position–no problem; reinstalling all the rivets–no problem. The only challenge was removing the self-tapping screws on the back (or bottom) of the step/gate. Fortunately two had broken off years ago. With screw-loosening oil I was able to unscrew one screw but the fourth one had to be hacksawed off. I did not replace the self-tapping screws with new ones. Instead, I just drilled four new holes with a 3/16″ drill bit and used four rivets. Will they hold up better than the screws? Good question. Perhaps I might add three more rivets just to make sure that none of the four rivets shear off as did two of the self-tapping screws. Again, your time in documenting in photographs and explanations was very much appreciated.
Thanks, Richard. Glad it was helpful. 🙂
I want to comment on the pop rivet tool. A good pop rivet tool is a nice thing to have around when you own an old popup. I’ve had to remove the front body panel (not too terrible) and had to reattach the cross braces on the bench seats. The pop rivet tool made both jobs easy.
Definitely, Bob! We use our pop rivet tool all the time. When we removed our front and back panels for repair, it came in quite handy!
Thank you for this post! I would probably have ruined this job without your step by step directions and photos. One thing I learned though (after buying 3 different boxes of rivets!) .There are lots and lots of sizes and materials available in rivetdom. I found that 3/16 by 1/2 Aluminum rivets worked wonderfully! The 3/16 x 1/2 steel were almost impossible to set and the 3/16 x 1/4 Aluminum pulled all the way through the holes.
Folks, if you’ve been putting this repair off because it seemed daunting, do so no more. If you have everything you need ready to go, it should take 45-60 minutes. On my 2004 Fleetwood Utah, I could not get the rear most two rivets out on the left side without removing the tire. I didn’t drill those out and had plenty of room to work. As others have mentioned, you will need 3/16″x1/4″ and 3/16″x1/2″ rivets, depending on the location, to fasten all the layers. If in doubt, just use 3/16″x1/2″ standard head aluminum rivets. Thanks, Larissa, for the tutorial!
Thanks for all the great info on this site! Last year I traded a portable torch I had sitting around for a 1982 Coleman Sun Valley. I haven’t been able to do anything with it until now but I’ve read a bunch of your info and it gets me really excited to remodel mine. I had to do some work to the door today and this post gave me the info I needed to successfully fix it. I’ll be taking pics of my remodel as I go along 🙂
How did you get the nut off from back of lock, holding your crossbars? Mine just sits there and turns but won’t come off. Article really helps but giving me a fit..lol
My door is closed and the handle mechanism is broken. Can not get the door open to replace the door lock.
Suggestions?
Well I got it open. Removed as much of the top panel as I could and used a bar and hammer to turn the mechanism. I don’t think I messed anything up, but I’ll find out when its all back together. Not sure what the piece of Styrofoam at the top of the door is for. Had to break it.
great info ,where did you buy the replacement lock.My wife is interested in other ideas for the popup decor and comfort. thanks
We found our lock at Coleman Pop Up Parts. 🙂
Thank you so much for the link to the Beckley’s website for Coleman parts. Besides needing the stepper door lock mechanism, I needed a tent pole plastic end. I appreciate all the info you have for us pop up campers. Thank you so much!!!
Larissa, thanks so much for the incredibly detailed step by step on this repair. The stepper door latch on our 2001 Westlake had been replaced by the PO and they botched it up by using a garage door t-handle. The door would not latch properly and on our last trip it actually opened while we were driving down the highway! Thank goodness for Gorilla Tape! When I got home I immediately ordered the replacement parts and just yesterday I undertook the repair. I had to replace both the handle and the spreader bars (both of which I got on https://colemanpopupparts.com/). I purchased the rivet gun from Amazon and it worked perfectly. Following your post and seeing the pictures made all the difference. I now have the original latch and a working door once again! Your site is a great help!
Definitely very helpful. Everything is put back together, turns correctly. However, I have run into a slight problem. When I go to close the stepper door into the pop up camper the lock will not turn into the camper & close. The door is all the way pushed into the camper. Seems like it is tad forward, but can not push back anymore. Not sure why it is not fitting. Any thoughts?
Hmmm… it’s been a long time since we did our lock replacement, Erick. I do know that we have to give the door a little extra push while we are turning the lock. Mr. TypeTwoFun actually pushes in on the door while he is turning the lock.
I just recently purchased a 1998 Jayco pop up! First one ever yay! Except it is junk lol I’m going to fix it up though first I just have to get the canvas in better shape. My main problem right now is that for some odd reason the canvas is a good two inches away from the door frame not even close! And the bottom is like sewn in place so it doesn’t stretch very well even if I don’t put the poles in the bunk ends until after its attached to the door frame! It’s so far away that there is no way it’s going to ever attach to that door. I leveled the crap out of it too so it’s not because it’s not leveled. I don’t understand? Anyone else ever have this problem and what can I do to fix it? I really just wanna get this old canvas in better shape and not have to buy a new one.
Have you adjusted the roof lately, Lisa? Check your owner’s manual for more information, but our Coleman needs to be adjusted every so often to make sure each corner is the same height. If your canvas still doesn’t stretch enough, it is possible that it has shrunk. There isn’t really a remedy for that… other than new canvas. 🙂
I was hesitant to jump into the repair of our camper door lock until I saw this post. It wasn’t too hard and gave me the excuse to get a new tool (rivet gun). Thank you for taking the time to do this. It looks like a common problem and you’ve helped a lot of people out with a simple-to-follow solution.
My husband and I completed this task today. We bought our pop-up from a friend of a friend. Before we purchased the pup they need to use it while their kitchen was remodeled. They had opened it rolled out the rug and then put it all back when they did the keys fell into the run that was in the camper. In order to get back in they had to drill out the lock. Purchased the lock from the site you recommended with two keys. We had a little of trouble with the positioning of the bars inside but figured it out and put all the rivets back. High fived when all done.
Thanks for the info on the lock change and where to buy it. Your a life saver on the info on both,
Great idea and instructions . Where did you purchase the new lock from. Thanks
ColemanPopUpParts.com