We have a lot of storage space in our pop up. In fact, you might remember I did a post here about how we added doors to our dinette storage area so we could access the space easily. How could we possibly need MORE storage space, right? Well, after our two-week road trip, we realized that a lot of things were getting left in storage totes in the back of the car. We knew we wanted to keep food out of the camper, especially after our close encounter with a grizzly in Yellowstone, but there were other things that didn’t necessarily need to stay in the car. We just didn’t have a good place inside the pop up to keep them. I’d seen how a lot of campers had modified a couple of tension shower curtain rods and wire shelves to make a pretty neat shelving unit for their pop ups, and I thought that just might be the solution for us, so we decided to give it a go. Here’s how we did it…
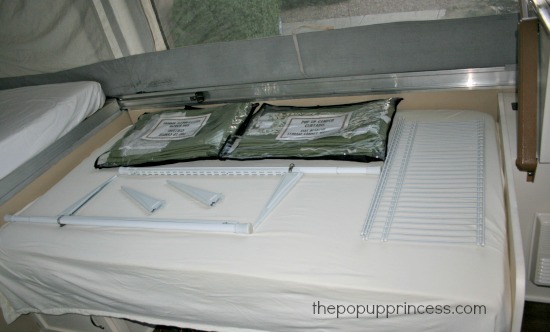
 First we ran to our local hardware store and gathered all of our supplies. The total cost for this shelving project was about $70.
- 1 – 6 ft length of 12″ wide wire shelving (or two smaller pre-cut shelves)
- 2 lengths of slotted upright brackets (we used 30″ uprights)
- 4 – 12″ locking shelving support brackets
- 2 hose clamps
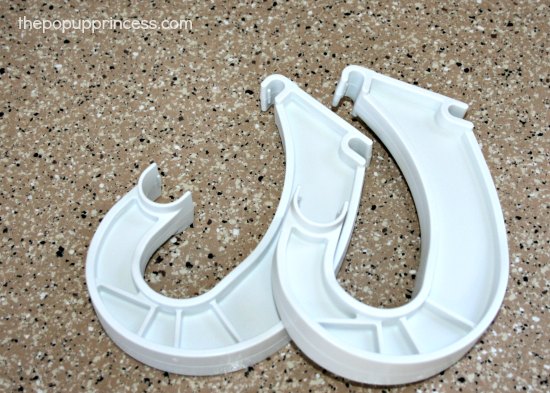
- 2 packages of closet pole sockets
- Rubber end caps
- 2 self tapping screws (We used 1 1/4″ length)
- 2 – 48-60″ tension shower curtain rods
- Plastic epoxy (or double sided automotive tape)
First, you’ll want to make sure your camper is set up and level. You need to install these shelves when the camper is perfectly level all the way around.
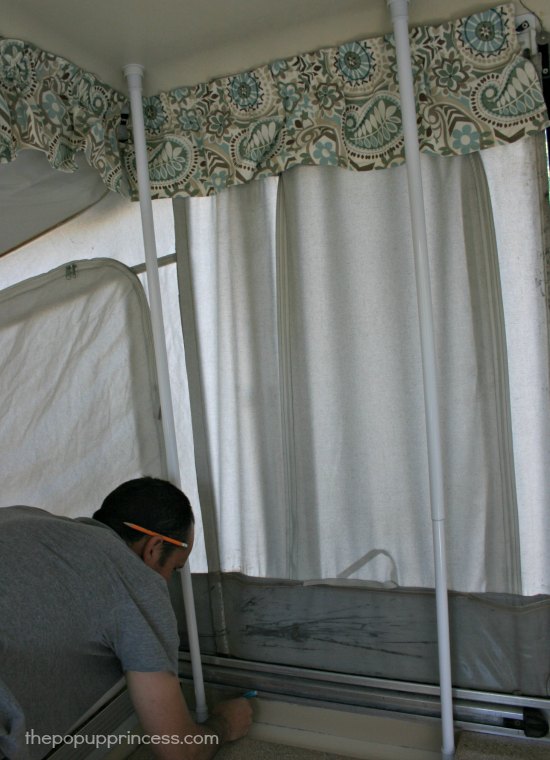
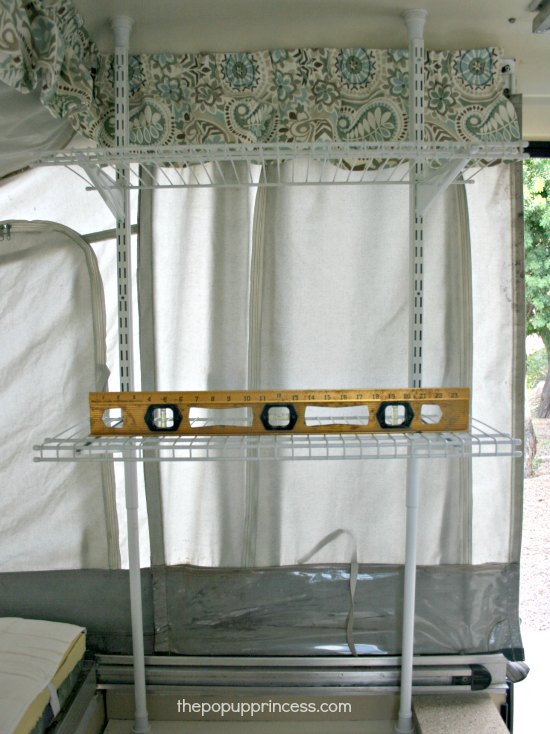
 Then we decided where we wanted to put the shelving unit. Since our shelving unit was going to be primarily used for toiletries and shower bags, we wanted the shelves to be close to the sink. It worked out best for us to place our shelves over the cassette toilet. We decided to place the first shelf high enough that the toilet could still be used in an emergency without removing the whole unit. Once we decided where we were putting the shelves, Mr. TypeTwoFun stretched both of the shower curtain rods to the highest position the roof could accommodate. He put the sockets on both ends, and he used his level to make sure everything was level.
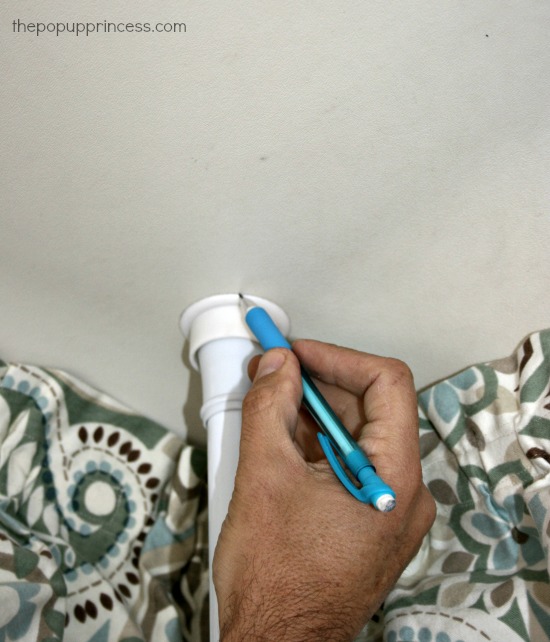
Then he traced around the outsides of the sockets so he could place them correctly. To place the lower sockets, we simply screwed them into the wooden counter piece. The top sockets were a little trickier. We have an ABS roof, and we weren’t sure we wanted to drill into that. If you don’t have an ABS roof, you could most likely just screw in the top sockets as well.
But because we didn’t want to use screws on the ceiling, we decided to use epoxy instead. To attach the top socket, Mr. TypeTwoFun first traced around the outside of it. Then he used a very small amount of MEK on a cotton swab and cleaned the area inside the pencil line. If you get MEK anywhere on the roof, it will whiten it, so be very cautious. Once the MEK was dry, we mixed some plastic epoxy up and applied it to the inside of the pencil circle. Then we lined the socket up with the pencil outline, stuck it on the roof, and used the tension rod to apply pressure while the epoxy cured. You could also use double sided automotive tape if you prefer.
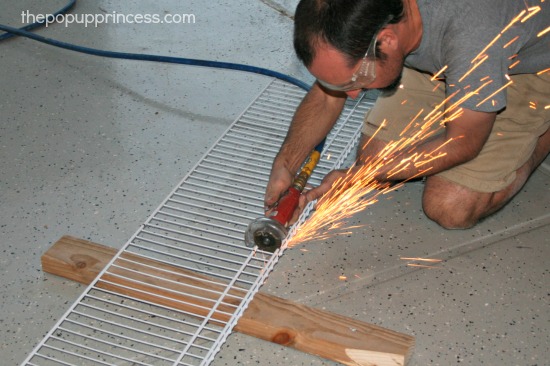
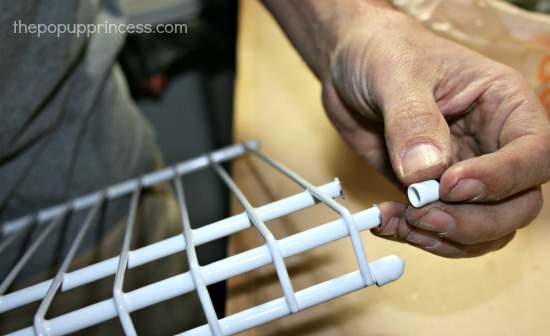
While the epoxy was curing, Mr. TypeTwoFun used a grinding wheel to cut our shelves to size. It was cheaper for us to buy one long shelf and cut it to the necessary size. We cut our shelves 26″ long, and then we used the end caps to cover the cut edges. If you don’t have a grinding wheel, bolt cutters should work just fine.
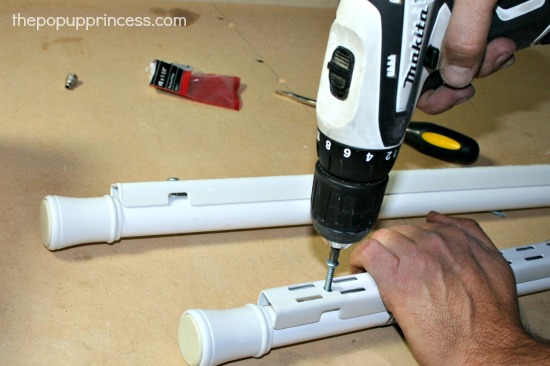
To attach the upright track to the tension rods, you will need to extend the tension rods a bit. You are going to insert a self-tapping screw through the track and into the top of the rod. You want to make sure you are going through the outside pole only, so extend the rod a few inches. Mr. TypeTwoFun lined up the track and drilled a screw through the track and the top of the tension rod.
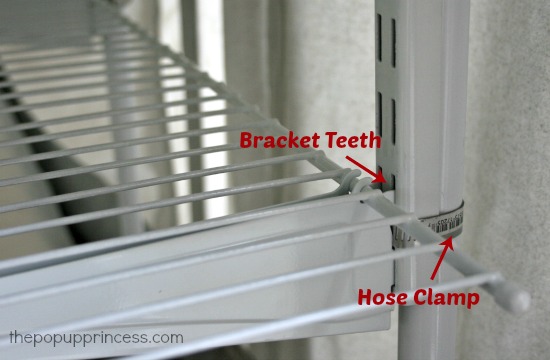
To attach the bottom of the upright track, Mr. TypeTwoFun used a small hose clamp. You want the bottom pole to move freely, so you won’t use a screw there.
The support brackets have “teeth” on them that feed into the upright track. Make sure that you don’t tighten your top screw and hose clamp too much or you won’t be able to get the teeth into the track. Once you’ve got your track attached to your tension rod, you are ready to install your shelves. We inserted our support brackets into the track before placing the tension rod in the sockets.
When we inserted the tension rod into the top socket, we extended the bottom of the rod until it fit snugly in the bottom socket and twisted the rod to lock it into place. Next we added our shelves and checked to make sure everything was level.
At the last minute, I decided the shelving unit would be a perfect place to hang a roll of paper towels, so we picked up these supports for a hanging bar. They were really cheap, and I just used a leftover piece of 3/4″ wooden dowel painted white to finish the project. Now I don’t have a roll of paper towels floating around the campsite. We know where they are at all times… which is important when you’re camping with kids.
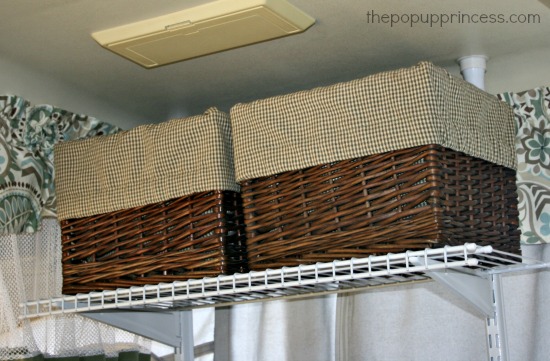
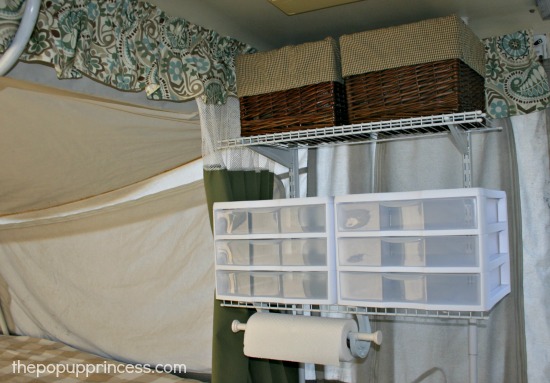 I’m really happy with how the whole project turned out. We plan to use the upper baskets to hold our shower bags, and the middle drawer units for toiletries. Each family member will have a drawer with all of their things inside. It will make getting ready in the morning (and at night) so much easier, especially when we are on the road for awhile.
We were a little concerned about how sturdy the shelves would be, especially with kids taking things off them all day. We tested them a bit and were pretty rough with them, but they stayed in place, nice and tight. Of course, I’ll remind the kids to be gentle with them anyway, but I don’t have any fear of the shelves coming down on the kids while they are brushing their teeth… and that was a concern when we started the project. Yeah, so… I’m a little paranoid when it comes to my kids. 😉
When we are ready to fold up the camper, it takes just a few minutes to take the shelving unit apart. Just pop off the shelves, release the tension on the rods, and remove the rods from their sockets. We store everything on the dinette bed, and it fits quite nicely.
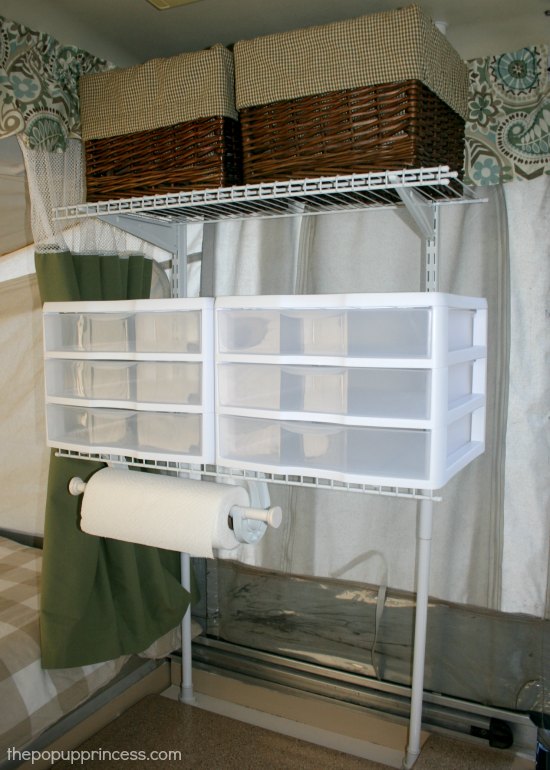 And there you have it! Pretty easy, right? Of course, this isn’t the only way to use the wire shelving mod in your pop up–I’ve seen so many great mods on Pinterest—but this is what worked best in our camper. Have you done this mod, or another shelving mod in your own pop up camper? Post your mod below… or even better! Post a picture on my Facebook page! I love to see how creative everyone is.
Happy Camping!


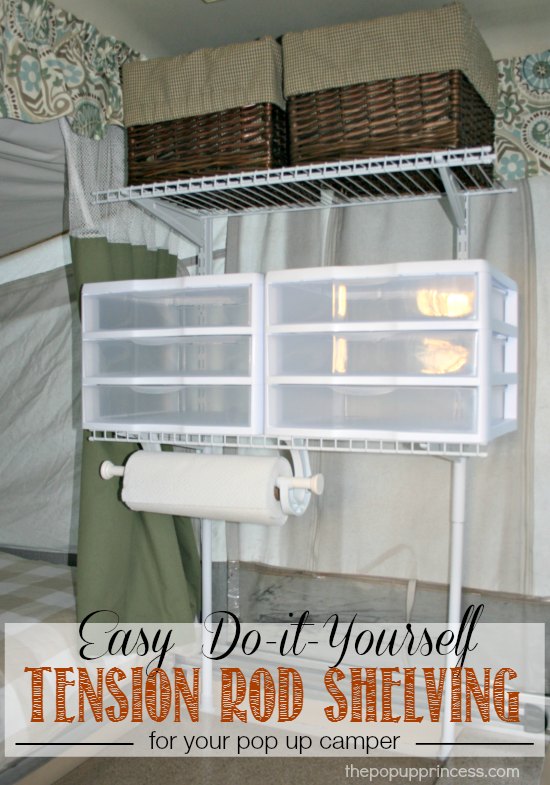

Aren’t you glad you did this?? I have to admit – those posts on pup.com about drilling into the roof left me scratching my head. I mean, if that gets compromised and water gets in, you’re sunk! No pun intended LOL. We have not secured it in any way but after reading this, i think i’m going to go the epoxy route – great solution.
Yep, Sheri, I am! It’s opening up a lot more storage space for us. I can’t wait to use it on our next trip. We had a trip planned for New Years, but one of the kids got a terrible case of the flu and tanked all our plans–and then it ended up snowing in Phoenix, AZ! That NEVER happens. I’m getting antsy to go camping!
Let me know how the epoxy job goes. Ours is solid. I can’t imagine it falling down in the middle of the night. It would take something fierce to knock it over. 😉
I am so glad I came a crossed this…… I am going to have my husband work on this this weekend! What a great help. Thanks so much to sharing.
Glad it was helpful, Mary. We love our new setup. It adds so much storage. You’ll have to send me pictures if you do this mod! I’d love to see your take on it. 🙂
so you screwed those top pieces in the roof? it doesnt make it leak? the idea is making me have a little panic attack. hehehe. and then you take it out when you pop the trailer down right?
No, Nichole, we didn’t screw the end caps into the roof. I wasn’t a fan of that method. We used epoxy to attach them. 🙂
Silly question, but what did you use to cap the ends of your dowel for the paper towel holder? Thanks for the detailed plans, I can’t wait to make these!
I just used some wooden dowel caps from Hobby Lobby. I plan to change them out to something a little more cutesy, though, like finials. I’m not crazy about them now. Hobby Lobby has all kinds of finials to choose from, though. 🙂
Thanks!!
Details, details! Saw the layout & immediately got the gist. Made a double shelf unit and tested on my kitchen counter. Passed muster! Just returned from Disney World with 7 packed in my Jayco. Shelves fell no less than 3 times. I reckoned that we had overloaded it aggravated by a slick ceiling that jiggled each time someone entered, left or slammed the door. Rereading your explanation I saw the solution, which I came to myself @ WDW, but had bigger fish to fry seeing 4 parks in 5 days. I needed closet sockets to secure top and bottom ends! Details, details!
Yup! Those closet sockets work wonders. We just returned from three weeks in the Pacific Northwest, and had ours loaded with stuff. They have never fallen on us. We love them! 😀
This mod is the best thing we’ve done to our camper! We put our two 44″ shelves over the galley, used one short screw AND epoxy to mount the sockets on the ceiling. It’s rock solid. I put the shelves on backward and upside-down, so the super slide brackets can hold a cafe curtain rod running the entire length of the shelves. We have room to hang paper towels as well as hand and dish towels, with space to spare, and they’re out of the way but well within reach, just behind the sink and stove. Love it! Thanks for the inspiration and installation tips.
Awesome, Kristin! I’d love to see pictures if you have them. We love ours, too. On our recent 3-week road trip, they were essential. Couldn’t have made it that long without them. 🙂
I would like to see pictures
I would aporeciate seeing a picture of what you did! (Since I cannot quite imagine what you mean.) 😃
I certainly hope to be successful with this project. It has been an all day affair so far and I’m not very far along. I will say my lack of progress is all self-inflicted. What I have learned today is to buy ALL pieces from the same brand. I went to my local Ace Hardware, armed with my list. I began today and discovered my tension rods would not fit in the sockets I bought. Exchanged those and ready to begin. The brackets I got do not lock so the shelf could slide. And the way-cool hook for papertowels does not fit on a Rubbermaid shelf. And the slotted upright brackets were, well, I think you get the point, not compatable. I just ordered ClosetMaid parts online from Home Depot and will pick up tomorrow. Lesson learned, stick with the same brand of everything. I am determined and WILL get this project done.
I have the parts to make the towel rack for under the pull out beds and am confident that will work.
Over Spring Break I covered the cushions with the link provided. You do amazing work and I certainly appreciate your taking the time educate the rest of us! I hope to install LED lights too, but I need to first finish the projects I’ve started!
Oh, wow, Kerry! That sounds like one of my projects! We always hit a snag at some point, but they usually turn out great in the end. I can’t wait to see pictures of your finished shelves! 😉
I finished the shelves today! I am so super pleased I can’t wait for our camping trip to South Lake Tahoe the third week of July.! I did take photos but they did not turn out well, I think due to the the time of day I took the photos. I will take more tomorrow morning. I also finished the towel racks today. They will be wonderful. I made four, although I bet I will most likely only use the two at the front of the trailer. I also ordered the LED lights last night so I am looking forward to installing them.
I have a 1997 Coleman Taos. So far recent upgrades have been to replace the door latch, recover upholstery (thanks to the link you posted to Honeybear), the shelf inside and towel racks outside, following your tutorials. Last season I also sent out my awning to be redone. I am so happy with everything and can’t wait to go camping.
Wow, Kerry! You’ve been busy! Where did you send your awning? Mine definitely needs some work!
I sent the canopy to Bear Creek Canvas in Wisconsin. (www.bearcreekcanvas.com) I had to take off the canopy and mail it to them. I cannot remember the cost to mail, but it was reasonable. I see from my receipt I did this in June 2013. The charge to make a new awning was only $60! You have to send yours as they make it specifically to fit your hardware. You really can’t be in a rush as they use pieces left over from making complete covers. I was lucky and had it back in less than a month. Their customer service is amazing. I called a couple of times and did not feel rushed or like my questions were a hassle. I HIGHLY recommend them for any canopy work.
Thanks, Kerry! I had called them before we left for our trip, but they couldn’t guarantee it would be back in time. We just limped it along for the trip, but I found a hole in the canopy itself. Now I’m thinking I may need a new canopy, too. 🙁
I see you have a fold-down wardrobe hanger on the ceiling in front of your shelves. Are you still able to use this with the shelves in place? We use ours for our rain gear, so I’d hate to loose that function completely.
Ours is broken, Jennifer, hence the reason our shelves went there. 😉
Thanks for this post. We have a Trailmanor and I really don’t want to put screws anywhere for as long as we could avoid it. This was a really good idea. Now I need to figure out how to mount a small T.V in a not so permanent spot. 🙂
We’ve struggled with that, Jan. I’m afraid, though, that as soon as I bring a TV inside the camper, my kids will check out. Let me know if you come up with a good solution. 😉
I’m curious about the leveling when you were putting the shower rods up. Guessing it is to make sure they are vertical? As far as the shelves being level I would think you have to mark the rods before putting the track on them to get them level? Or is the roof consistent in height where it isn’t an issue? I think I am missing something really simple but REALLY like this mod. Thinking about making two and placing the second on the other side of the door. Are the baskets you have large enough to have one for each person’s clothes? think that would be a great way to simply get rid of extra bags and suitcases.
Thank you so much Larissa for your detailed step by step instructions with your lovely pictures as well. This will be our 1st mod and I am very excited about it, as yours looks so lovely. Its day 5 with our new to us 1998 Coleman Westlake and I am deep cleaning every nook and cranny at the moment. We went camping in it for 1 night this past weekend and it was so nice. But its very original and looks tired and your tutorials will come in super handy in the weeks to come. Thank you again for all the hard work you put into your blog, its so inspiring and helping me a lot.
My husband like the shelve idea. He got it finished and it’s nice for the extra space in our Utah.
The only issue we have is that it falls. It has happened twice. The double sided tape did not work well, so he glued the socket to the ceiling. It seems to be affected by the expansion/contration of the top with the heat and cold. We have to check it several times and readjust the tension. Has anyone else seen this problem?
It’s a great idea. We just have to fine tune it.
Hmmm…. We’ve never experienced this, Ruth. We’ve had our shelving up in freezing temperatures and in pretty warm ones, too. It hasn’t ever fallen down on us. Maybe it is the tension rods you used?
It does. I found out that he used an old rod we had and modified it. Apparently, not that good. He will have to do some more work on it. I think that he would have been better just following your parts list. It is a great idea!
I’m loving your detailed makeover blogs! I’ve had a blast working on mine. Just working on the finishing touches. Currently I’m working on the tension rod shelving, but how in the world did you put the screws in?!?! I’m having such a difficult time!
I love the idea of using a socket. I have my camper shelves over my sink and stove. The socket gives one an accurate place to the tension rods all the time for quick placement. Thanks for the tip. Will place the sockets as soon as I can.
Thanks for the idea,
Matthew
We used our tension rod shelves for the first time this weekend. What a great idea. The shelves gave so much more space in our popup. I built them a couple of weeks ago in preparation for our trip. They are easy to set up, take down and store for travel. I wish we had built these a long time ago.
Thanks,
Matt
They’re handy, aren’t they, Matt? I *love* ours. You can see just how we use ours for organization here. Best mod ever! 😀
My wife wants to do this project this weekend at Clifty Falls…Wish us luck! BTW: Awesome site!
Finished this project last weekend. Thanks for the great idea! I love DIY projects, especially ones involving our PUP. I had a little trouble finding a good tension rod (limited to Lowe’s around here) and screwing the tracks into the rod was a little difficult, otherwise went without a hitch. I put an extra hose clamp near my self tapping screw for peace of mind. 😉 I love the website and look forward to many more projects. Have a great day!
Great mod idea. I made the shelves yesterday and they are perfect. Where did you get your plastic storage shelves?
Thanks, Robin! It’s one of the best mods we’ve done. I love all the additional storage space I get. We bought our plastic storage drawers at Target and Walmart. You can read more about them here. 😀
When you say you screwed in the sockets, do you mean the rubber end caps from the shower rods?
The sockets are the plastic pieces attached to the roof and the top of the cabinet. They are closet pole sockets (see pictures above). We did NOT screw them into the ceiling, because we have an ABS roof, and I didn’t want to mess with that. We used plastic epoxy, and it worked great! 🙂
Just loving all the ideas im getting from here! This is now on my to do list. I already have some spare shelving like this and im now ordering the poles now. Would love to use your links but as im in the UK the shipping is far to expensive. Thanks so much for all these ideas.
I am glad I came across this. We have a hardside pop up and there are 6 of us plus 2 dogs. Space is a premium! We have come up with all kids of solutions but we had this one spot of counter that we cannot find any shelving to fit, I think we will try this as we can customize the size
I love your website!!! Its awesome. We just bought our first Pop up and I am itching to do this Mod. I think I can do this without hubby (who is more keen on using the pup than modifying it). How do you know how much weight is ok to put on the shelves?
Also from your different post, how do you know if your wheel well sags under the weight of something on it? I was planning to use that space for storage, but now I am worried that we will need to build something like your hubby did. Oh and since you live in AZ too, is your husband for hire?? LOL. Just kidding!
Our rubber wheel fenders had big holes in them from the tires rubbing during travel. It would be a smart idea to build a shelf of some sort to keep the weight of the fenders. I love that storage space, but it certainly wasn’t very well designed. You can see them in the picture below.
Nice to see another Arizonan! What’s your favorite camping spot in the state? 🙂
for quick getaways, definitely Lynx Lake. Lost Dutchman for winter camping. Anything on the Mogollon rim for longer, so far Canyon Lake campground has been a favorite,. We are also trying out Fools Hollow (in show low) this memorial day weekend, so I ill let you know how that is
This sounds very interesting. Can’t wait to see what else you have in here.
I love this idea, but is there still room to sit on the potty w/o hitting your head on tiolet paper roll ?
We hardly ever hang the paper towel roll there anymore, Lynn. I think we would still have room to do it, but I find that we use our paper towels outside more often than not, so we’ve been rigging an outdoor holder for those. 🙂
I am going to try your idea with the shower rods. Being from Ont we are going to take our pop up camper to Florida for 3 months and I figure my husband & I will need more storage. If you have any more great ideas please let me know or post it here Thanks Nan
Thanks, Nancy! We have a whole post on how we organize the camper while we are out on the road. If you’re interested, you can find that here. 🙂
So, we made these shelves in our pop up. I’ve had them up for about a week. I opened the door to the pup today and they all crashed down. I used double sided sticky tape to hold the closet pole sockets to the ceiling but it failed. Also it looks like my tension rods failed too. If you tighten them too much the thing on the inside that makes the tension will break off the pole and get stuck inside. If you don’t tighten enough I guess your shelves come crashing down. Any suggestions? What type of epoxie did you use exactly? I don’t want to put screws in the ceiling either.
We used plastic epoxy, Dan, since our roof is ABS plastic. We load those shelves up, and we have never had them crash down on us… even when my 14-year-old puts them up all by herself. 😉
Thank you for this amazing DIY project. I couldn’t wait to get to the hardware store to buy everything needed. Ended up buying a kit that had two 4 foot shelves, 6 brackets, 6 locking shelving support brackets and screws. Ended up being cheaper than buying it separately. The epoxy worked great! Loved the paper towel holder and ended up buying a pole that goes to an outside light to hold a flag. It was $4 and fit perfectly in the mount. Zip tied a power outlet and battery operated light, and LOVE the way everything turned out…thank you so much this was fun to make! 😊
Has anyone ever weighed the tension rods + shelves? I’m assuming they don’t weigh much with wire shelves . . .
We just inquired 1983 sun lite pop up . parts and accessories are very hard to find. Just found you make over. I’m going to do this. I need some place to hang our jackets. There is a RESTORE (left over building stuff that contractors donate for Habitat for Humanity) that always has most of the pieces that I need to do this. AWESOME JOB. !!!
We epoxied our top brackets and screwed the bottom ones. One night the shelves fell anyway. Found that the tension rods had contracted slightly, allowing them to fall. We now use an extra set of hose clamps below the seam on the tension rods. Everything has worked well since then.
I wish I had seen this when we had our Santa Fe! Awesome ideas.
So you only epoxyed the caps to the ceiling of the pop up? Love the idea for storage but I was not clear either. Also, did you do the same for the bottom caps as well? I don’t think we would want to screw into the counter.
We used screws on the bottom caps, but we have an MDF shelf behind the cassette potty. We didn’t have to drill into a countertop. You could use epoxy, but epoxy is permanent. This is a permanent solution for us. We won’t be trying to take it down in a few years. We love the extra storage. We just didn’t want to put actual holes in the ceiling, hence the epoxy. If you are looking for something a little less permanent, maybe try that adhesive automotive tape.
Excellent tutorial thank-you! I built mine above my sink/stove and I love it so much I’m thinking of adding another one as a pantry solution next to it.